About this course:
This learning module provides an overview of the most common vascular access devices (VADs) utilized for adult patients in clinical practice. It will explore the indications and procedures for insertion and removal, as well as the benefits, risks, and complications of each type of VAD. In addition, this module will review the guidelines regarding the care, maintenance, and assessment of each type of VAD.
Course preview
Vascular Access Devices
Upon the completion of this module, learners will be able to:
- Identify the different types of VADs, the standards for insertion, and infection control measures following the 2021 Infusion Nurses Society (INS) Standards of Practice.
- Describe the various types of peripheral intravenous (PIV) catheters, their indications for use, site selection, placement, care, and safety considerations.
- Discuss the various complications for PIVs and patient-specific access by identifying contraindications for site-specific insertion.
- Review specialized VADs, including intraosseous (IO) and arterial catheters, and their indications for use, site selection, placement, care, and safety considerations, including complications and contraindications to insertion.
- Explain the interpretation and clinical guidance derived from arterial catheters.
- Describe the various types of central venous catheters (CVCs) and their indications for use, site selection, placement, care, and safety considerations.
- Discuss the management, complications, and site-specific contraindications to the insertion of CVCs.
- Explore the interpretation and clinical guidance derived from invasive monitoring with central venous and pulmonary artery catheters, their placement, management, and role in patient care.
VADs are essential components of patient care and are widely utilized across various health care settings. Health care professionals (HCPs) must be aware of the latest evidence-based practice (EBP) standards regarding VAD insertion, use, and management in order to provide safe and effective care. A VAD is a hollow tube inserted into a vein or artery through the peripheral or central vasculature. These devices have diagnostic and therapeutic uses, including fluid replacement therapy, intravenous (IV) medications, blood products, parenteral nutrition, blood sampling, and hemodynamic monitoring. VADs are commonly divided into two categories: PIV catheters and CVCs. In addition, specialized VADs include IO catheters and arterial lines (Craven et al., 2021; Nettina, 2019).
Standards of VAD Care
The INS is an international organization established to advance the delivery of quality infusion therapy to patients through evidence-based standards, professional ethics, and education. The INS has been publishing guidelines for infusion therapy for over 40 years, with updated guidance published every 3 years. The published standards for IV therapy practices apply to all patient care settings in which VADs are utilized with the goal of ensuring that high-quality care is delivered to optimize patient outcomes. Hospitals and health care organizations utilize INS standards of care to establish institutional policies and clinical practice guidelines for the placement, management, and use of VADs. Therefore, this module will focus on the standards set forth in the INS Infusion Therapy Standards of Practice. These standards address the comprehensive management of infusion practices, including planning for infusion therapy; VAD type and site selection; skillful insertion; administration, management, and monitoring of the patient’s response; recognition of and monitoring for complications with prompt intervention; and ongoing planning for long-term patients' needs or VAD discontinuation. Infusion therapy specialists play an important role in ensuring consistency and standardization of infusion principles across organizations. Although the INS provides standards of practice for infusion therapy, HCPs should refer to their state's Nurse Practice Act and institutional policies regarding specific policies and procedures for VAD use (Nickel et al., 2024).
VAD Selection
Device selection is based on individual patient factors, the indications for the VAD, the duration of the prescribed therapy, and resources available to care for the VAD. Patient-specific characteristics, such as age, comorbidities, and vascular integrity, in conjunction with therapeutic requirements, are essential factors to consider when selecting an optimal VAD, location, and size. In addition, guidelines for VAD selection are established through organizational policies and procedures. Beyond the therapeutic purposes, the goal is to choose a device, size, and site that will promote vessel health and preservation while providing the necessary access required for the duration of the prescribed therapy. Overall, the placement of a VAD is indicated for the administration of therapies that are not available or are less effective via a less invasive route. For example, blood products must be administered intravenously. Patients who have severe nausea and vomiting can safely receive IV hydration and antiemetics via a PIV despite being unable to take medications or fluids orally. The INS standards recommend using the least invasive VAD with the smallest outer diameter and the fewest number of lumens needed to complete the prescribed therapy. Site selection is based on the planned therapy, VAD type, vessel health, and patient comfort and preference. The INS standards recommend choosing the most distally appropriate site (upper extremity preferred over lower extremity; Frank, 2023; Nickel et al., 2024).
Infection Control Guidelines
VADs disrupt the integrity of the skin, increasing the risk of infection with bacteria or fungi. Since the catheter provides a portal of entry and a direct pathway to the venous system, an infectious agent can quickly spread throughout the bloodstream, making the patient critically ill (Haddadin et al., 2022). A breach in sterile technique during the insertion procedure can lead to an infection of the catheter or surgical site. An infection can also develop if the line is not cared for adequately. Bloodstream infections can induce hemodynamic changes, leading to organ dysfunction and sepsis, which can be fatal (Centers for Disease Control and Prevention [CDC], 2017). Peripheral line-associated bloodstream infection (PLABSI), central line-associated bloodstream infection (CLABSI), and catheter-related bloodstream infection (CRBSI) are all categories of bloodstream infections (BSIs) encountered in clinical practice. Since multiple catheter types can cause a CRBSI, the INS advises strict adherence to infection prevention measures during catheter insertion and all catheter management encounters. Infection control measures remain the most critical method for preventing catheter-associated infections. It is estimated that 250,000 BSIs occur annually, with most of these being caused by intravascular devices. The estimated cost of CLABSIs is approximately $46,000 per infection, with a mortality rate of up to 25% (Nickel et al., 2024).
Hand hygiene is the single most important measure to reduce microorganism transmission across VADs. Adherence to hand hygiene recommendations and aseptic techniques during all aspects of VAD insertion and care is critical for all HCPs. Hand hygiene should be performed using an alcohol-based rub containing 60% ethanol or 70% isopropyl alcohol, or antimicrobial soap and water before direct contact with any VAD, including insertion and dressing changes, and before and after patient contact. Consider a 70% to 95% ethanol-based preparation for environments with high viral load. Hand hygiene should be performed for 15...
...purchase below to continue the course
The INS 2016 standards discuss the importance of chlorhexidine-impregnated dressings in reducing the infection risk for patients who have CVC devices. The 2021 standards noted the benefits of chlorhexidine-impregnated dressings for use with short-term, non-tunneled CVC devices with the highest level of evidence (i.e., Level I). In addition, the new standards expand the usage recommendations for patients over 18 and for various catheter types, including arterial, epidural, dialysis, and implanted ports. Medication-impregnated dressings provide a slow release of antiseptic solutions onto the VAD access site. All trials evaluating the effectiveness of medicated dressings have been performed with CVC rather than PIVs. Silver-impregnated dressings have been found to be effective for infection prevention in hemodialysis patients, but the evidence to support this type of dressing is limited (Nickel et al., 2024; Ullman & Chopra, 2024).
The INS standards recommend active disinfection (scrubbing for 5 to 15 seconds) of all needleless connectors, ports, or hubs with a 70% isopropyl alcohol or alcohol-based chlorhexidine swab pad and air drying before access to reduce the introduction of intraluminal microbes. Passive disinfection with disinfecting caps is also acceptable. Both active and passive disinfection are associated with lower rates of CRBSIs. However, 70% isopropyl alcohol swabs were less effective, based on a meta-analysis of quasi-experimental studies. Research has also found that passive decontamination with 70% isopropyl alcohol is associated with reduced phlebitis. At this time, more research is needed to determine whether active or passive disinfection is superior in infection prevention. However, passive infection has a higher adherence rate among clinicians (Nickel et al., 2024; Ullman & Chopra, 2024).
The INS recommends using catheter-associated skin injury (CASI) guidelines to describe any localized skin damage around the VAD site, including drainage and erythema below a dressing. CASIs are any abnormalities (i.e., skin erosion or tear, vesicle, erythema, dermatitis) that are observable 40 minutes or more after the dressing or securement device is removed. HCPs should identify patient risk factors for CASIs (i.e., history of a previous CASI, older adults, and patients who are critically ill or immunocompromised) and institute prevention strategies, such as avoiding insertion into previously injured areas. Likewise, using a sterile, alcohol-free skin barrier that Is compatible with an antiseptic solution in order to protect at-risk skin is recommended. The preferred skin antiseptic agent is chlorhexidine gluconate (CHG). The INS standards also address the global COVID-19 pandemic, highlighting the need to expand standard precautions (e.g., fit-tested, certified N95 respirators and additional hand hygiene protocols) to prevent cross-contamination for HCP and patient safety (Nickel et al., 2024; Ullman & Chopra, 2024).
The aseptic non-touch technique (ANTT), a new term introduced in the INS 2021 guidelines, builds on the original concept of key-part and key-site protection to maintain asepsis. As it relates to VADs, the entrance site of the VAD would be considered a key site, and the key parts of a VAD would include the syringe tip, the IV tubing spike, the male Luer end of the IV tubing, and needleless connectors. Standard ANTT applies to clean procedures (e.g., flushing a peripheral catheter or administering a medication) and requires a general aseptic field (i.e., single-use or disinfected surface to organize all supplies needed for the procedure). By contrast, CVC placement, dressing changes, and implanted port access require a critical aseptic (sterile) field, referred to by the INS as surgical ANTT, via a large sterile drape or barrier (Nickel et al., 2024; Ullman & Chopra, 2024).
The importance of implementing EBP standards to improve health care quality prompted various organizations to establish clinical practice bundles. Bundles are concise and straightforward guidelines intended to assist HCPs in delivering consistent and reliable care. These EBP interventions improve the processes of care and patient outcomes. There are several types of best-practice bundles for CVC care, which are revised and adapted to the specifics of each health care organization. While there are alterations based on institutional policies, an extensive literature review demonstrated that the vast majority are premised on five essential components of care geared toward preserving the integrity of and preventing the infection of central lines (Jarding Major & Makic, 2021; Ullman & Chopra, 2024). These five components include:
- Using proper hygiene and sterile contact barriers.
- Properly cleaning the patient’s skin.
- Finding the best vein possible for the IV.
- Checking every day for signs or symptoms of infection.
- Removing or changing the line only when needed (Jarding Major & Makic, 2021; Ullman & Chopra, 2024).
Since October 2008, the Centers for Medicare and Medicaid Services (CMS) no longer reimburse for hospital-acquired conditions, including CLABSI. In addition, the CDC published revisions to their 2011 Intravascular Catheter-Related Infections Guidelines in 2017. In partnership with several other accredited organizations, these guidelines determined the EBP standards for preventing CLABSI and other health-care–associated infections. A comparison of the various organizational guidelines shows predominantly consistent recommendations. Table 1 offers an overview of these critical aspects of VAD care (CDC, 2017; Jarding Major & Makic, 2021; Nickel et al., 2024).
Table 1
5 Core Components of VAD Care
Essential I
Hand hygiene using the correct technique | Hand hygiene should be performed using an alcohol-based rub in the following instances:
Hand hygiene should be performed using an antimicrobial soap and water instead of an alcohol rub when hands are visibly contaminated or soiled, after providing care or having direct contact with a patient who has norovirus or a spore-forming pathogen (e.g., Clostridium difficile [C. difficile] infection), before eating, and after using the bathroom. |
Essential II
Use maximal barrier precautions | Maximal barrier precautions should be used when inserting a CVC. CVC insertion is a sterile procedure. The clinician inserting the line and those assisting should wear appropriate personal protective equipment (PPE): a cap (covering all hair), a mask (covering the nose and mouth tightly), a sterile gown, and sterile gloves. A sterile drape should cover the patient from head to toe, and a sterile dressing should be applied immediately after the insertion. |
Essential III
Chlorhexidine skin antisepsis | Chlorhexidine skin antisepsis should be performed before the insertion of a CVC and when changing the dressing. The skin should be prepped with chlorhexidine 2% in 70% isopropyl alcohol. For patients with sensitivity to chlorhexidine, a single-use povidone-iodine or 70% alcohol application are recommended alternatives. The sponge should be held against the skin to allow the solution to saturate the pad. The insertion site should be scrubbed in a back-and-forth motion for at least 30 seconds. The antiseptic should dry on its own for maximal effect (about 2 minutes). Avoid wiping or blotting before puncturing the site or applying a new dressing. |
Essential IV
Optimal site selection | The optimal site should be selected using the smallest gauge catheter and the fewest lumens required for the prescribed or anticipated therapies. The use of the subclavian vein may decrease the risk of infection compared to the jugular vein, and the subclavian vein is generally preferred for non-tunneled catheters. The femoral vein should be avoided whenever possible due to higher risks of infection, bleeding, and thrombosis, especially for adults who are overweight. Other factors should be considered, such as operator skill and the potential for mechanical complications or vein stenosis. The rationale for the chosen site should be documented. |
Essential V
Daily assessment | The line must be assessed daily for continued necessity and the potential for prompt removal. The line should be removed as soon as it is no longer clinically indicated. Daily VAD assessment should include, at minimum, the following components, which must be documented in a flowsheet in the patient's medical record:
|
(CDC, 2017; Jarding Major & Makic, 2021; Nickel et al., 2024; Ullman & Chopra, 2024)
In addition to optimizing VAD care, patient selection and risk stratification are essential in CLABSI prevention. Herc and colleagues (2017) performed a retrospective model-based study to establish CLABSI risk factors, estimating an individual’s risk before peripherally inserted central catheter (PICC) placement. Their proposed model performed well and could inform the patient selection and surveillance practices for high-risk groups, although it should first be validated for clinical practice. Their model, the Michigan PICC-CLABSI (MPC) score, assigns points for the presence of:
- Hematological cancer (3 points)
- A CLABSI in the last 3 months (2 points)
- Placement of a multi-lumen PICC (2 points)
- Ongoing chemotherapy for a solid tumor/cancer (2 points)
- Receipt of parenteral nutrition (1 point)
- Another CVC at the time of PICC placement (1 point; Herc et al., 2017)
Gram-negative aerobes were the predominant organism associated with CRBSIs prior to the 1980s. Since that time, the prevalence of gram-positive aerobes and Candida has increased. Surveillance reports in the US and Europe have found that coagulase-negative staphylococci, S. aureus, enterococci, candidal species, and Klebsiella species account for a majority of CRBSIs. Patient factors can also increase the risk of CRBSIs, including immune deficiency, chronic illness, parenteral nutrition, previous BSI, older age, loss of skin integrity, and malnutrition. Outside of pulmonary artery catheters, non-cuffed, femoral, and multi-lumen lines have the highest infection rate. Arterial catheters have a slightly higher infection rate than cuffed or tunneled CVCs and PICCs, and short PIVs have a somewhat higher rate than midline catheters. Evidence supports the use of antimicrobial-impregnated catheters to prevent infection. Other factors that increase the risk of infection include repeat catheterization, the presence of septic foci elsewhere, thrombosis of the catheter, and increased manipulation of the catheter (Jacob, 2022[CT1] ; Ullman & Chopra, 2024).
The availability of alternative venous access and the severity of the illness should be considered when deciding whether a potentially infected VAD should be removed. Two blood cultures should be drawn from two different sites and sent for culture, along with the catheter tip (if removed) for a suspected infection. Broad-spectrum antibiotics should be started until the organism and effective antibiotics can be identified, at which time antibiotic treatment should be appropriately focused. A CRBSI that persists despite 48 to 72 hours of appropriate antimicrobial coverage should prompt the removal of the infected VAD. Replacement of a temporary catheter over a guidewire for a patient with bacteremia is not recommended, as the existing skin tract is often colonized. Prophylactic catheter replacement at scheduled intervals has not been shown to reduce infection rates, and replacing functioning VADs without evidence of complications is unnecessary. Most guidelines recommend replacing VADs based on clinical indications, not a predetermined time frame. However, the risk for infection increases in short PIVs after 3 to 4 days of dwell time, in arterial catheters after 4 to 6 days, and in CVCs after 6 days. As a result, guidelines regarding the routine replacement of various VADs do not exist. Most research encourages close observation of VADs for indications of complications/malfunction, replacement when clinically indicated, and immediate removal when no longer required. The exception to this recommendation is the replacement of all emergently inserted catheters as soon as possible (or within 48 hours of placement), as aseptic technique cannot be confirmed. Most research recommends replacing IV infusion sets at 4- to 7-day intervals to reduce the risk of infection, except as indicated for chemotherapeutics, blood products, inotropes, and lipid infusions (Calderwood, 2023; Nickel et al., 2024; Ullman & Chopra, 2024).
Documentation
Regardless of the type of VAD utilized, documentation is a critical component of practice. Documentation should be comprehensive, occur promptly, and include all of the following:
- Type, length, and size of the device
- Date and time of insertion and the number of attempts
- Type of stabilization device
- Patient tolerance of insertion
- Identification of insertion site location
- Radiographic confirmation of tip location, if indicated
- Condition and appearance of potential site complication
- Specific site preparation, infection control, and safety precautions as appropriate for the procedure
- Device discontinuation, date, condition, site appearance, dressing applied, the reason for removal, and patient response (Campagna et al., 2018; Craven et al., 2021; Nickel et al., 2024)
Vascular Access Specialist Teams
The INS guidelines discuss the importance of establishing interprofessional vascular access specialist teams (VAST) to meet organizational needs for the safe delivery of quality infusion therapy. VASTs are a group of specialty-trained clinical experts that are used within organizations to perform various specialized services. These teams can reduce the risk of adverse events and decrease costs associated with these events (i.e., antimicrobial stewardship, CRBSI infections, extravasation prevention, and analysis of IV-associated medication errors). Health care organizations will need to identify the services that the VAST will provide, including placement of PICC lines or other CVCs, assessment of patient needs and resulting selection of the appropriate VAD, urgent venipuncture or PIV placement, and ultrasound-guided placement (Nickel et al., 2024).
Peripheral VADS
Short PIV Catheters
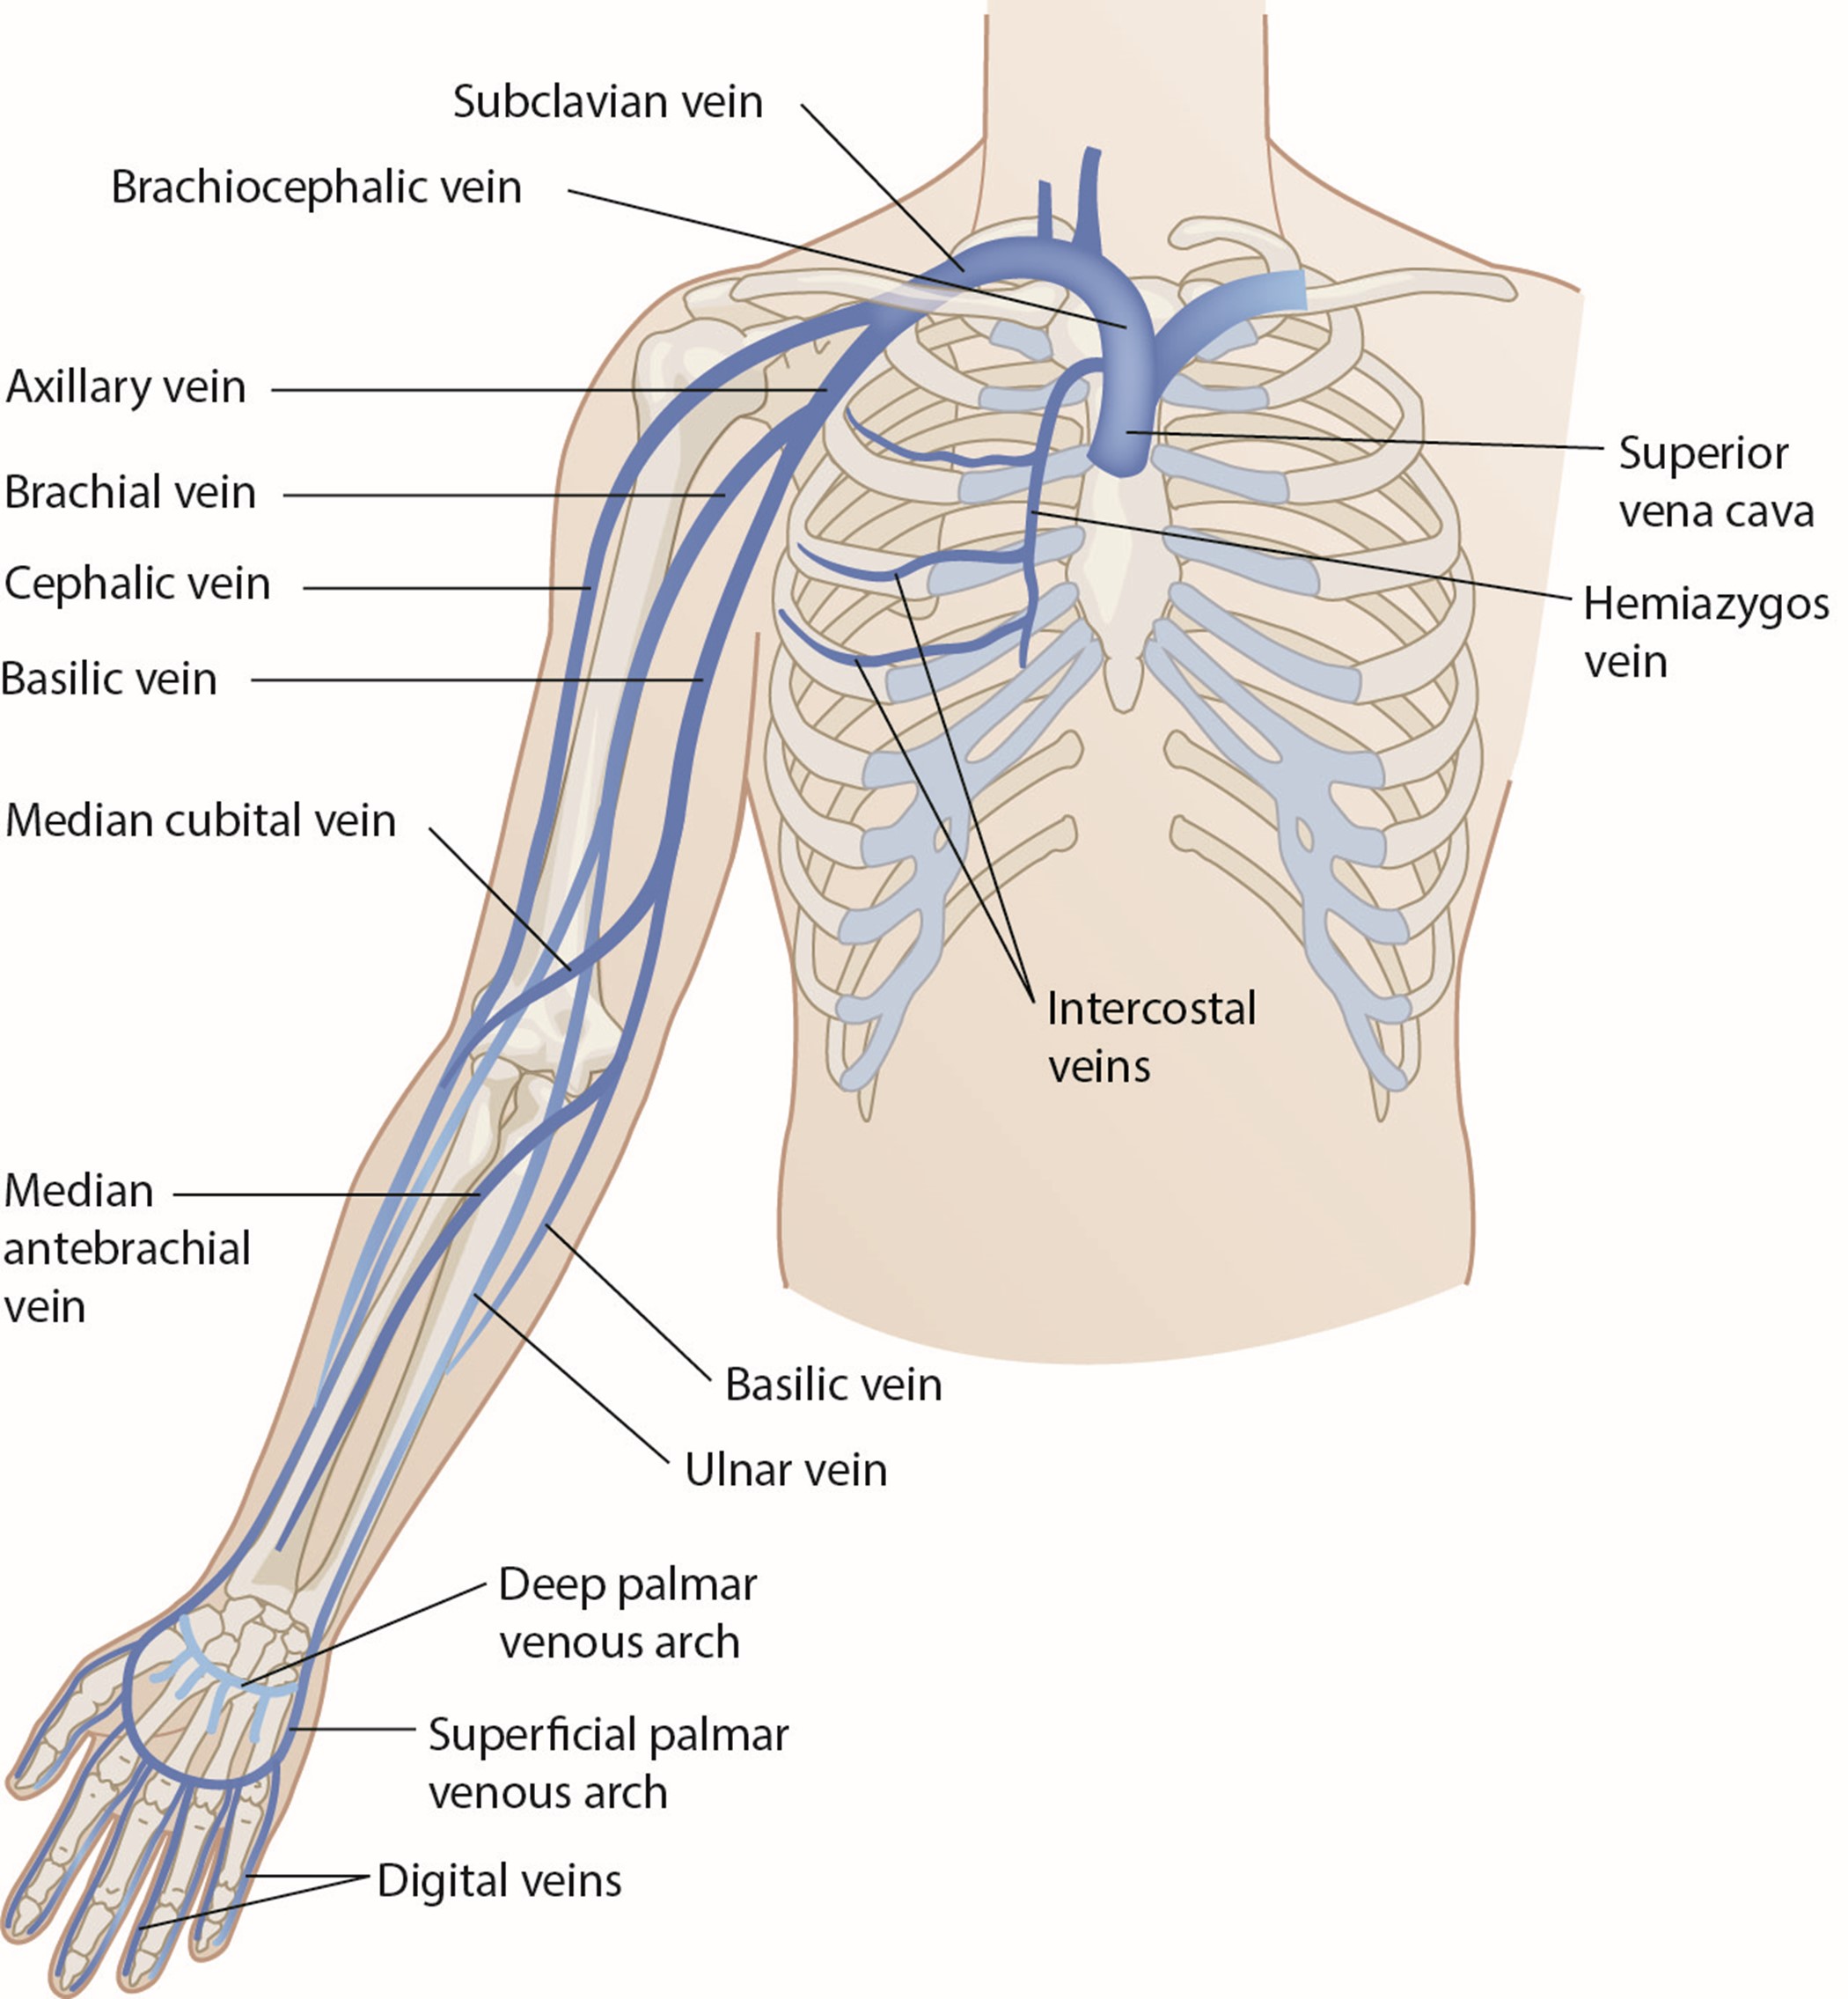
Short (or standard) PIV catheter insertion is one of the most common clinical procedures for hospitalized patients. Virtually all hospitalized patients have at least one PIV inserted per hospital stay. PIVs are short-length catheters (under 7.5 cm or 3 inches) intended for short-term therapy. They are inserted into the small veins in the dorsal and ventral surfaces of the upper extremities, including the metacarpal, cephalic, basilic, and median veins. The lower extremity can be used in certain situations (i.e., dorsal venous plexus of the foot). HCPs should refer to the institutional policy regarding lower-extremity PIV placement. Refer to Figure 1 for an illustration of the veins within the upper extremity. The specific duration of these PIV catheters remains controversial and is undetermined at this time. Infusion standards have historically recommended that PIVs for adult patients be rotated every 72 to 96 hours (Alexandrou et al., 2018; Beecham & Tackling, 2023; Frank, 2023; Nickel et al., 2024). According to the 2017 CDC guidelines, there is no need to replace PIV catheters more frequently than every 96 hours for asymptomatic adults. Short PIVs may remain until removal is clinically indicated, with definitive timelines deferred to institutional policy (CDC, 2017).
Figure 1
Veins of the Upper Extremity
Catheter Size
A short PIV is a hollow, plastic, tube-shaped catheter that is attached to a larger hub (which remains above the skin after placement). The length of the catheter can vary among different manufacturers. PIV catheters are available in a variety of sizes or gauges (G), ranging from 24G (smallest) to 14G (largest), with 18G and 20G typically used for routine infusions and 14G and 16G used for high-volume infusions in adults. PIV gauges are universally color-coded, with the hub color designating the gauge of the IV. Table 2 provides a general overview of PIV gauges and their common uses (Beecham & Tackling, 2023; Liu, 2023b; Nickel et al., 2024).
Table 2
PIV Gauges and Uses
Gauge | Color | Uses |
24G | Yellow |
|
22G | Blue |
|
20G | Pink |
|
18G | Green |
|
16G | Grey |
|
14G | Orange |
|
(Pedagogy Continuing Nurse Education, n.d.)
Catheter size impacts device functionality. Among adult hospitalized patients, catheters of 18G or larger showed increased rates of thrombosis and phlebitis, and catheters of 22G or smaller had higher rates of dislodgment, occlusion, and infiltration. When administering blood products, it was previously recommended that larger-bore IV catheters (i.e., 18G or 20G) were necessary to prevent hemolysis. Per the INS guidelines, the smallest gauge that can accommodate the prescribed therapies and meet the patient's needs should be selected. The potential needs of the patient must be considered when selecting a catheter size. Notwithstanding these recommendations, choosing a smaller size for long-term therapy when a larger size is attainable potentially subjects the patient to dislodgement or occlusion, requiring another venipuncture and the risks and discomfort associated with this procedure (Frank, 2023; Nickel et al., 2024).
Site Placement
The site of PIV placement is premised on the clinical judgment of the HCP, who must consider individual patient factors and the clinical situation. The INS recommends the placement of the PIV in an area of non-flexion, such as the forearm, to provide stability and reduce patient discomfort. Emergently, PIV access can be established in the antecubital fossa if needed, but this is not the first choice for nonemergent access due to the risk of dislodgement and kinking. The nondominant arm should be used if possible. The HCP should start distally with the dorsal surface of the hand and progress proximally to preserve peripheral access. The use of the most distal site for VAD insertion affords additional proximal sites for future or repeated cannulation. The choice of a proximal site as the initial site of insertion negates the use of a distal location in the future due to the potential risk of extravasation of administered fluids or medications from the initial site. The reverse is far less likely to occur unless multiple catheters are inserted into the same limb along the same venous network. Preferred veins are straight, distal, and non-branching (due to the presence of venous valves at branching sites). The vein should also feel spongy and be non-pulsatile on palpation. Lower-extremity access (greater saphenous or dorsal metatarsal veins) should only be considered if upper-extremity access is unavailable. A short PIV may be temporarily placed in the external jugular in emergency scenarios without alternatives through collaboration with a licensed provider. Veins in the foot may be considered for neonates and infants who are nonambulatory, and scalp veins are considered a last resort. Veins in the proximal arm (i.e., cephalic, brachial, and basilic) are more safely cannulated with ultrasound guidance (Alexandrou et al., 2018; Beecham & Tackling, 2023; Frank, 2023; Nickel et al., 2024).
Some therapies, such as vesicants (e.g., chemotherapy), should never be infused through a hand, wrist, or antecubital vein. Hand veins should only be utilized for short-term therapy (i.e., under 24 hours) due to increased failure rates with longer dwell times. VADs should not be placed in the veins of an upper extremity on the same side as a previous breast surgery with axillary lymph node dissection, in the setting of lymphedema, or with a known deep vein thrombosis (DVT) due to heightened risks for infection and thrombotic complications. Additional contraindications include the presence of a hemodialysis catheter (e.g., an arteriovenous fistula [AVF]), current or recent infection (e.g., cellulitis), fracture, burn injury, or neuromuscular dysfunction related to a central nervous system injury (e.g., hemiparesis, hemiplegia). These contraindications apply to PIVs, midline catheters, and PICC lines. An upper-extremity PIV is only relatively contraindicated in a limb with neuromuscular dysfunction. Refer to Figure 1 for an overview of the interconnectedness of the vasculature (Alexandrou et al., 2018; Frank, 2023; Nettina, 2019; Nickel et al., 2024).
Insertion of a PIV
Implied consent is typically considered acceptable for PIV placement, but the procedural steps and risks should be discussed with the patient in nonemergent situations. When a PIV is needed for a procedure, it should be placed as close to the procedure time as possible. The patient should be warm and calm, as cold extremities and patient anxiety lead to vasoconstriction and make PIV placement more challenging. Excessive hair should be clipped, not shaved. A topical anesthetic (1 to 2 g of lidocaine per 10 cm2) can be used if required, and sufficient time should be given for the medication to take effect (30 to 60 minutes). The selected limb should be extended on a stable surface slightly below the level of the heart to enhance venous dilation. A rubber tourniquet can be placed 5 to 10 cm proximal to the intended site. The vein can be gently tapped or stroked (proximal to distal) to enhance dilation further, or the patient can alternately clench and relax their fist on that side. If a challenging PIV placement is expected, various strategies can be employed to increase the likelihood of success. In addition to gently tapping the skin overlying the vein, a warm compress can be placed over the intended site, or the limb can be soaked in warm water for several minutes. The site should be palpated to ensure the vein is soft and spongy. Hand hygiene should be performed, and the appropriate PPE should be donned for standard ANTT (clean gloves, protective eyewear). Unlike CVC placement, surgical ANTT is not recommended for PIVs unless indicated by institutional policy (Beecham & Tackling, 2023; Frank, 2023; Liu, 2023b; Nickle et al., 2024).
Several tools can assist with locating a vein, such as infrared light (e.g., VeinViewer) or an LED light at a specified frequency that highlights deoxygenated blood (e.g., Veinlite LED). A Doppler ultrasound can visualize veins larger than 2 mm. PIV placement should not be attempted in the proximal (upper) arm without ultrasound guidance due to iatrogenic arterial or nerve injury risk. The site should then be scrubbed with chlorhexidine or alternative skin cleanser per institutional protocol and not touched after being cleaned. The limb can be stabilized with the nondominant hand, using the thumb to gently pull on the intended vein without excessive pressure, which may unintentionally collapse the vein. The access catheter should be held in the dominant hand between the forefinger and thumb, ensuring the bevel is facing upward. The needle should be inserted at a 10° to 30° angle with the skin in a slow, continuous motion. Once a flash of blood in the chamber is visualized, the angle of the catheter should be lowered, and the tip advanced another 1 to 2 mm to ensure the entire catheter tip—not just the needle tip—has been inserted into the lumen of the vein. Next, the catheter should be advanced into the vein using the forefinger of the dominant hand without moving the needle hub. The needle should be retracted, the tourniquet removed, and the catheter secured. The insertion device should be disposed of safely in a sharps container. An IV infusion set or syringe can be attached to the catheter. Fluids and medication should infuse easily without discomfort, resistance, or swelling at the site. After two unsuccessful attempts to cannulate a PIV by the same HCP, the task should be escalated to a clinician with a higher skill level, or an alternate form of access should be considered (Beecham & Tackling, 2023; Frank, 2023; Liu, 2023b; Nickle et al., 2024).
If resistance is encountered as the operator attempts to advance the catheter, it may have advanced too far through the posterior wall of the vein, in which case it should be withdrawn slightly until another flash of blood appears. Alternately, the needle may have entered the vein but the catheter has not, in which case the needle should be advanced slightly before advancing the catheter. Resistance when advancing the catheter may be related to a valve or tortuous portion of the vein. This may be addressed by instilling sterile saline from a small syringe into the catheter while advancing. An appropriately placed PIV should have steady venous blood flow with no swelling at the puncture site. Swelling at the site may indicate an extravenous placement. This catheter should be removed, pressure should be applied, and a dressing should be placed over the area. Arterial cannulation is characterized by bright red pulsatile blood flow, which produces a waveform if a transducer is attached. If a second attempt needs to be made within the same vein or extremity, this should be done proximal to the first attempt (Beecham & Tackling, 2023; Frank, 2023; Liu, 2023b; Nickle et al., 2024).
Securing the PIV to limit movement is recommended to reduce the risk of inadvertent dislodgement and thrombophlebitis. Proper securement decreases patient reports of pain, fear, and anxiety related to device replacement, in addition to reducing health care costs. Tissue adhesive (TA), such as cyanoacrylate, can be applied to seal the insertion site and bond the catheter hub to the skin, which is then covered by a transparent dressing (e.g., Opsite, Tegaderm). The TA should be reapplied with each dressing change, which offers immediate hemostasis at the insertion site. It may also prolong the interval until the first dressing change is needed. Alternatively, PIVs may be secured with an integrated securement device (ISD, e.g., SorbaView), which combines a transparent dressing with built-in securement technology. PIV catheters should not be secured using non-sterile tape, suture material, or a rolled bandage. A splint may be required for PIVs placed along a joint line or in the patient’s dominant hand to limit motion (Beecham & Tackling, 2023; Frank, 2023; Liu, 2023b; Nickle et al., 2024).
Care of PIVs
For adult patients, the PIV site must be assessed at least once per shift. Proper assessment involves monitoring for signs of malfunction, infection, displacement, or pain. Best practice guidelines recommend the prompt removal of symptomatic devices, such as when phlebitis or other complications are suspected, as well as when the catheter is no longer required. PIVs should be assessed regularly for redness, edema, tenderness/pain, or resistance to flushing. Pain, swelling, and a slow infusion may indicate extravasation of fluid. Accurate documentation regarding the insertion, maintenance, and removal of PIVs in the medical record is considered best practice and is the policy of most health care facilities. PIVs have limitations regarding therapeutic usage. Short PIVs are not appropriate for continuous vesicant therapy, parenteral nutrition, infusions with a pH below 5 or above 9, or infusions with an osmolality over 900 mOsm/L. PIVs being used for intermittent therapy (i.e., not continuous infusion) should be flushed with 2 to 10 mL of sterile saline after every medication administration or at least every 4 to 12 hours. HCPs should use a push pause (pulsatile) technique to clear the PIV line and prevent blood reflux. When available, a commercially manufactured prefilled flush syringe should be used to reduce the risk of CRBSI and device failure. Patients may report a taste or odor when their PIV is flushed (although more common with CVCs). These sensations can be minimized by flushing at a slower rate (Frank, 2023; Nickle et al., 2024; Ullman & Chopra, 2024).
Removal of PIVs
As previously mentioned, PIV removal is performed when clinically indicated and not on a predetermined timeline. Reasons for removal can include a suspected contamination of a key site or key part, evidence of a complication (i.e., phlebitis, infiltration), or the PIV no longer being clinically indicated. It is presumed to be no longer indicated if it is not included in the plan of care or has not been used for 24 hours. While removal procedures vary by institution, the nurse should collect the required supplies, perform hand hygiene, and don clean gloves. The dressing and any securement device should be removed while stabilizing the catheter in place. A sterile 2x2 gauze can be placed over the entry site as the catheter is withdrawn slowly and steadily. Pressure should be held on the entry site after removal for 2 to 3 minutes, and a gauze/tape or adhesive bandage should be applied for 12 to 24 hours to ensure bleeding has stopped. All equipment should be disposed of safely, hand hygiene should be repeated, and the procedure should be documented in the patient’s chart (Craven et al., 2021; Liu, 2023b; Nickel et al., 2024).
Midline (PIV) Catheters
A midline catheter is a deep peripheral catheter intended for intermediate-term therapy (more than 5 days but fewer than 28 days). These catheters are inserted 3.8 cm (1.5 inches) proximal to the antecubital fossa into the basilic, cephalic, or brachial veins. Veins in the leg (e.g., saphenous, popliteal, or femoral) may also be considered for pediatric or neonate patients. The tip should then terminate below the inguinal crease. Scalp veins may be used as a last resort for pediatric patients, with the tip located in the neck above the thorax. Midline catheters vary in length, ranging from 8 to 20 cm (3 to 8 inches). They extend up the arm with the proximal tip resting just distal to the axillary arch. Ideally, they should be used for a maximum of 2 weeks. Midline catheters should be considered for patients who need intermediate-term IV therapy when standard PIV access is difficult (Berry, 2022; Nickel et al., 2024; Villalba-Nicolau et al., 2022).
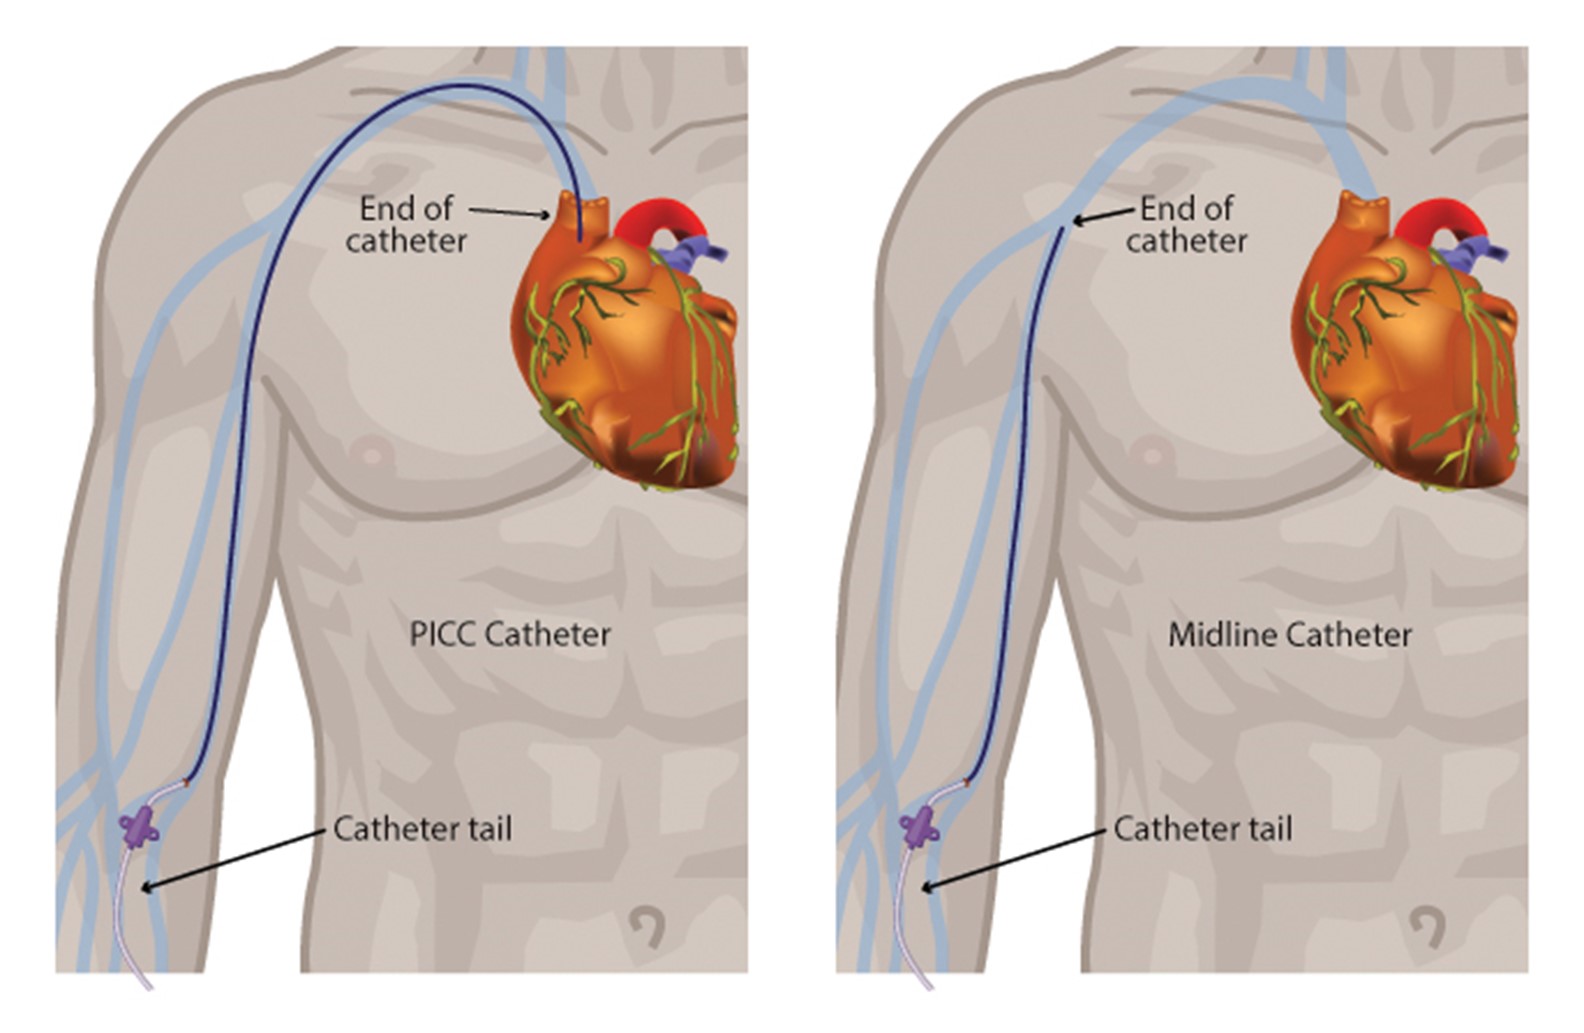
Midline catheters do not dwell in the central circulation. They offer several advantages over central lines and standard PIV catheters. A midline catheter reduces the need for repeated venipunctures for patients who have difficult peripheral venous access and poses significantly lower complication rates than CVCs. Midline catheters are associated with decreased risks of infection and catheter-related thrombosis while allowing for prolonged use. Some midline catheters are power-injectable and can tolerate high flow rates, allowing for the administration of iodinated contrast for enhanced radiographic studies. This use depends on the type of device inserted and institutional policy. Midline catheters are functionally similar to a PICC line (Adams et al., 2016; Berry, 2022; Nickel et al., 2024; Villalba-Nicolau et al., 2022). In a cohort study of 10,863 patients across multiple hospitals (5,758 with PICC lines and 5,105 with midline PIVs) who were deemed to have difficult IV access, Swaminathan and colleagues (2022) found that midline PIVs were associated with fewer bloodstream infections and catheter occlusions but similar thrombotic events compared to PICCs. Figure 2 shows the key distinctions between a midline catheter and a PICC line.
Figure 2
PICC Catheter vs. Midline Catheter
A midline catheter is usually inserted in the patient's nondominant arm via ultrasound guidance, which decreases the risk of cannulation failure, arterial puncture, and hematoma. Surgical ANTT is used when placing a midline catheter in most institutions. First, the vein is cannulated using an introducer needle, micropuncture needle, or angiocatheter. The operator should occlude the needle hub with their thumb when the guidewire is not in place in order to avoid air entrainment/embolism, which can occur if air is externally introduced into the systemic circulation. Next, the guidewire is inserted through the needle or angiocatheter, and its position is confirmed via ultrasound or fluoroscopy. The needle or angiocatheter is removed while the guidewire is carefully stabilized. A single stab incision may be required adjacent to the guidewire to introduce a tissue dilator or a coaxial dilator/sheath, which is inserted over the guidewire, keeping the guidewire’s position unchanged. Then, the tissue dilator is removed, leaving either a guidewire or a sheath to guide catheter insertion, depending on the particular kit. The catheter is then threaded over the guidewire (or through the sheath) and held in place while the guidewire (or sheath) is removed. This procedure was originally termed the Seldinger technique (ST) and has since been adapted and termed the modified Seldinger technique (MST). A catheter/needle combination may also be inserted initially during an MST approach, allowing for the advancement of a catheter early, followed by needle removal. This catheter serves as the conduit for the guidewire, followed by a tissue dilator and, finally, the indwelling catheter (Heffner & Androes, 2023; McCarthy et al., 2016; Nettina, 2019; Nickel et al., 2024; Song et al., 2018).
A chest x-ray is not required for catheter tip verification following insertion. The midline is anchored to the skin with a securement device to reduce the risk of inadvertent dislodgement. The INS recommends securing midline and other long PIVs using methods such as a TA, an ISD, an adhesive securement device (ASD), or a subcutaneous anchor securement system (SASS). TA and ISD procedures mirror those described for short PIVs. An ASD (e.g., StatLock) anchors the catheter to the skin. A SASS contains flexible feet placed beneath the skin to stabilize the catheter at the insertion site. Both the ASD and SASS should be covered with a transparent dressing. ASDs should be replaced with dressing changes per the manufacturer’s guidelines, while an SASS will remain in place during dressing changes. The exit site should be covered with a transparent dressing to facilitate adequate assessment. Most midline catheters need to be replaced every 28 to 30 days, although some midline catheters can remain for longer durations. The device's manufacturing guidelines and institutional policies should be referenced for a specific replacement timeline (Nettina, 2019; Nickel et al., 2024).
Care of Midline Catheters
The care of midline catheters includes measuring and documenting arm circumference before insertion, and while the catheter is in place, as clinically indicated, monitoring for an increased circumference of the extremity due to swelling, which can indicate a DVT. The measurement should be taken about 10 cm above the antecubital fossa. Basic flushing protocols include the use of 10 to 20 mL of 0.9% preservative-free saline solution following each infusion of medication. The line should be flushed every 12 hours when used for intermittent infusions. A pre-filled 10 mL syringe should be used when flushing VADs to generate lower injection pressure. Since many midline catheters are equipped with a valve system to prevent the backflow of blood, they do not require heparin flushes to maintain patency. Recent evidence has suggested that flushing with saline is just as effective as heparin in maintaining patency. HCPs should use a push-pause (pulsatile) technique to clear the PIV line and prevent blood reflux. The transparent dressing should be changed weekly or sooner if it becomes visibly soiled, loose, or damaged (Nettina, 2019; Nickel et al., 2024).
Limitations of Midline Catheters
Midline catheters are not suitable for continuous vesicant therapy, parenteral nutrition, or the administration of certain types of antibiotics, such as erythromycin (Erythrocin), vancomycin (Vancocin), or nafcillin (Penicillin). Dextrose concentrations greater than 10% are contraindicated, as are infusions with a pH below 5 or over 9 or with an osmolality greater than 600 mOsm/L. A midline catheter should not be placed in patients who have a history of thrombosis, hypercoagulable blood clotting disorders, or currently decreased venous flow. Additionally, blood samples should not be drawn from a midline catheter. HCPs and caregivers should avoid performing any blood pressure assessments or venipunctures on an extremity with an indwelling midline catheter. As with other VADs, midline catheters should not be placed in an arm following axillary lymph node dissection with the presence of lymphedema. Since midline catheters and PICC lines are placed in similar locations, documentation in the medical record must indicate which type of line has been inserted. Appropriate and clear documentation can prevent confusion between a midline catheter and a PICC device and prevent inappropriate use (Nettina, 2019; Nickel et al., 2024).
Extended-Dwell PIV Catheters
Extended-dwell PIVs are similar to midline catheters. They are FDA approved for a dwell time of 29 days. Unlike midline catheters, they are shorter in length, ranging from 6 cm to 15 cm. They are considered ideal alternatives for patients who have difficult peripheral venous access and require extended IV therapy. They are typically placed within superficial or deep veins in the cephalic, basilic, or median veins of the forearm without crossing into the antecubital fossa. These extended-dwell PIVs can be inserted with a traditional over-the-needle technique or with an advanced procedure, such as the ST or an accelerated Seldinger technique (AST). Ultrasound assistance should be used to improve the first-time success of cannulation. Extended-dwell PIVs are instrumental in emergency department settings, as they can be placed at the bedside by specially trained IV nurses (Bahl et al., 2019; Nickel et al., 2024).
Complications Associated with PIVs
PIVs are associated with high complication rates, including insertion difficulty, phlebitis, infiltration, occlusion, dislodgment, and PLABSI. Several studies have demonstrated that up to 90% of PIVs malfunction before therapy is completed and are removed. Catheters placed during emergencies are more prone to complications. When an initial catheter fails, vascular access often becomes problematic, compromising patient care and safety. The use of ultrasound guidance with VAD insertion has improved insertion success and reduced premature catheter failure. As is the case for other VADs, the number of unsuccessful attempts is the most accurate predictor of complications. The experience level of the HCP placing the VAD also strongly influences immediate complication rates. Immediate complications for any VAD include bleeding or hematoma due to venous or arterial injury. Arterial injury is the most crucial complication to identify immediately to limit bleeding. The pulsatile flow of blood is characteristic of arterial insertion but may be less evident in a hypotensive or critically ill patient (Alexandrou et al., 2018; Bahl et al., 2019; Frank, 2023; Liu, 2023b; Nickel et al., 2024). Refer to Table 3 for an overview of the most common PIV complications.
Table 3
Common Complications of PIVs and Other VAD Therapies
Complication | Potential Signs and Symptoms |
Extravasation (leaking of a vesicant drug into the surrounding tissue, causing severe tissue damage with infection, tissue necrosis, disfigurement, loss of function, and even amputation) |
|
Infiltration (leaking of IV fluids into the surrounding tissue) |
|
Phlebitis (inflammation of the vein, usually associated with highly acidic or alkaline solutions) |
|
Dislodgment |
|
Infection |
|
Thrombosis |
|
Occlusion |
|
(Campagna et al., 2018; Frank, 2023; Nettina, 2019; Nickel et al., 2024)
Careful assessment of any VAD before and during each flush and medication administration may help prevent or identify complications early and allow for prompt intervention. If a complication is suspected, alternative access should be explored and established if required. The provider should be notified of suspected medication extravasation, and details should be thoroughly documented in the patient’s chart. This documentation should include the affected site, symptoms, medication and the amount (approximately) administered, and any treatments provided. Most institutions are equipped with protocols regarding symptomatic treatment (e.g., cold or warm compresses) and antidote therapies (if available) that should be administered based on the situation. The administration set should be detached, and any residual medication should be aspirated from the catheter hub before removing the VAD. Infection control guidelines should be followed to prevent and manage these complications. Risk factors for VAD thrombosis include a history of prior venous thromboembolism (VTE), acute critical illness, presence of coagulopathy, recent surgery or trauma, extremes of age, pregnancy, oral contraceptive use, and certain chronic conditions (e.g., end-stage renal disease, diabetes, irritable bowel syndrome, and cancer). Insertion sites in the upper extremity typically confer a higher risk of thrombosis when compared to the internal jugular or subclavian vein (Frank, 2023; Nettina, 2019; Nickel et al., 2024).
The smallest catheter size should be used for the shortest time with the fewest lumens required. Early mobilization and adequate hydration also reduce the risk of VTE for all patients. The INS standards recommend against removing a venous catheter based only on the presence of a DVT. However, if the VTE is confirmed with imaging studies, treatment should commence as soon as possible per the current VTE management guidelines. A VAD that appears occluded should be inspected for any areas of obvious crimping. For an upper-extremity device, the patient should be instructed to maintain a straight arm during infusions to avoid internal occlusions. The insertion site should be examined for potential catheter migration, and the possibilities of medication precipitate (i.e., combining incompatible medications or the infusion of a high-precipitate drug, such as furosemide [Lasix] in 5% glucose solution or amphotericin [Amphocin] in 0.9% normal saline) or thrombus formation should be considered. Facility protocols regarding flushing and locking VADs should also be carefully followed. An occluded PIV is often removed and replaced with a new access point, but in extreme situations with limited access options, fibrinolytic treatment may be considered per facility standards (Frank, 2023; Nettina, 2019; Nickel et al., 2024).
Thrombophlebitis occurs in up to 15% of patients with a PIV. This risk is mitigated by using the upper-extremity veins (avoiding the lower-extremity sites described previously), minimizing catheter movement through proper securement and splinting, using the smallest catheter size appropriate for the therapy required, and removing the catheter when no longer needed. Rarely, PIVs have also been associated with septic discitis (i.e., inflammatory process of the intervertebral disc), venous air embolism, pneumocephalus (i.e., presence of intracranial air), skin necrosis, bacteremia, compartment syndrome, nerve/tendon/artery injury, and venous aneurysm (Frank, 2023; Nettina, 2019; Nickel et al., 2024).
Nerve damage is also possible with PIV insertion and should be considered. For example, the cephalic vein (see Figure 1) at the wrist may traverse near the superficial radial nerve. The median nerve is at risk when cannulating the wrist's volar (inner) portion, and the interosseous nerves and antebrachial nerves are at risk when a PIV or PICC line is inserted at or just proximal to the antecubital fossa (Frank, 2023; Nettina, 2019; Nickel et al., 2024).
Specialized Vascular Access Devices
Intraosseous Cannulation
IO cannulation is fast and reliable and provides access to the vasculature located within the medullary cavity long bones (i.e., proximal tibia, humerus) and is generally reserved for critically ill patients who require rapid access for stabilization in emergent situations. Among adults, IO cannulation may be used in battlefield settings and cases of trauma, hemorrhage, or cardiac arrest when IV access is not available or unable to be obtained rapidly. Cannulation success rates are twice as high for critically ill patients with IO devices compared to PIV devices. Although IO access is becoming more routine, it is still highly underutilized. IO access is also commonly used for infants and young children, particularly in cases of shock or cardiac arrest, because their bony cortices are thin and easily penetrated. There are three categories of IO devices, and commercially available IO devices are preferred: manual (i.e., Jamshidi and modified Dieckmann), impact-driven (i.e., Bone injection gun [BIG] and FAST1), and drill-powered needles (i.e., EZIO). High success rates have been found with battery-powered IO devices (Berry, 2022; Dornhofer & Kellar, 2023; Nickel et al., 2024; Perron, 2022). Figure 3 depicts the components of an IO needle-insertion device, and Figure 4 demonstrates the placement of an IO catheter.
Figure 3
Intraosseous Devices
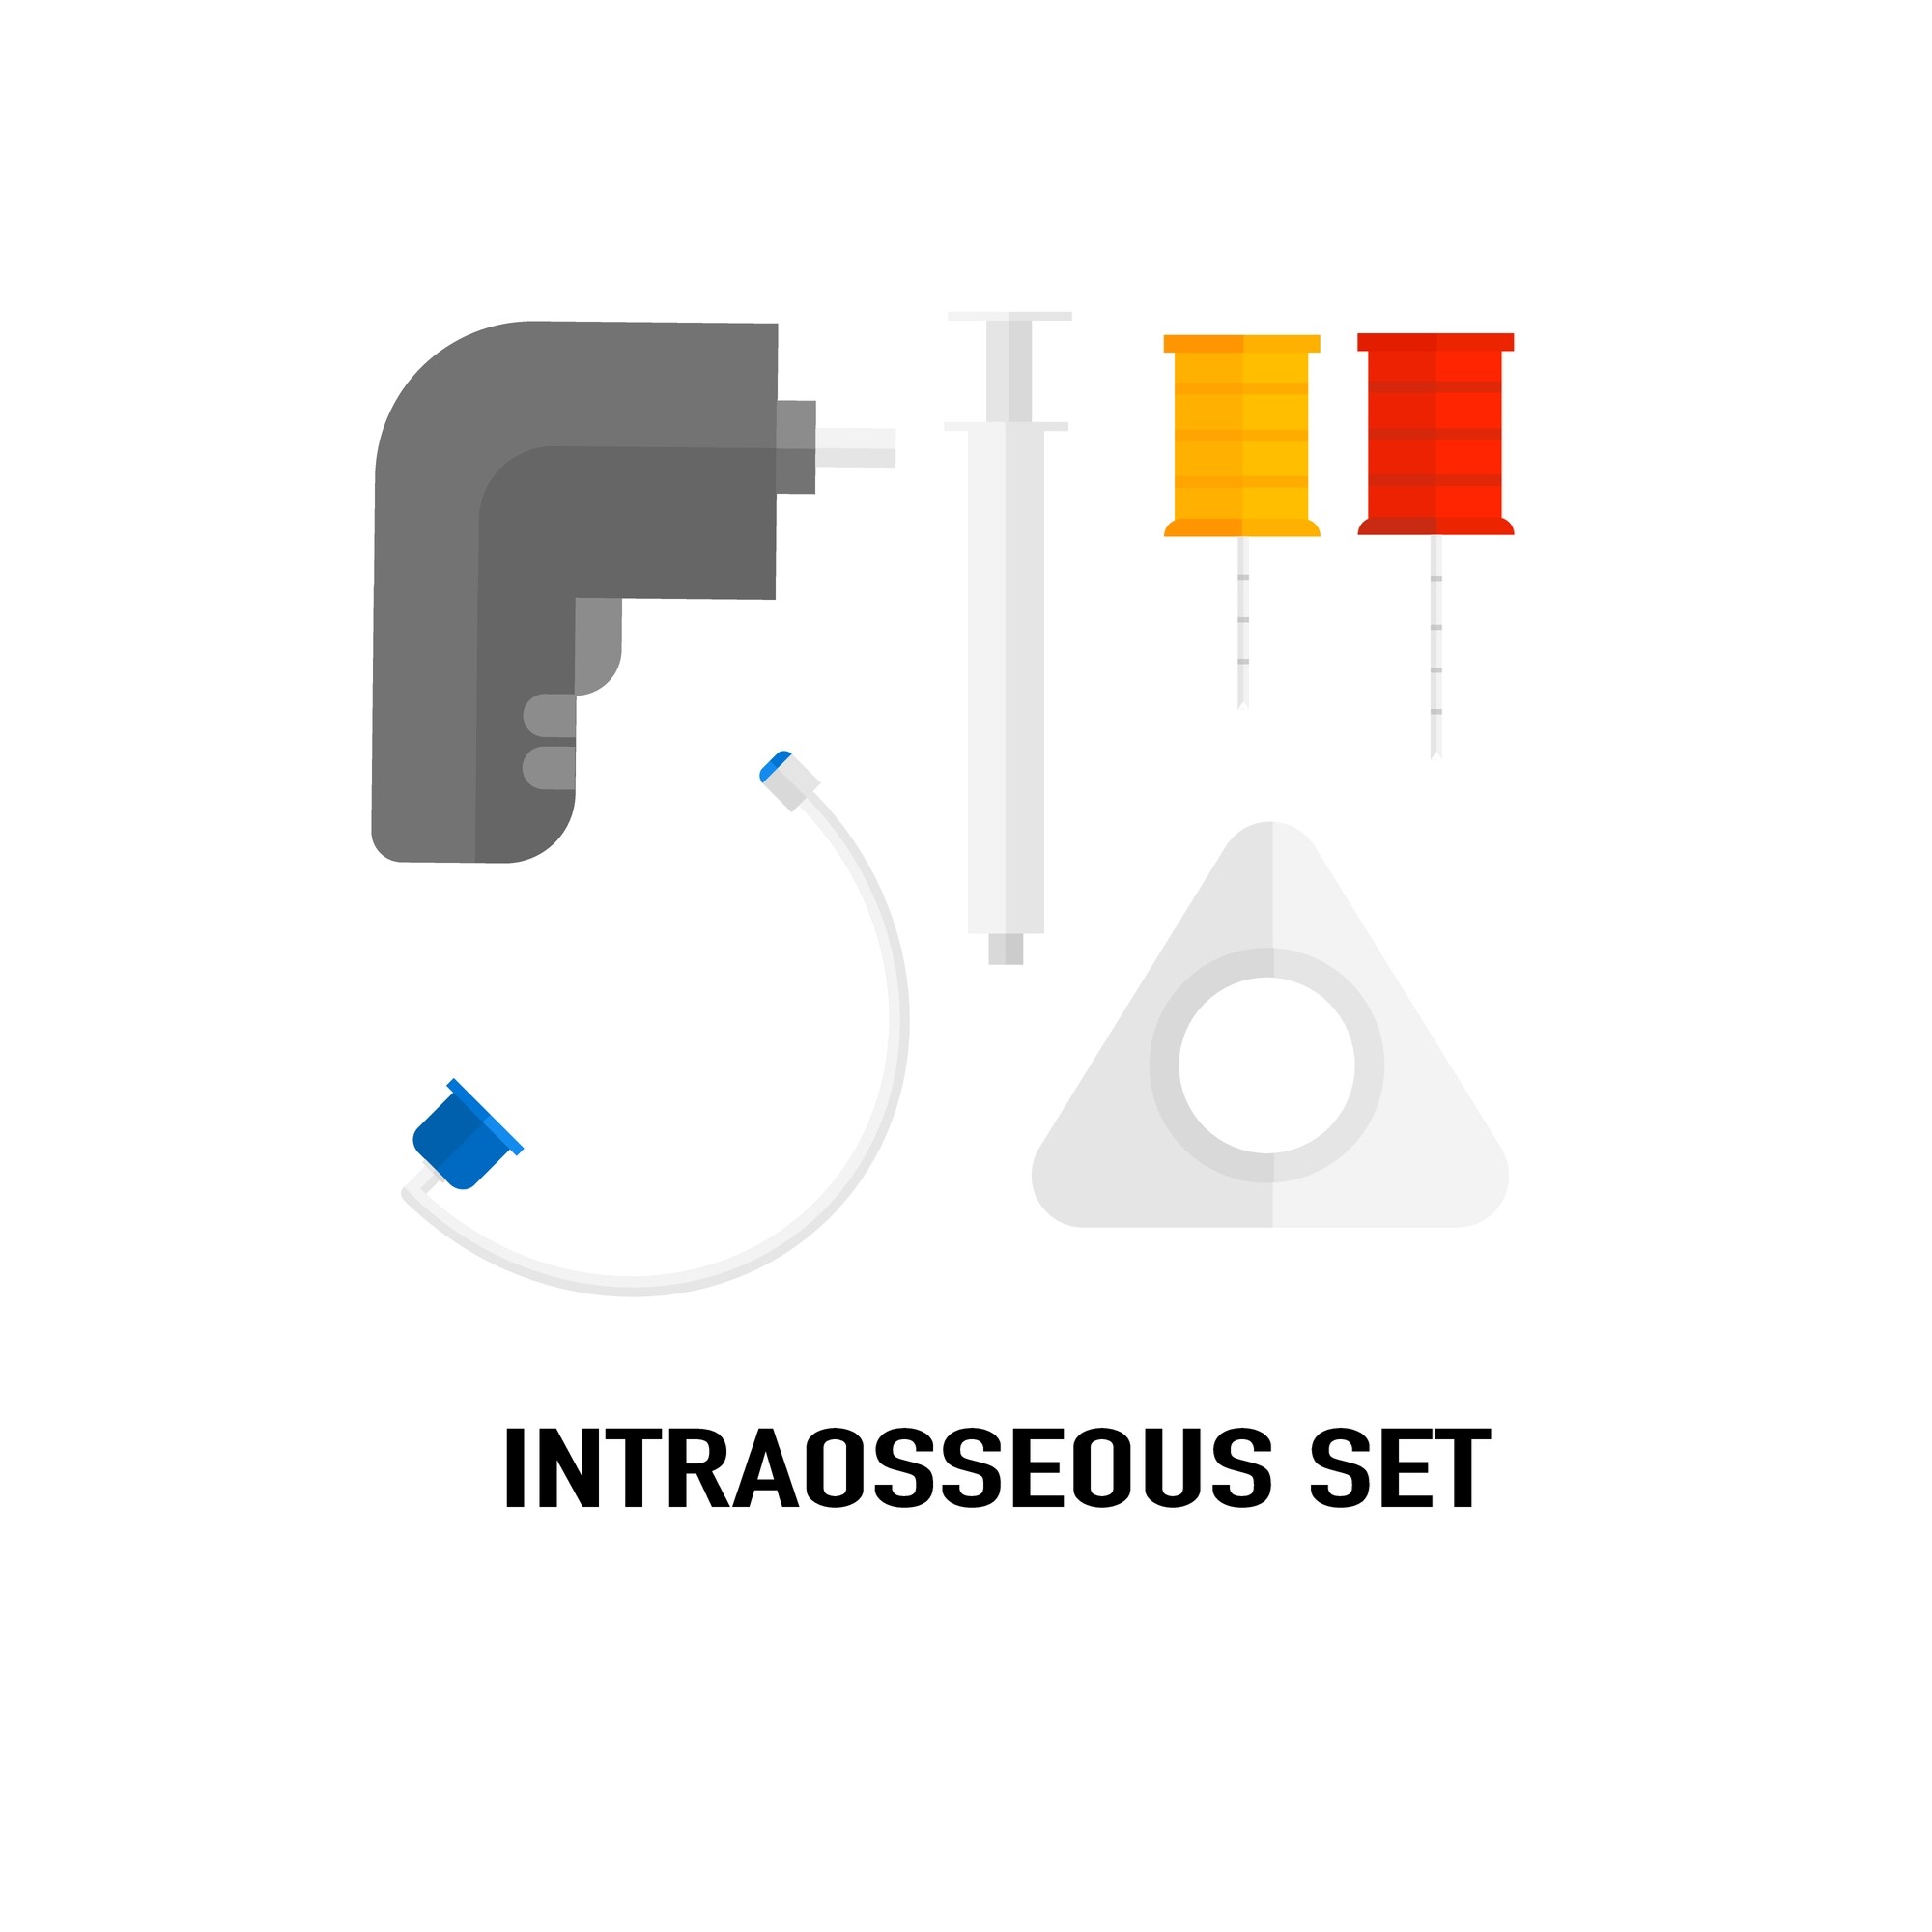
Figure 4
Intraosseous Catheter Placement
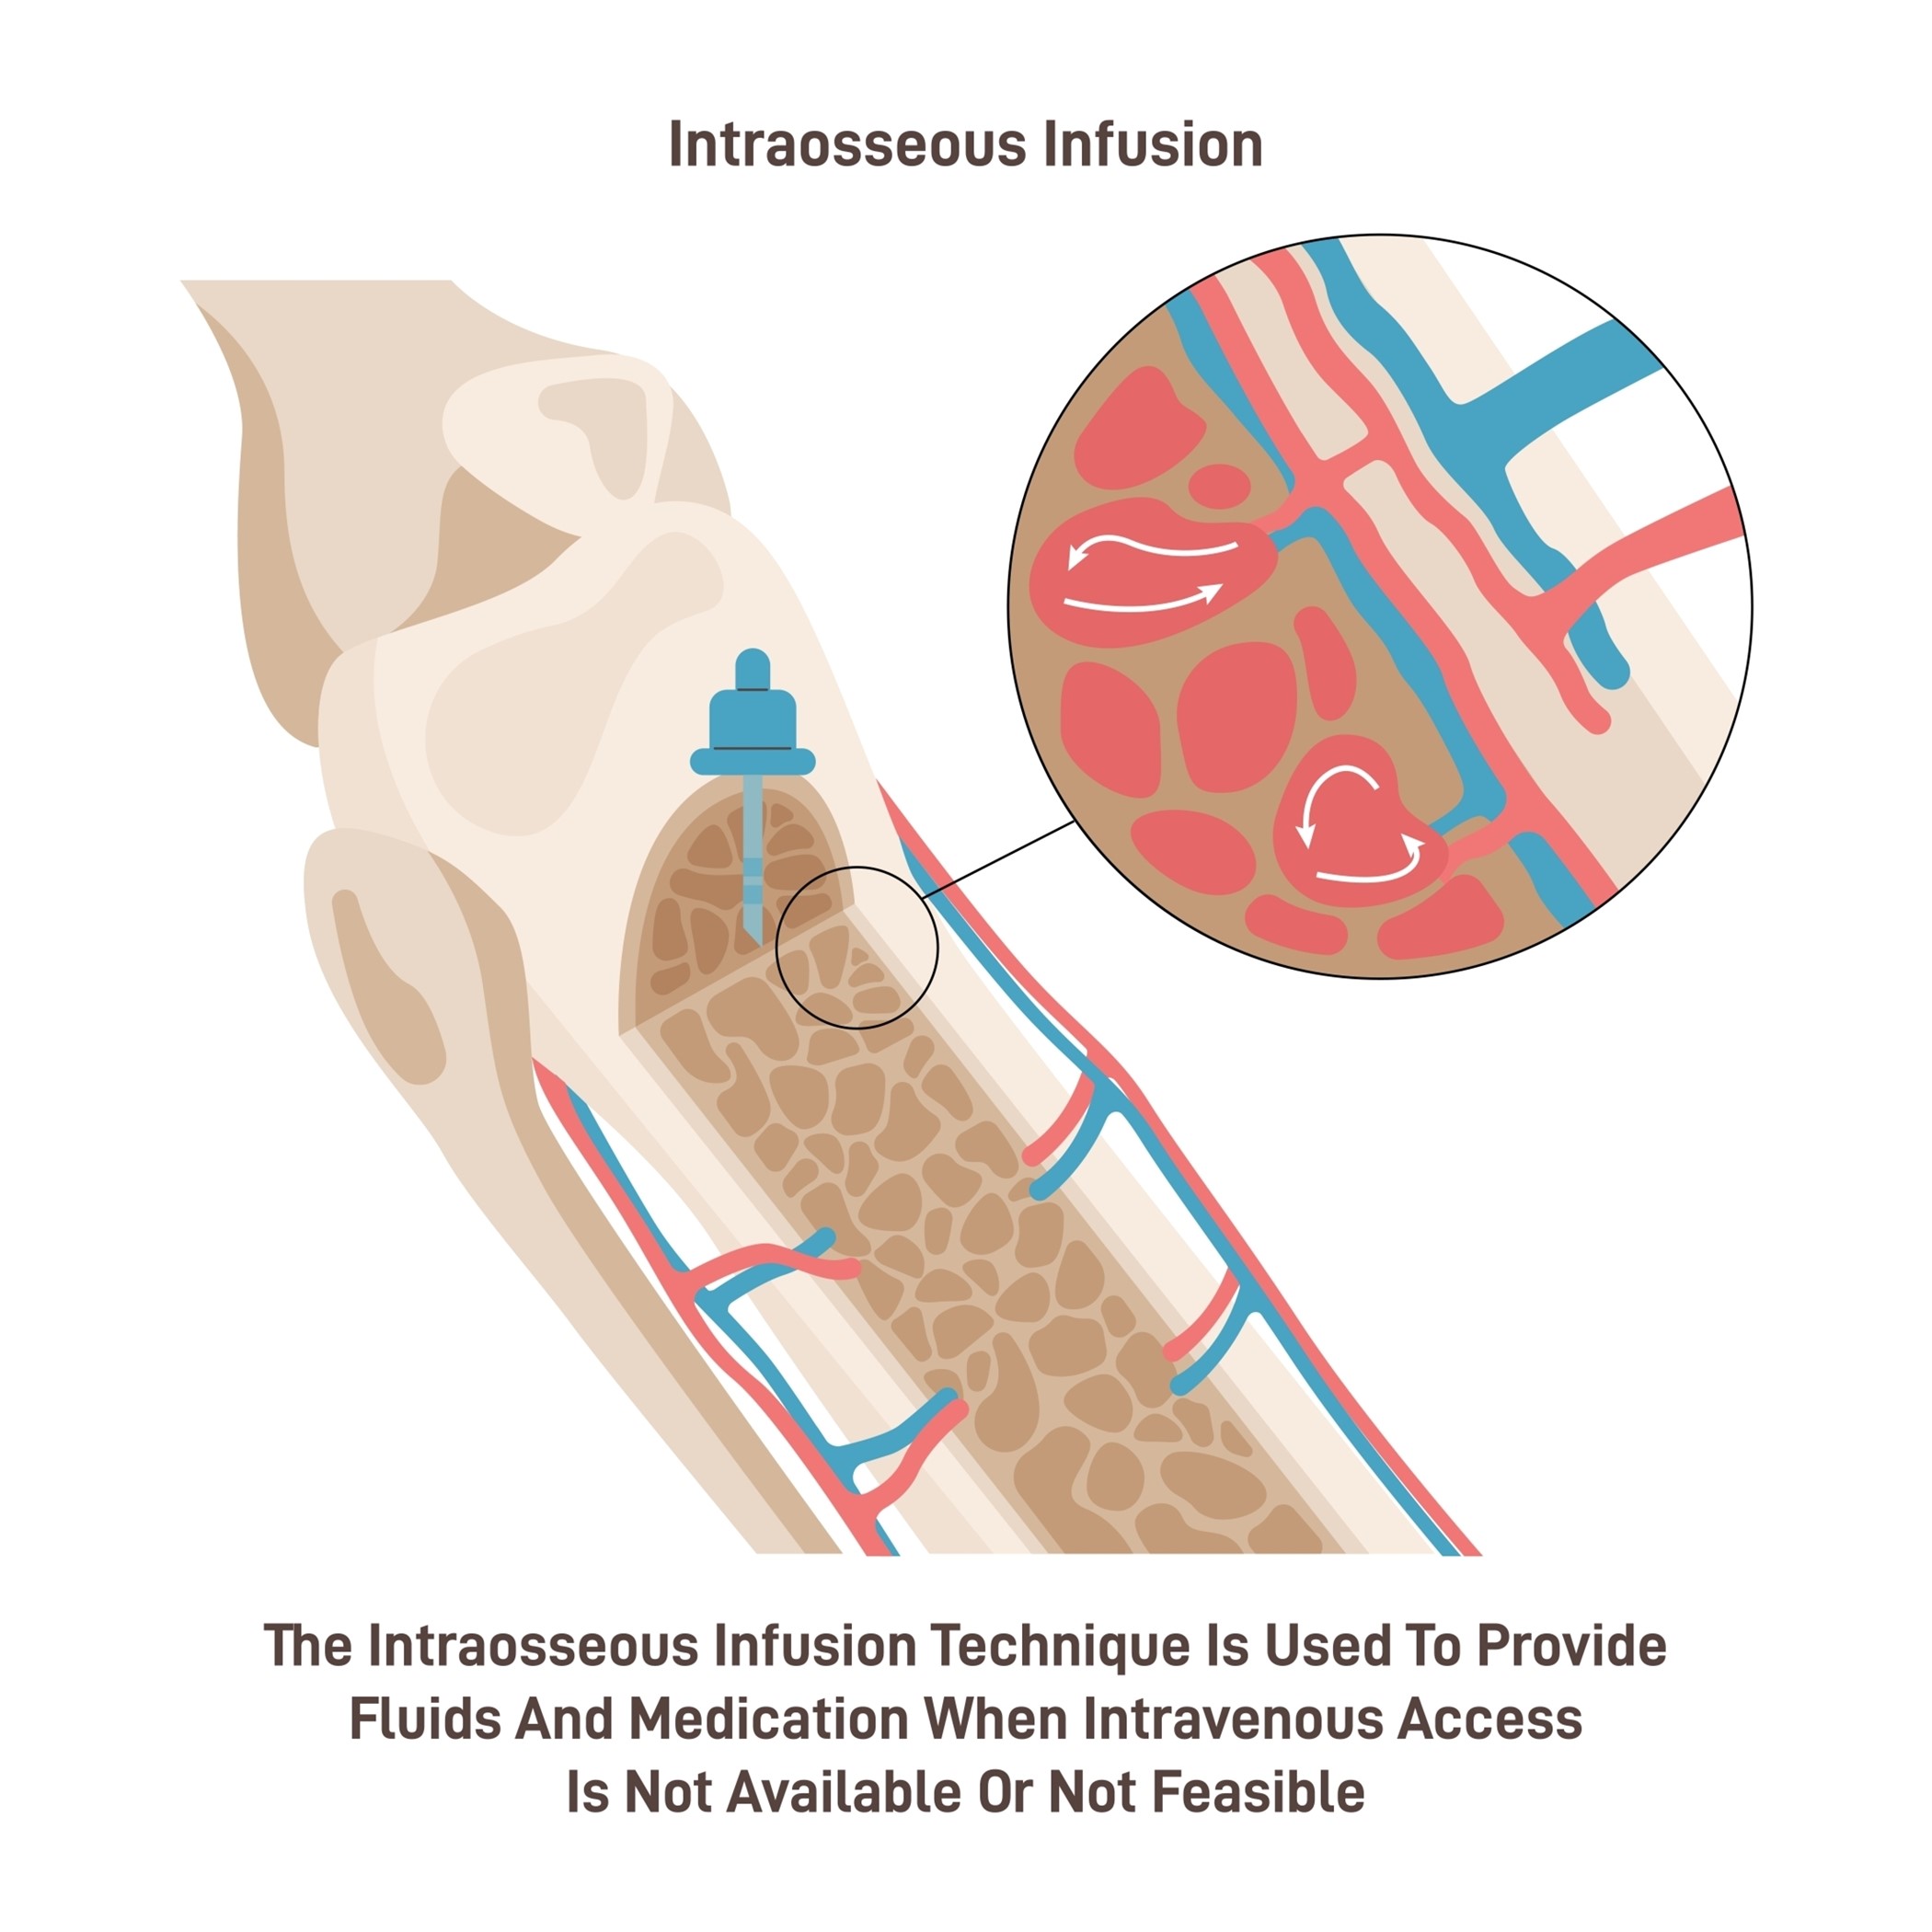
The most common IO insertion sites for adults are the proximal tibia and humerus, with the proximal tibia being the preferred site. This landmark can be found by locating the inferior tip of the patella and moving 3 cm below. A battery, drill-powered, or impact-driven device is typically needed for proximal tibia cannulation. The sternum should be avoided, as it is too thin to accommodate the needle and could lead to pneumothorax and impede resuscitation. Before placing an IO device, the extremity should be restrained, and the skin should be prepped using an aseptic technique with greater than 0.5% chlorhexidine in alcohol solution, povidone-iodine, or 70% alcohol. Awake patients should receive a local anesthetic (e.g., 1% lidocaine) prior to cannulation. Adults usually require a 15G needle (2.5 cm long) for IO access, and placement can occur as quickly as 20 seconds. After insertion, flush the IO line with 5 to 10 cc of normal saline. Patients may experience pain with flushing. Consider injecting a 2% IV lidocaine 20 mg to 40 mg, and allow 2 minutes before flushing again. A specially trained nurse or clinician must perform catheter insertion. Training usually includes a 1-hour lecture and a 1-hour hands-on experience, which can take place on simulation models, animal bones, and cadavers (Berry, 2022; Dornhofer & Kellar, 2023; Nickel et al., 2024; Perron, 2022).
Care of IO Devices
The IO site must remain covered with a sterile dressing, and the device should be stabilized and secured to prevent movement out of the bone. Proper placement of the IO device can be confirmed by assessing needle positioning and the ability to flush at least 5 mL of 0.9% normal saline easily without signs of infiltration. The ability to aspirate blood or bone marrow may also be used to confirm needle placement. However, aspiration may be difficult for some patients, especially those experiencing severe dehydration. If the inability to aspirate is present, continue to saline flush and attempt aspiration again. Needle placement and the surrounding site should be assessed frequently and reevaluated before using the device, especially when highly irritating agents or large volumes will be infused (Dornhofer & Kellar, 2023; Liu, 2023a; Nickel et al., 2024; Perron, 2022).
The same doses of IV fluids and medications that can be infused through a PIV may be infused through an IO device. However, an infusion pump is often required for rapid flow rates. IO devices become clogged or clotted with bone marrow more quickly than with PIV access. Clogging can be avoided by maintaining a connection to a continuous flow of IV fluids or by frequent flushing to prevent occlusion. IO catheters should only be used during the immediate trauma or resuscitation period while the patient is stabilized. HCPs should document the date and time of IO placement to ensure that it is removed in a timely manner. IO catheter dwell time should be limited to a maximum of 24 hours (Dornhofer & Kellar, 2023; Liu, 2023a; Nickel et al., 2024; Perron, 2022).
Complications of IO Cannulation
IO cannulation is considered relatively safe, with serious complications occurring in less than 1% of patients. Complications associated with IO devices can include local infection at the site, infiltration, extravasation, catheter dislodgment, and compartment syndrome. Compartment syndrome is a condition in which increased tissue pressure in a confined anatomic space decreases circulation to the area, leading to tissue hypoxia and pain. HCPs must monitor for discoloration, mottling, coldness, or swelling of the extremity. Compartment syndrome is a medical emergency requiring immediate intervention. Failure to perform a fasciotomy to release the localized pressure causing tissue hypoxia can result in permanent damage, and amputation of the limb may be required. Rarely, IO devices can lead to other serious complications, such as fat emboli, iatrogenic fracture, and osteomyelitis. The risk for osteomyelitis, or severe infection of the bone, increases when the dwell time extends beyond 24 hours (Liu, 2023a; Nickel et al., 2024; Perron, 2022).
Contraindications to IO Insertion
The INS lists the following absolute contraindications to IO placement:
- Compartment syndrome in the extremity
- Previously used IO site or a recently failed IO attempt
- Fracture adjacent to the intended site
- Prior orthopedic surgery or implanted orthopedic hardware
- Infection, severe burns, open wounds, or tissue necrosis at or near the intended site
- Local vascular compromise
- Bone diseases, such as osteoporosis or osteogenesis imperfecta (Liu, 2023a; Nickel et al., 2024; Perron, 2022)
Arterial Catheters
Arterial lines are distinct from PIVs and CVCs in several ways. An arterial line is a thin, flexible tube placed into an artery and is most commonly used in surgical suites and ICU settings. Arterial lines are primarily inserted for hemodynamic monitoring (i.e., beat-to-beat blood pressure monitoring) and frequent laboratory testing or blood sampling. They provide easy access to routine blood samples to monitor oxygen saturation and carbon dioxide (CO2) levels in critically ill patients. Arterial blood pressure (mean arterial pressure, or MAP) is a measurement of the pressure exerted on the walls of the arteries, which directly affects the perfusion of oxygen and nutrients to the tissues and the removal of waste products (Butterworth et al., 2022; Elisha et al., 2023; Liu, 2023c).
Selection Site for Artery Cannulation
The radial artery is the most common site of arterial catheter placement in adults due to its accessibility (i.e., secondary to its superficial location) and collateral flow. The ulnar artery is usually not chosen because it is much deeper and tends to be torturous. Although the radial and ulnar arteries ultimately join together to provide flow to the hand, the ulnar artery carries greater blood flow, and damage from insertion could result in a loss of function up to and including loss of digits or the hand. The brachial artery is large and easy to palpate, but its presence in the antecubital fossa leads to an increased risk of catheter kinking. The brachial artery should not be used in pediatric patients due to a lack of collateral flow. The axillary artery is rarely used because of the risk of nerve damage from hematoma formation or traumatic cannulation. The femoral artery carries an increased risk of infection and hematoma formation. Finally, the dorsalis pedis and posterior tibial arteries are a long distance from the aorta, often leading to distorted waveforms in adults. However, they may be appropriate for pediatric patients (Butterworth et al., 2022; Nickel et al., 2024).
Like venous catheters, arterial catheterization (and arterial puncture for one-time sampling) is contraindicated in the presence of insufficient collateral or peripheral circulation, local infection, thrombus, or abnormal anatomy due to previous surgery (e.g., radial artery harvesting), congenital malformation, trauma, burn injury, aneurysm, stent placement, AVF, or vascular graft. It is also contraindicated in severe peripheral artery disease or active Raynaud’s syndrome affecting the intended artery. Arterial catheters are also contraindicated in those who have a platelet count below 50,000/µL (50 x 109/L). The use of therapeutic anticoagulation is a relative contraindication, but an antiplatelet agent is not (Liu, 2023c; Theodore, 2023; Weiner et al., 2017).
Collateral circulation should be confirmed before cannulation using the original or modified Allen’s test. This test involves elevating the wrist with a closed fist to allow the blood to drain from the hand. The investigator then compresses the ulnar and radial arteries. Next, the hand is lowered, opened, and observed as the pressure is removed from the ulnar artery only. Healthy blood flow from the ulnar artery and an intact superficial palmar arch are indicated by a return to pink from the initial white in the patient’s palm. In the original Allen’s test, the process is repeated while only releasing the radial artery pressure. The same test can be performed on the dorsalis pedis artery to assess collateral flow with the posterior tibialis. Alternatives include Doppler flow, finger pulse plethysmography, and measurement of the arterial pressure of the thumb, but these are rarely used clinically (Liu, 2023c; Pierre et al., 2024; Theodore, 2023).
Techniques for Arterial Cannulation
An arterial line can be inserted at the bedside by a specially trained nurse, licensed practitioner, or physician. Similar to central line placement, the insertion of an arterial line is a sterile procedure requiring appropriate skin antisepsis with a chlorhexidine-alcohol solution. The clinician is advised to wear a cap, mask, sterile gloves, and eyewear, and a small, sterile drape is used. A 20G catheter is recommended for adults and simplifies blood sampling and vigorous waveform interpretation. A local anesthetic may be used for conscious patients. Typically, 0.5 to 1 mL of 1% to 2% lidocaine without epinephrine is injected subcutaneously, creating a dermal papule for enhanced patient comfort (Nickel et al., 2024; Theodore, 2023).
The INS recommends ultrasound guidance to increase first-attempt success when placing arterial catheters. Ultrasonography can increase first-attempt success and decrease the failure risk when used for real-time guidance throughout the placement procedure. However, ultrasound guidance does not reduce the time needed for insertion or improve the overall success rate. Either B-mode or color duplex and either transverse (i.e., short axis) and/or longitudinal (i.e. long axis) views can be utilized. Most clinicians opt for B-mode (due to fewer artifacts) and combination or transverse views. Ultrasonography may reduce the risk of hematoma or aneurysm by identifying pseudoaneurysms, AVFs, or atheroma (i.e., plaque deposit along an artery wall). It may also reduce the risk of damage to adjacent structures, especially when attempting to avoid injury to the brachial plexus during axillary catheterization (Nickel et al., 2024; Theodore et al., 2022).
There are two generally accepted techniques for arterial line insertion: (a) direct cannulation and (b) through-and-through technique. In direct cannulation, the operator’s nondominant hand palpates the artery as the dominant hand inserts and then manipulates the catheter. Direct cannulation is typically performed with the assistance of a guidewire to prevent shearing of the artery and thread the catheter through the arterial ("pressure”) side of the vasculature. As the name implies, direct cannulation involves puncturing the artery directly and threading the guidewire through the cannulated vessel. An intravascular catheter with an inner needle should be inserted at a 30° to 45° angle and advanced slowly until pulsatile blood flow is observed. With an integral guidewire (most common), the angle should be decreased after pulsatile blood flow is noted so that the needle/guidewire/catheter is nearly parallel to the skin and artery. If pulsatile flow ceases, the entire unit should be advanced slightly until flow returns. If the pulsatile flow continues, the guidewire should be advanced with the dominant hand. The catheter is then advanced over the needle guidewire before removing the needle guidewire and securing the catheter. If a separate guidewire is utilized, the catheter should be advanced slightly after the pulsatile flow is first observed to ensure that the catheter tip is within the artery’s lumen (Butterworth et al., 2022; Elisha et al., 2023; Theodore et al., 2022).
The intravascular catheter is then stabilized with the operator’s nondominant hand while the needle is removed. If pulsatile blood flow is not observed, the catheter should be withdrawn slightly until pulsatile flow returns. Next, the guidewire is inserted through the catheter into the artery’s lumen, well beyond the catheter’s tip. The catheter is advanced along the guidewire into the artery before removing the guidewire and securing the catheter. Performing direct cannulation without the aid of a guidewire is only recommended for experienced operators. The process mirrors the integral guidewire steps described above for the initial puncture. After the angle of the needle-catheter unit, it should be advanced another 1 to 2 mm, observing for continued pulsatile flow. This ensures that the catheter tip is now within the artery lumen, as the needle tip extends beyond the catheter tip by 1 to 2 mm. If pulsatile blood flow stops, the needle may be slowly withdrawn, allowing blood flow to resume. The catheter may also need to be withdrawn slightly if the unit has punctured the back wall of the artery, allowing the catheter to re-enter the lumen and advance within the artery. If the pulsatile flow continues as the needle-catheter unit is initially advanced, the outer catheter alone is then advanced into the artery over the needle without the aid of a guidewire. The needle is removed slowly, and the catheter is secured (Butterworth et al., 2022; Elisha et al., 2023; Theodore et al., 2022).
The through-and-through technique mirrors the initial steps described above, except the needle is advanced further, "going through" the other side of the vessel wall. The needle catheter is then retracted until pulsatile flow is achieved, indicating the catheter is now back in the vessel's lumen. The guidewire is then advanced beyond the catheter, and the catheter is slid into place over the guidewire (Butterworth et al., 2022; Elisha et al., 2023; Theodore et al., 2022).
Following needle removal, the artery should be compressed manually proximal to the catheter to limit bleeding while the pre-flushed arterial tubing is connected to the catheter. The site should be covered with a transparent, sterile, occlusive dressing to ensure adequate assessment of the insertion site and the catheter should be secured with a securement device per institutional protocols. A transducer apparatus can be connected to the arterial line to create a secure fixation and prevent inadvertent dislodgement and excessive movement that can interfere with monitoring (Butterworth et al., 2022; Elisha et al., 2023; Theodore et al., 2022). The INS standards recommend chlorhexidine-impregnated dressings for patients over 18 who have arterial access devices (Nickel et al., 2024).
Arterial lines cannot be used for medication administration. Injectable medications can lead to severe tissue damage and require amputation of the limb if administered into an artery rather than a vein. Additionally, administering some medications directly into the arterial system can result in severe systemic consequences up to and including death. Therefore, it is essential to label all arterial lines properly. Two nurses should check before administering any medication through an IV line in the same limb as an arterial line to avoid accidental injection into the arterial line (Butterworth et al., 2022; Liu, 2023c; Pierre et al., 2024).
Complications of Arterial Lines
While arterial lines are considered relatively safe, complications are possible. Complications associated with arterial line placement include hematoma, bleeding, vasospasm, arterial thrombosis, embolization of a thrombus, pseudoaneurysm, skin necrosis, infection, nerve damage, necrosis of the extremities or digits, and unintentional intraarterial injection. Arterial lines can pose risks similar to those of other vascular devices, including infiltration, occlusion, and catheter migration. Life-threatening hemorrhage can ensue (arterial bleeding) if accidental catheter disconnection occurs. Occlusion and hematoma are the most common complications of radial catheters, although peripheral neuropathy is also possible. Femoral artery catheters convey a risk of hematoma, which is the most reported complication for this site, specifically retroperitoneal hematoma. Axillary catheters can cause brachial plexopathy, and brachial site catheters can damage the median nerve (Butterworth et al., 2022; Theodore et al., 2022).
Thrombosis is a common complication of arterial line placement and is more closely associated with the narrow vessels of the distal circulation than with the larger central arteries. Patients who have pre-existing hypercoagulable states, such as those who have advanced malignancies, generally have a higher risk of thrombosis. The incidence of thrombosis correlates directly with the dwell time, increased length, and gauge of the arterial catheter. Other risk factors include low cardiac output, peripheral artery disease, and vasospastic disorders (e.g., Raynaud’s syndrome). Signs of thrombosis include a loss of distal pulses, a lost or dampened arterial waveform, or peripheral digits that appear cyanotic (Theodore et al., 2022; Weiner et al., 2017).
Embolism can also occur due to the dislodgment of a thrombus at the catheter site, which can lead to extremity ischemia. Emboli are primarily associated with peripheral catheters placed at the radial and brachial locations, although catheters near the carotid artery (e.g., axillary catheters) may lead to cerebral emboli. Therefore, distal pulses should be monitored closely, and flushes should be performed manually with the lowest pressure needed instead of prolonged or high-powered flushes with the system flush valve. If a clot is suspected in the catheter tip, the catheter should be replaced. Signs and symptoms of embolization vary with collateral circulation and the size of emboli but typically create distal ischemia (Theodore et al., 2022).
Another possible complication is air embolism. An arterial air embolism can lead to ischemia or infarction of any organ not supplied with sufficient collateral flow. While less common than venous air embolism due to the relatively higher intravascular pressure of the arterial system, even a tiny air volume can be detrimental. In a primate model, 2 mL of air injected into the radial artery resulted in cerebral air emboli that were clinically significant. The lines should be flushed before establishing a connection with the arterial catheter, and all air must be removed from the pressure bag to prevent air emboli. The procedure to manage arterial air emboli differs from Durant’s maneuver (described above) for venous air emboli. The flush should be stopped immediately to prevent any additional air from entering the system. The system can be turned vertically to allow air bubbles to rise, and the rotating hemostatic valve should be fully opened to allow the arterial pressure to dispel the air. The patient should be kept in the supine position while high-flow oxygen and the rapid response or code blue system are initiated to obtain assistance in resuscitating the patient (McCarthy et al., 2016; Theodore et al., 2022).
Arterial catheters can commonly cause vasospasm, occurring in up to 57% of patients. Risk factors include female sex, diabetes, and the size of the catheter in relation to the diameter of the vessel. The signs and symptoms of vasospasm include pain in the extremity, decreased arterial pressure, severe damping of the arterial waveform, a loss of arterial pulse, or a significant decrease in pulse oximetry signal quality distal to the cannulation site. Unintentional intra-arterial injection of medication is also a potential sequela and warrants vigilant care to ensure that medications are constantly being injected into the proper (venous) line. This may lead to end-organ ischemia, tissue damage, or necrosis. Uncommonly, arterial dissection, pseudoaneurysm, and AVF can occur due to arterial cannulation. Dissection should be watched closely (i.e., monitoring the waveform), as it can lead to occlusion and distal ischemia. Although rare (incidence less than 0.1%), pseudoaneurysm manifests as a pulsatile mass, typically after local site bleeding or hematoma formation. This is generally secondary to multiple cannulation attempts, larger catheter size, and catheter infection (Theodore et al., 2022).
The risk of infection in arterial catheters is typically lower than in CVCs. Infections most often affect the insertion site and appear more frequently in femoral catheters. Other risk factors include poor aseptic technique, insertion via surgical cut-down, and longer dwell time (greater than 4 days). Blood draws/sampling from an arterial catheter requires an additional 3 to 12 mL of initial blood to be wasted to avoid contamination of the sample with saline or heparin. Iatrogenic blood loss can be limited by sampling from the port closest to the catheter insertion site. Alternately, intra-arterial blood gas monitoring with a fluorescent optode eliminates the need to withdraw blood from the patient if this is the primary indication for blood sampling (Theodore et al., 2022).
Care of Arterial Lines
The insertion site and areas distal to the insertion site must be monitored closely and frequently for warmth, loss of sensation, delayed capillary refill, and diminished or absent pulses. HCPs should ensure that patients who have femoral arterial catheters wear anti-embolic compression stockings to reduce the risk of thrombosis. Arterial catheters are not routinely replaced or relocated to a new site at any specific or defined interval, except for catheters placed during an emergency (i.e., without standard sterile precautions). The catheter is changed only for an infection, malfunction, or another complication. However, the maximum dwell time for femoral lines should be 5 days, and dwell time should be 7 days for other sites. A sterile, transparent dressing should be changed when it becomes soiled, wet, or loose. The continued need for the catheter should be reassessed daily, and the catheter should be promptly removed when it is no longer required. Disposable transducers are generally replaced at 96-hour intervals, along with the associated tubing, continuous flush devices, and flush solutions. HCPs should refer to manufacturing equipment and institutional policy for definitive timeframes. Arterial catheters should be flushed, typically with sterile saline solution, at defined intervals per institutional policy to maintain patency. Arterial catheters are often attached to a continuous infusion of normal saline (potentially with 1 to 2 units/mL of added heparin, although this is unnecessary per the existing evidence), infused at 1 to 3 mL/hour to maintain patency. For this reason, blood draws from arterial lines typically require an initial waste of the first 1 to 3 mL of blood withdrawn to prevent lab errors (Pierre et al., 2024; Theodore et al., 2022).
Arterial Line Monitoring
Continuous monitoring with an intra-arterial catheter is the gold standard for determining a patient’s blood pressure (mean arterial pressure, or MAP). It is more accurate than non-invasive cuff pressure measurements for patients who are in shock or have cardiac arrhythmias, severely increased systemic vascular resistance due to vasoconstrictive medications, or significantly decreased systemic vascular resistance due to distributive shock. Invasive arterial monitoring also reduces discrepancies in patients who have extreme hypotension and hypertension as compared to non-invasive cuff monitoring (Theodore et al., 2022).
The arterial waveform reflects blood pumping from the left ventricle into the aorta during systole, followed by the diastolic peripheral runoff. The initial ascent in the waveform corresponds with the ventricular ejection. The dip or depression halfway down the systolic decline in the second half of the waveform is referred to as the dicrotic notch or incisura. This section of the waveform represents the closure of the aortic valve and the start of diastole. The remainder of the waveform is the primary determinant of left ventricular blood flow. The waveform provides the patient’s peak systolic pressure, nadir diastolic pressure, pulse pressure (i.e., the difference between the systolic and diastolic pressures), MAP (i.e., the average of the area under the curve over several cardiac cycles), left ventricular contractility (i.e., reflected in the slope of the systolic upstroke), and resistance in the arterial tree (i.e., as indicated by the slope of the diastolic decline/runoff). Pathology in the ascending aorta or aortic valve may lead to changes in the arterial waveform. Elevated pulse pressure may indicate age-associated vascular stiffness. A decrease in pulse pressure from the patient’s baseline reflects hypovolemia, decreased stroke volume, or increased systemic vascular resistance, while a relative increase reflects the reverse conditions. Examples of abnormal arterial waveforms associated with specific pathology can include pulsus alternans with left ventricular failure, pulsus paradoxus with cardiac tamponade, pulsus bisferiens with aortic regurgitation, and anacrotic pulse, pulsus parvus, or pulsus tardus with aortic stenosis (Pierre et al., 2024; Theodore et al., 2022). The specifics of these waveforms are beyond the scope of this activity.
The waveform is affected by the site of catheter placement. There is an exaggeration of systolic pressure, a wider pulse pressure, a steeper systolic upstroke, a lower diastolic BP, and a lower/later dicrotic notch as the pressure wave moves peripherally through the arterial tree. This effect is due to the reduced diameter and elasticity of the peripheral vessels, wave reflections off the peripheral branch points and walls, and gravity. Therefore, blood pressure measurements for patients who have known peripheral vascular disease may differ significantly across the extremities. A higher value is generally used. An arterial catheter’s placement on the pressurized side of the vasculature requires the catheter to be attached to a transducer system with pressure tubing, a pressure bag of fluid (to prevent backflow), and a pressure-monitoring cable linked to a bedside or centralized cardiac monitor. A mechanical signal received by the transducer is converted to a waveform on the monitor (Pierre et al., 2024; Theodore et al., 2022). Figure 5 demonstrates a typical arterial line waveform based on placement.
Figure 5
Arterial Line Waveform Analysis

Before monitoring, the transducer must be zeroed. This process can be performed by turning the stopcock adjacent to the transducer off to the patient but open to the air, exposing it to the ambient atmospheric pressure. The ZERO button should be selected on the bedside monitor. The stopcock should then be closed to air and adjusted to the proper position. Arterial line monitoring requires accurate transducer placement, which should be placed at the phlebostatic axis (as shown in Figure 6), aligned with the base of the right atrium. This point is at the fourth intercostal space, which in most adults is just inferior to the nipple line, at the mid-diameter of the anterior-posterior chest wall. Failure to position the transducer properly leads to imprecise blood pressure monitoring and potentially improper patient care. An arterial line transducer positioned above the phlebostatic axis will result in artificially lower blood pressure readings, and a transducer placed too low will result in higher readings. If the patient is lying in the left or right lateral decubitus position, the transducer can be placed mid-sternum. If blood pressure accuracy is in question or the electronic pressure-monitoring cable becomes disconnected, this zeroing procedure should be repeated. Extra tubing and stopcocks may reduce the monitor's accuracy and should be avoided (this is referred to as damping). Air bubbles or clots in the system typically do not affect MAP accuracy but may create a subtle decrease in the displayed systolic pressure and a narrowed pulse pressure. Flushing the catheter to remove the air or clot often resolves this artifact (Butterworth et al., 2022; Theodore et al., 2022).
Figure 6
Phlebostatic Axis
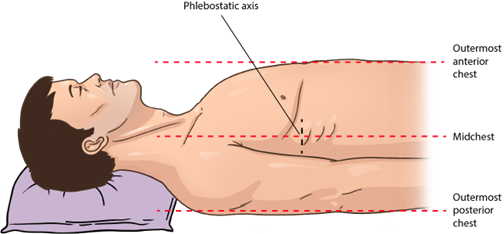
Arterial Line Removal
An arterial catheter should be removed by a specially trained nurse or practitioner, depending on institutional policy. The Trendelenburg position is not necessary for arterial line removal as it is when removing CVCs. However, the supine position is recommended for patients who have a femoral catheter in order to maintain adequate pressure at the site. Before removal, coagulation factors, such as INR, partial thromboplastin time (PTT), platelet count, and any ongoing medications that may affect coagulation or platelet function, should be assessed. Aseptic technique is used to remove arterial catheters, and PPE (i.e., a face mask with a shield, a gown, and clean, non-sterile gloves) should be worn to protect from splashing blood. The catheter should be flushed, or blood should be aspirated into the catheter before removal. The site should be cleaned with chlorhexidine in alcohol solution, and a 4x4 dressing should be used to apply pressure over the puncture site. The catheter should be removed slowly and with steady movement (Nickel et al., 2024; Theodore et al., 2022).
Pressure should be applied at the artery and skin puncture sites for at least 5 minutes (for radial artery site) to 10 minutes (for femoral site) or until the bleeding subsides. Compression time should be extended (10 to 20 minutes) in patients who have impaired coagulation. Larger catheter sizes may also increase the compression time required for bleeding to subside. If oozing continues, pressure should be held for an additional 5 minutes and then reassessed. Failure to maintain adequate pressure can result in hematoma formation and potential arterial bleeding at the insertion site. Once the bleeding subsides, a sterile dressing should be placed. A patient who has a femoral catheter should lay flat (i.e., no hip flexion) for up to 2 hours after catheter removal. Distal pulses should be checked every 15 minutes to assess for hematoma or extremity ischemia. After removal, the catheter should be inspected as instructed above for other VADs. If a catheter fracture is suspected, pressure should be held proximal to the puncture site to prevent embolization until surgical consultation can be obtained (Nickel et al., 2024; Theodore et al., 2022).
Central Venous Access Devices
A CVC is commonly referred to as a central line. CVCs are indwelling devices inserted into a vein of the central vasculature. They consist of a thin, flexible tube inserted by a puncture directly through the skin into the intended large vein, often in the neck, chest, arm, or groin. The catheter tip is threaded through the vein until it empties into a large vein near the heart, allowing the treatment to be administered within seconds. Like midline catheters, the point where the central line leaves the skin is called the exit site. CVCs can contain 1 to 4 lumens. The end of each lumen must be covered with a cap when not used In order to prevent air entrainment into the central vasculature. Each lumen of the CVC is treated and managed as a separate catheter and must be flushed according to the defined institutional protocol. Multiple lumens allow for the safe administration of various medications simultaneously, including incompatible medications. CVCs are long-term devices that can remain in place for extended periods if adequately maintained, often for months to years. They are ideal for administering vesicant or irritant therapy (e.g., chemotherapy, vasopressors, parenteral nutrition), large rapid fluid boluses, blood products, antibiotics, stem cell transplantation, potassium chloride (KCl), and concentrated dextrose infusions. Central lines allow treatments to move quickly into the bloodstream (CDC, 2019[CT2] ; Lippincott, 2022).
Central venous access can also be used for interventions such as extracorporeal therapies (e.g., renal replacement therapy/hemodialysis, plasmapheresis), central venous pressure (CVP) measurement, vena cava filter placement, venous thrombolytic therapy, venous angioplasty or stenting, pulmonary artery catheters (which will be outlined later), and cardiac pacemaker/defibrillator placement. Unlike peripheral catheters, a CVC can also be used to draw blood. While CVCs may be used in inpatient, outpatient, and community settings, they serve a chief role in intensive care units (ICUs) for acute or critical care resuscitation and complex infusion therapies and treatments. In addition, patients who have a history of difficult peripheral venous access due to extensive prior PIV therapy, surgery, or previous tissue damage for whom vascular site selection is limited are also candidates for CVC placement. CVCs are inserted by specially trained and certified nurses, advanced practice nurses (APRNs), or physicians. Some CVCs require surgical placement in the surgical suite or interventional radiology (i.e., tunneled or implantable CVCs), while others may be inserted at the bedside (non-tunneled CVCs; Elisha et al., 2023; Heffner & Androes, 2024; Leib et al., 2023).
The type of CVC inserted depends on the anticipated type and duration of therapy, patient complexity (e.g., comorbidities), and overall clinical status (e.g., diagnosis, condition). Site selection is also based on the patient's age, local and surrounding vasculature conditions, the skin condition at the intended insertion site, history of prior venipunctures or access devices, operator skill, ultrasound availability, and preference. CVCs are typically placed in the jugular, subclavian, or femoral veins. Higher success rates and lower complications are associated with operator experience and the use of ultrasound-guided placement. Various access sites have inherent advantages and disadvantages (see Table 4). To reduce CLABSI risk, clinicians should select the device with the smallest gauge and fewest lumens necessary to complete the prescribed therapy (Nickel et al., 2024). The most common types of CVCs are as follows:
- PICC
- Tunneled CVC
- Non-tunneled CVC
- Implantable port
Table 4
Comparative Advantages and Disadvantages of Central Venous Access Sites
Access Site | Advantages | Disadvantages |
Jugular |
|
|
Subclavian |
|
|
Femoral |
|
|
(Chopra, 2024; Heffner & Androes, 2024; Nickel, 2024)
Potential contraindications to CVC placement at any of the selected sites include a skin infection over the intended insertion site, obstruction secondary to thrombus within the intended vein, or stenosis of the vein. The presence of a thrombus or stenosis of the vein may preclude placement and necessitate an alternative site. A history of surgical manipulation or trauma to the intended location is another potential contraindication. The presence of a pacemaker or a hemodialysis catheter may preclude the use of a particular site, as well as proximity to a burn, wound, or tracheostomy. The rationale for the chosen site should be documented (Heffner & Androes, 2023; Leib et al., 2023; Nickel et al., 2024; Tse & Schick, 2022).
CVC Placement
Best practice guidelines recommend using a procedural checklist to ensure preparation and complete adherence to protocols during the placement of all CVCs, such as the one recommended by the Agency for Healthcare Research and Quality (AHRQ; see Figure 7).
Figure 7
Example of CVC Checklist
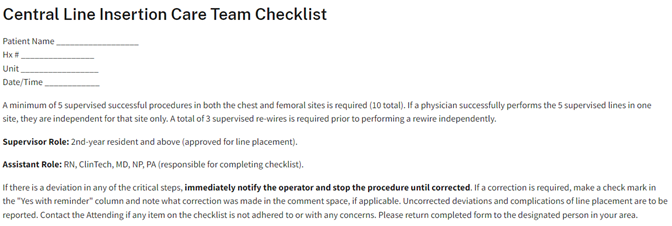
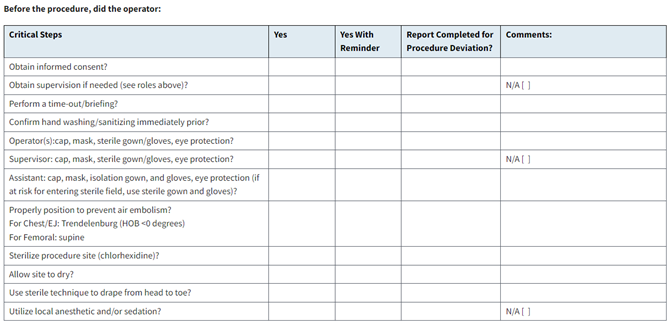
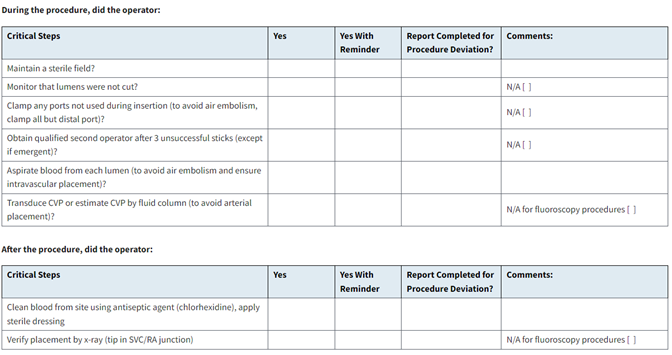
(AHRQ, 2024)
PICC and non-tunneled percutaneous catheters are typically placed at the bedside, while tunneled catheters and implantable ports are inserted in an interventional suite or a surgical suite. While consent is implied in emergencies, informed consent should be obtained before the planned placement of any CVC in nonemergent circumstances. This discussion should include the planned procedure and its indications, potential complications, and associated corrective procedures to manage possible complications (e.g., chest tube placement for a pneumothorax). Patients should receive continuous cardiac rhythm monitoring and pulse oximetry during CVC placement, and supplemental oxygen should be immediately available at the bedside. Those at risk of respiratory compromise may require anesthesia and a controlled airway for safety during the procedure. The patient’s bed should be elevated to optimize the operator’s comfort during the placement procedure. Based on the insertion site, the patient should be positioned to facilitate access to the intended location and maximize the diameter of the intended vein. When placing a device in the subclavian or jugular veins, Trendelenburg positioning (head down) may help reduce the risk of air embolism. However, this position may be intolerable for critically ill patients or those with obesity (Chopra, 2024; Heffner & Androes, 2023; Nickel et al., 2024).
CVC placement is a sterile procedure that should be performed using an aseptic technique or surgical aseptic non-touch technique (ANTT), even in emergencies. Surgical ANTT requires the use of a sterile drape to cover the entire patient, a sterile ultrasound probe cover, a long-sleeved sterile gown, a surgical mask, sterile gloves, and a head covering (surgical cap). The operator should perform hand hygiene using surgical antiseptic wash before donning the proper PPE. A chlorhexidine-alcohol skin antiseptic solution should be used to scrub the site and allowed to dry before drape placement, as described by the CDC and INS guidelines. Prophylactic antibiotic administration is not routine. Sedation may be required to facilitate patient comfort, ranging from a low-dose, short-acting benzodiazepine to more profound procedural sedation. Local anesthetics (e.g., topical lidocaine/prilocaine [EMLA] or subcutaneous 1% lidocaine) may also enhance patient comfort during the procedure. Bupivacaine (Marcaine) is a slightly longer-acting anesthetic that may provide pain relief for up to 12 hours for patients receiving a tunneled catheter or implantable port (Chopra, 2024; Heffner & Androes, 2023; Nickel et al., 2024).
Patency, site suitability, and anatomic variations can be assessed at the bedside before placement using ultrasound when available. This evaluation is critical for those who have a history of prior DVT or instrumentation in the proposed region. An ultrasound can be used (if available) for real-time guidance during placement. Compared to landmarks, ultrasound guidance during cannulation by experienced practitioners reduces the time to cannulation and the risk of complications. An ultrasound can also identify potential complications (e.g., guidewire malposition and pneumothorax) immediately (Chopra, 2024; Heffner & Androes, 2023; Nickel et al., 2024).
Although equipment and procedural details vary by institution, setting (bedside, interventional suite, or operating suite), and insertion site, the basic steps of non-tunneled CVC placement correspond with the ST. The vein is cannulated using an introducer needle, micropuncture needle, or angiocatheter. The operator should occlude the needle hub with their thumb when the guidewire is not in place In order to avoid air entrainment/embolism, which can occur if air is externally introduced into the systemic circulation. The guidewire is inserted through the needle or angiocatheter, and its position is confirmed via ultrasound or fluoroscopy. The guidewire should be inserted just beyond the anticipated catheter depth to avoid intracardiac advancement. Guidewire depth should not exceed 16 cm to limit this risk. If a cardiac arrhythmia is detected, the guidewire should be withdrawn slightly until the arrhythmia resolves. The needle or angiocatheter is removed while the guidewire is carefully stabilized. A single stab incision may be required adjacent to the guidewire to introduce a tissue dilator or a coaxial dilator/sheath, which is inserted over the guidewire, keeping the guidewire’s position unchanged. Then, the tissue dilator is removed, leaving either a guidewire or a sheath to guide catheter insertion, depending on the particular kit. Sheaths are typically equipped with a side port that can be aspirated and irrigated to assess function. After being secured, the catheter, device, or pacemaker lead is introduced through the sheath, and the sheath is then removed. Alternatively, the catheter can be threaded over the guidewire and held in place while the guidewire is removed. This procedure was originally termed the ST and has since been adapted and termed the MST. A catheter/needle combination may also be inserted initially during an MST approach, allowing for the advancement of a catheter early, followed by needle removal. This catheter serves as the conduit for the guidewire, followed by a tissue dilator and, finally, the indwelling catheter. Each port/access hub of the indwelling catheter should be checked for blood aspiration as well as saline flush (Heffner & Androes, 2023; McCarthy et al., 2016; Song et al., 2018).
The catheter should be secured and covered with a transparent and semipermeable sterile dressing or gauze if the patient is diaphoretic, bleeding, or oozing. The INS 2016 standards discuss the importance of chlorhexidine-impregnated dressings in reducing the infection risk for patients with CVC devices. The 2021 standards noted the benefits of chlorhexidine-impregnated dressings for use with short-term, non-tunneled CVC devices with the highest level of evidence (i.e., Level I). The new standards expand the usage recommendations for patients over 18 and for various catheter types, including arterial, epidural, dialysis, and implanted ports (Heffner & Androes, 2023; Nickel et al., 2024).
The securement of a non-tunneled CVC is challenging, and the INS guidelines recommend additional research to delineate the ideal securement method for these lines. However, until this research can be completed, the INS recommends using either TA in combination with sutures or an ISD to secure non-tunneled CVC catheters. According to the CDC (2017) and INS, chlorhexidine-impregnated dressings with an FDA-cleared label that specifies a clinical indication are recommended to reduce CLABSI and protect the insertion site of short-term, non-tunneled CVCs. Sponges impregnated with chlorhexidine gluconate may be utilized in some facilities. Finally, the tip position of jugular and subclavian catheters should be confirmed with a chest x-ray before use, ideally in the lower superior vena cava (SVC), at the cavoatrial junction (CAJ), outside the right atrium, and above the pericardial reflection. Femoral catheter tips should be located just superior to the confluence of the iliac veins in the inferior vena cava (IVC) and above the level of the diaphragm (Heffner & Androes, 2023; Nickel et al., 2024). Figure 8 depicts the anatomy of the thoracic abdominal veins that are involved.
Figure 8
Thoracic Abdominal Veins
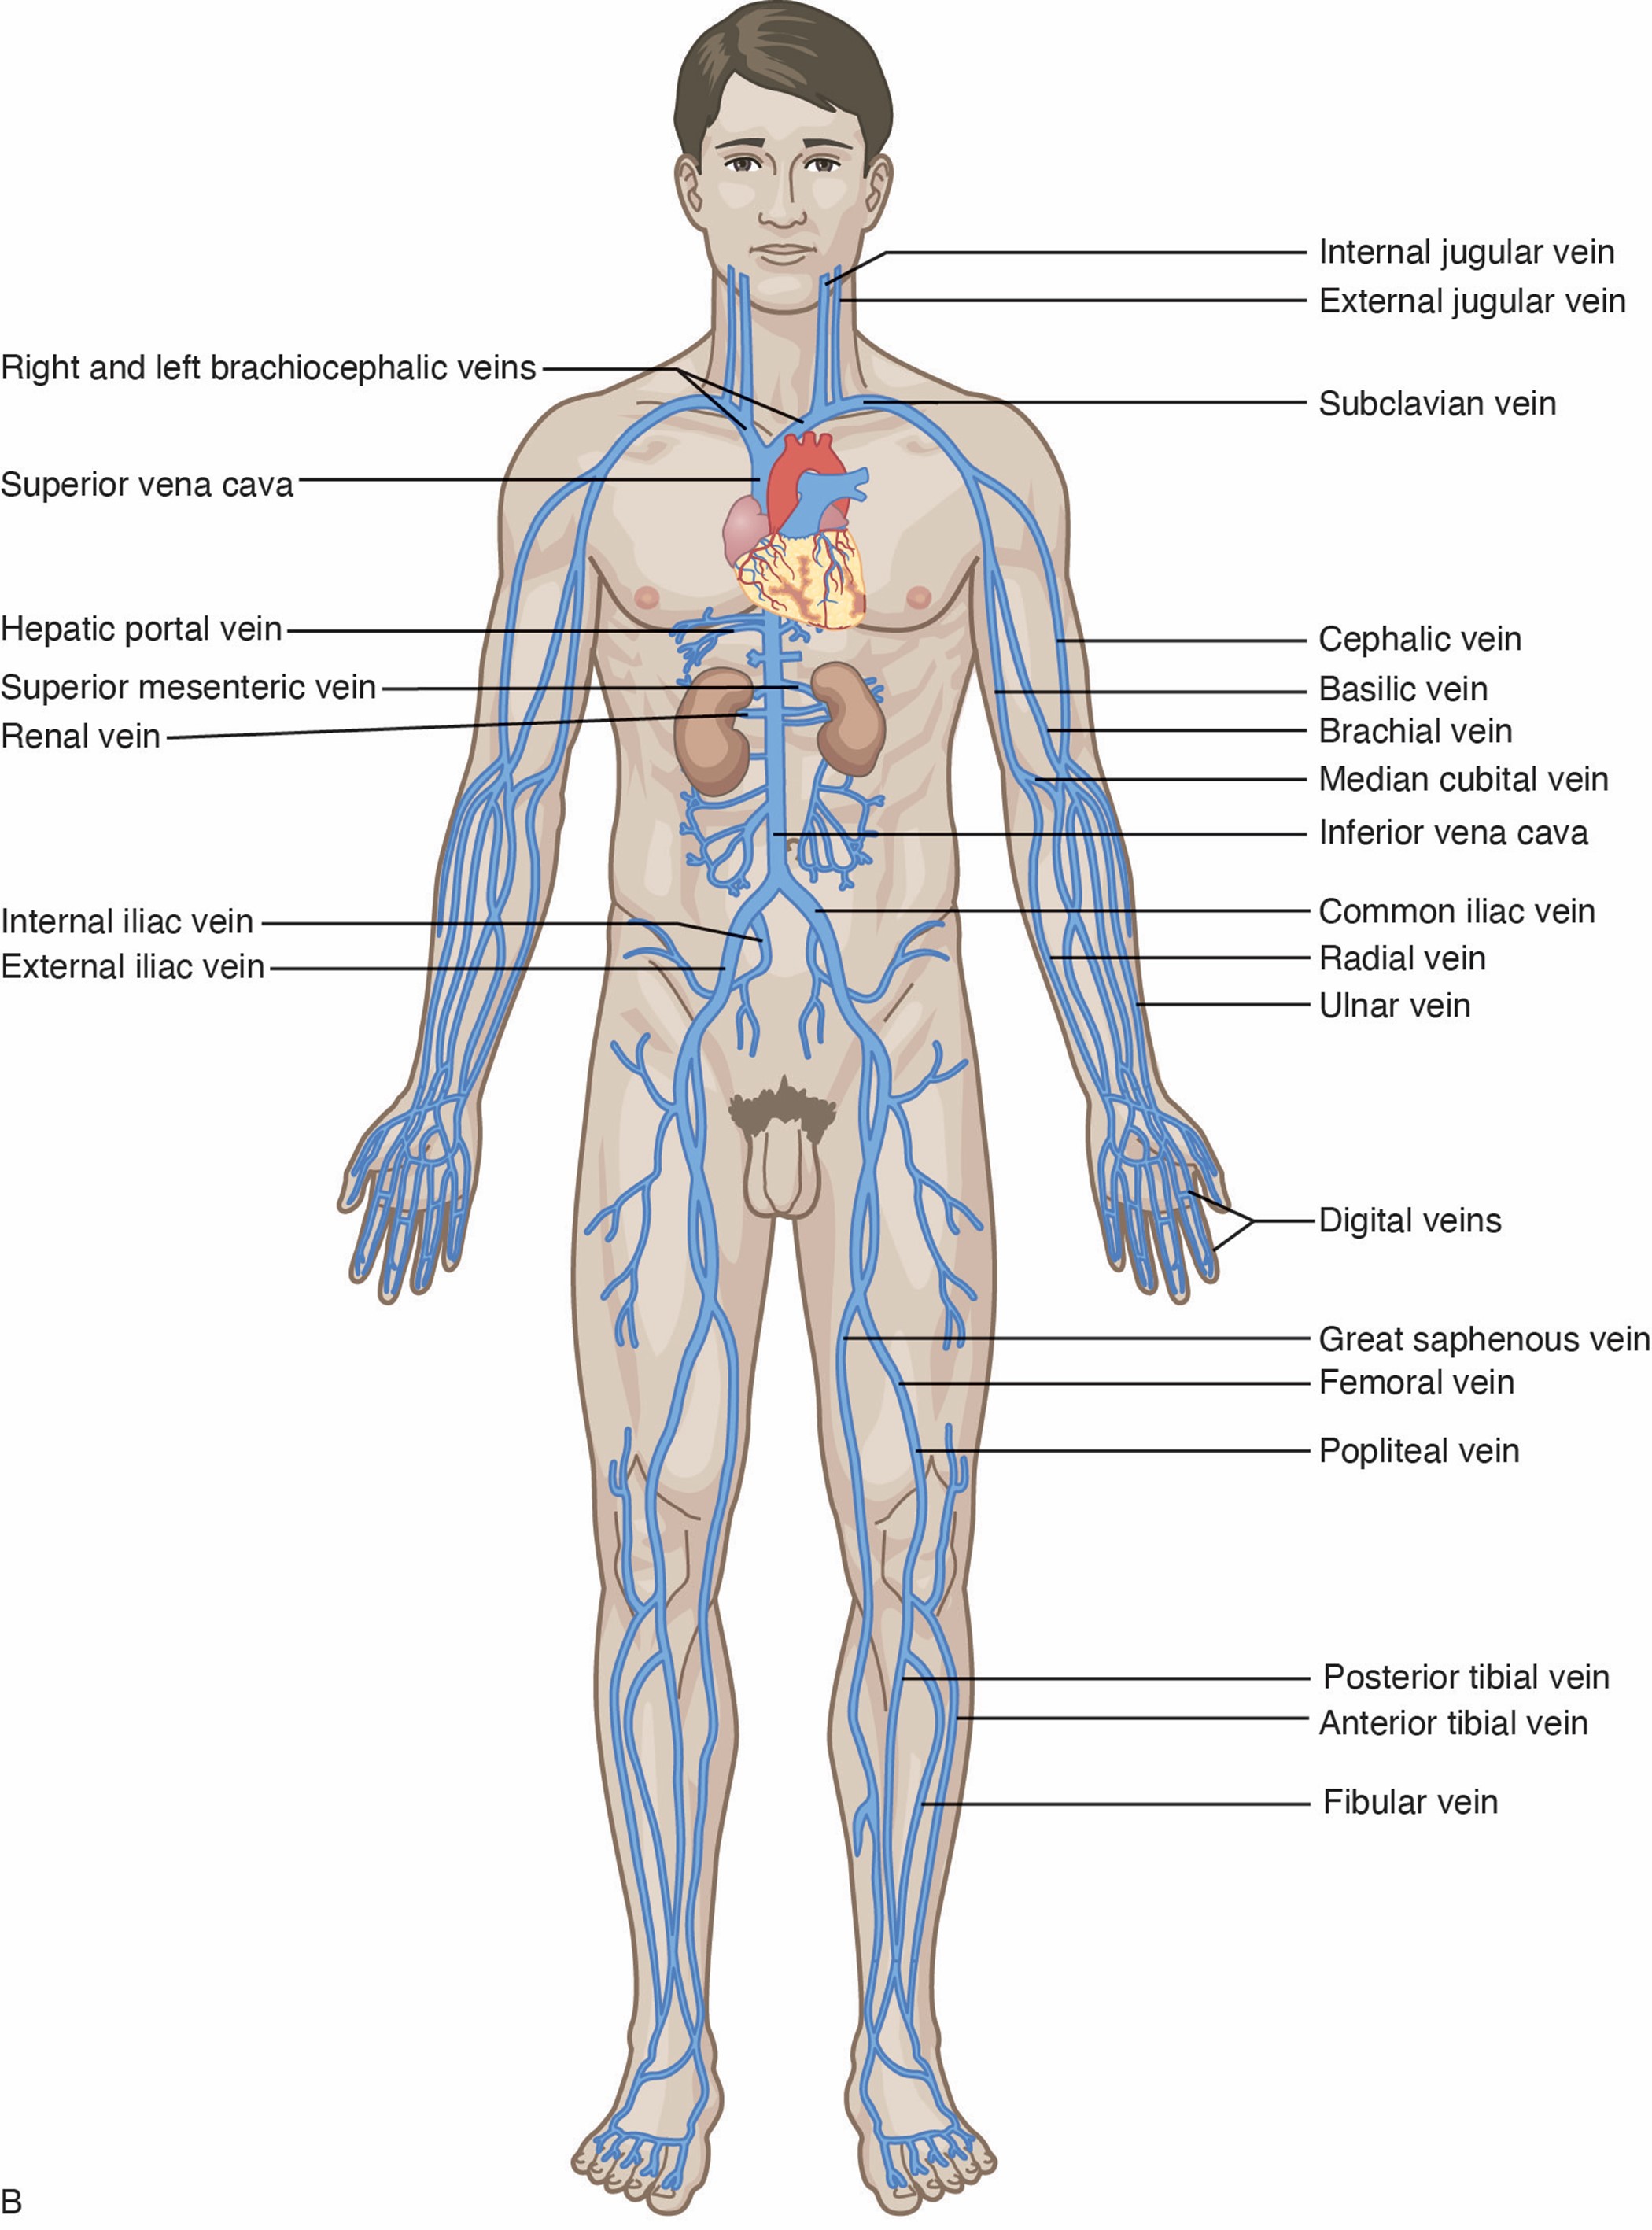
For most subclavian and jugular lines, the exit site should lie below the mid-clavicle at a position that does not interfere with clothing or upper-extremity movement. Many tunneled catheters can be trimmed before or after tunneling, although hemodialysis catheters often come in fixed sizes and cannot be shortened. In these cases, the exit site is determined by the length of the catheter. Tunneled catheters are inserted using fluoroscopic guidance, although ultrasound may be used for pediatric patients. The procedure begins as described above. Once the guidewire is set and the guidewire exit site incision is made, the planned tunnel and catheter exit site should be anesthetized (if not already). Many tunneled CVC kits include a tunneling device attached to the most distal catheter lumen opening. An incision is made at the planned catheter exit site. The device should be used to tunnel from the catheter exit site to the guidewire exit site, creating a gentle curve and avoiding acute angulation. The tunneling device is then removed, and the remainder of the insertion mirrors the MST previously described. The catheter tip position should be assessed and adjusted as needed before securing the catheter, and the cuff should be placed at the catheter exit site. Hemodialysis catheters should terminate at the mid-right atrium, as opposed to within the lower SVC. While tunneled catheters were historically sutured in place until the cuff became incorporated into the subcutaneous tissue, the INS guidelines recommend using a securement device, such as a SASS, ISD, TA, or an ASD for both cuffed and non-cuffed tunneled catheters (Heffner & Androes, 2023; Nickel et al., 2024).
As an alternative to the MST, Access Scientific's WAND device uses an AST. The WAND combines the needle, guidewire, dilator, and sheath into a single device. It purports to reduce the number of steps and the time required to cannulate, thereby improving insertion safety. The 21-gauge introducer needle is inserted until the “fast-flash” is identified, at which point the hub should be held still. The guidewire can then be advanced after disengaging the cap. The dilator collar is turned clockwise one-quarter turn, allowing the dilator/sheath to advance over the guidewire. This sheaths the needle tip and prevents needlestick injuries automatically. It can also be done manually by withdrawing the needle hub until it locks within the sheath/dilator hub. The dilator hub is then disengaged from the needle hub, allowing the needle, guidewire, and dilator to be removed as a single unit, leaving behind only the cannulated sheath within the vessel. Finally, the sheath is used to insert the device or indwelling catheter of choice (Ferrada, 2020; Thaut et al., 2019; Tse & Schick, 2022; Ullman & Chopra, 2024).
CVC care requires astute clinical judgment, assessment, and training to ensure competency in managing and maintaining each type of device. Central lines serve critical roles in restoring the health of acutely and critically ill patients. While CVC catheters are widely used clinically, they are associated with potentially life-threatening risks and complications. The primary responsibility of the HCP caring for those who have CVCs is to safeguard patient care through the consistent use of EBP interventions and clinical assessment to reduce the risk of complications. The line must be assessed daily for continued necessity and the potential for prompt removal. The line should be removed as soon as it is no longer clinically indicated (Nickel et al., 2024). Daily CVC assessment should include, at minimum, the following components, which must be documented in a flowsheet in the patient's medical record:
- Date, time, and insertion site
- Date of the last needle, cap, and infusion supply changes
- Radiographic confirmation of tip location, if indicated
- Daily review of line necessity, including the functionality of the line, flush protocol, site appearance, blood return, and condition and appearance of potential site complications (CDC, 2017; Nickel et al., 2024)
VAD documentation should be comprehensive, occur promptly, and also include the following:
- Type, length, and size of the device
- Specific site preparation, infection control, and safety precautions as appropriate for the procedure
- Number of attempts and patient tolerance of insertion
- Type of stabilization device
- Device discontinuation, date, condition, site appearance, dressing applied, the reason for removal, and patient response (Campagna et al., 2018; Nickel et al., 2024; Ullman & Chopra, 2024)
Individual care recommendations for various CVCs will follow.
Tunneled CVCs
A tunneled CVC is surgically implanted (typically in an interventional suite or surgical suite) in a central vein in the neck or chest and then subcutaneously tunneled to an exit site in the chest wall. Figure 9 (right) demonstrates the vein entry site on the upper chest and the catheter exit site between the third and fourth intercostal spaces. The catheter should terminate in the SVC at the CAJ, which often lies roughly at the level of T5 to T7. A Dacron cuff is positioned within the tunneled portion of the catheter, approximately 2 to 3 cm from the exit site. Tissue grows around the cuff to create a mechanical barrier against microorganisms and anchor the catheter in place. The subcutaneous tunnel reduces the risk of infection by preventing organisms on the skin from reaching the catheter and, ultimately, the bloodstream (Chopra, 2024; Flick & Winters, 2023; Nettina, 2019; Nickel et al., 2024).
Figure 9
Tunneled and Non-Tunneled Central Venous Access Device
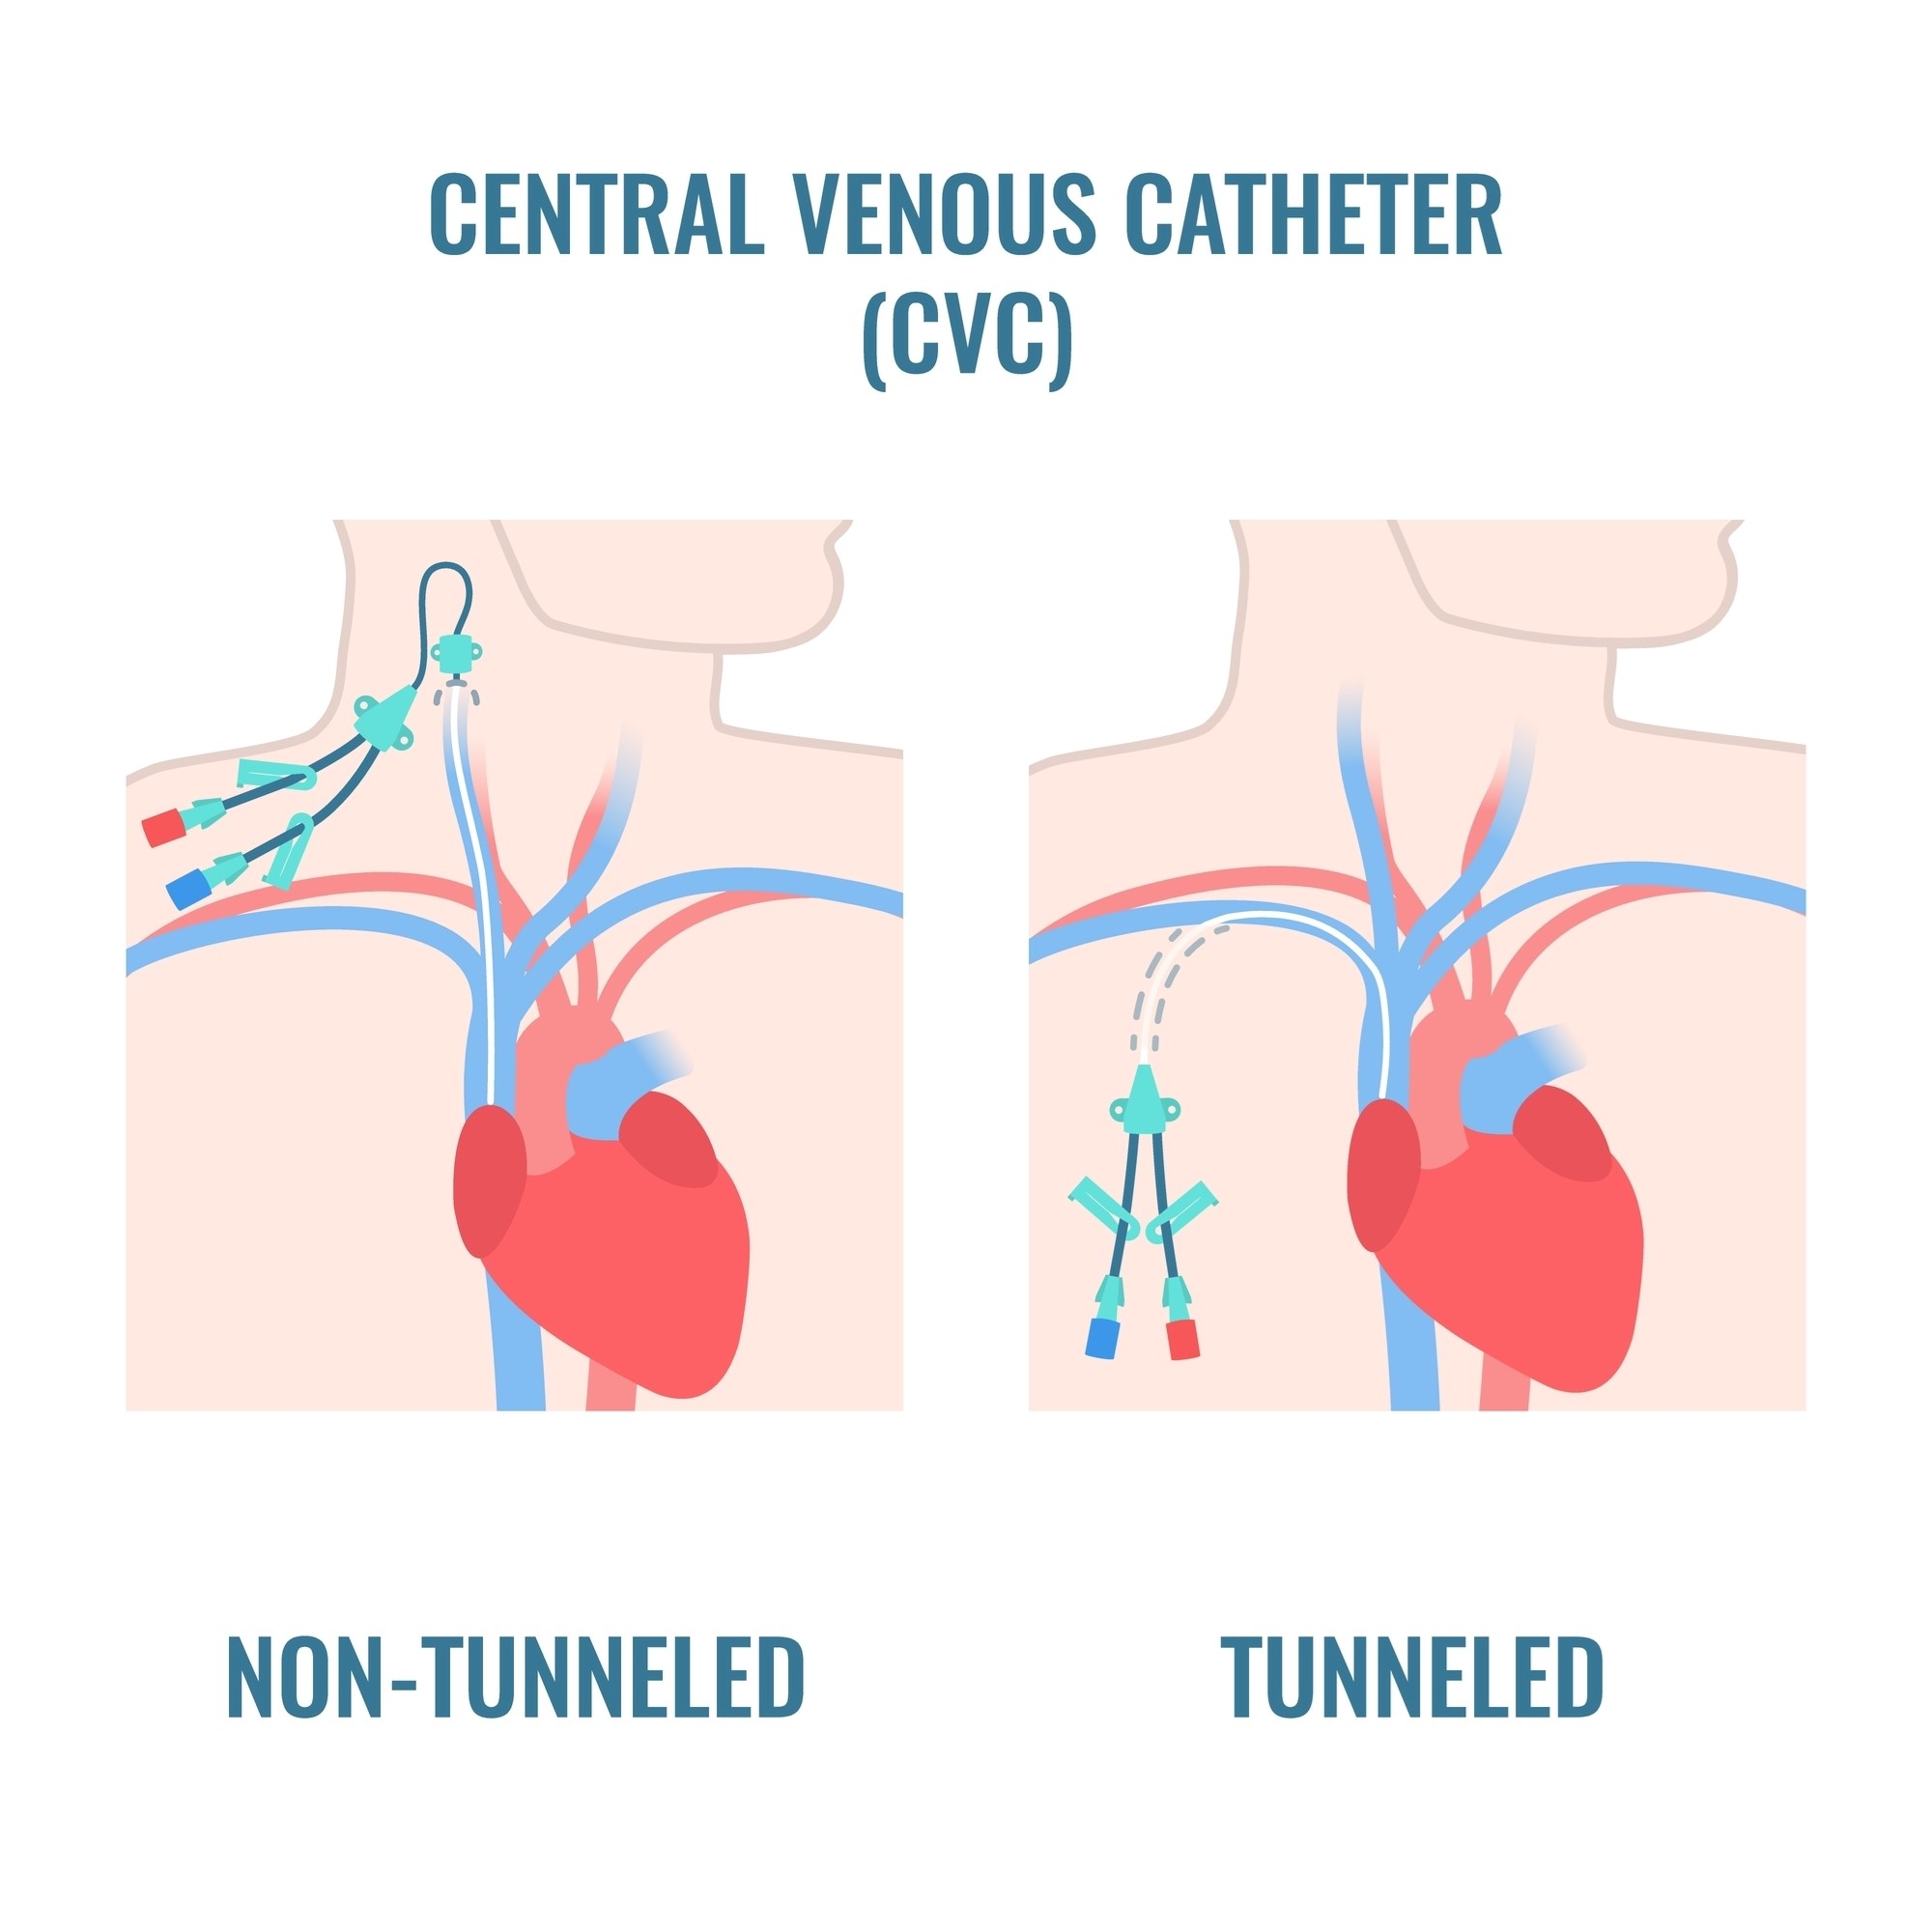
Tunneled CVCs are used for patients who require long-term access, generally for more than 30 days. Tunneled CVCs may also be ideal when a PICC line is not feasible for the patient (e.g., bilateral mastectomies with lymph node dissection). A tunneled CVC can be used for any medication infusion, including antibiotics, vesicants (e.g., chemotherapy), blood products, or extended parenteral nutrition (i.e., months or longer). The line may also be used for blood sampling, and it may have a single, double, or triple lumen. There are two main types of tunneled CVCs: small-bore (open-ended, such as Hickman® or Broviac®) and pressure-activated safety valve (PASV, closed-ended, such as Groshong®). The functionality is similar to that of non-valved and valved PICC lines. Small-bored tunneled CVCs require clamps to prevent the backflow of blood. These clamps must remain closed unless a pressure-activated safety cap is applied to the end of the line, and each lumen should be flushed daily with a heparin solution to maintain patency based on institutional policies (Nettina, 2019; Nickel et al., 2024).
The Groshong® tunneled CVC is a closed-ended system with one or more patented 3-position PASVs near the closed catheter tip (hub). The PASVs serve as the gatekeepers for infusion of fluids or medications and aspiration of blood, allowing fluids to flow in or out but closing when not in use. They restrict blood from backflowing and reduce the risk of air embolism by remaining closed when not in service. The valves also maintain catheter patency and reduce the need for heparin flushing by using clamps. This system is safer and more cost-effective than open-ended catheters due to the reduction in catheter maintenance, as they only need to be flushed once weekly with normal saline when not in use (Chopra, 2024; Flick & Winters, 2023; Nickel et al., 2024).
When aspirating from a PASV, negative pressure is created by pulling back on an attached 10 mL syringe, causing the valve to open inward and allowing specimen retrieval. Conversely, positive pressure caused by gravity, an infusion pump, or injecting with a syringe will open the valve outward and allow fluids to infuse into the catheter. Whenever the catheter luminal pressure returns to normal, the valve closes. After blood is aspirated or a medication is infused into the catheter, it must be flushed with 0.9% sodium chloride in a 10 mL syringe to clear the lumen and allow the valve to return to its normal closed position (Chopra, 2024; Flick & Winters, 2023; Nickel et al., 2024). Table 5 compares the main differences between the two types of lines.
Table 5
PASV Versus Small-Bore Tunneled CVCs
PASV (Closed-Ended) Common Brand: Groshong® | Small-Bore (Open-Ended) Common Brands: Hickman®, Broviac® |
|
|
(Chopra, 2024; Flick & Winters, 2023; Nickel et al., 2024).
Contraindications to Tunneled CVCs
Insertion of a tunneled CVC is contraindicated in patients who have active septicemia due to the risk of colonization of the device. If the patient has a tunneled CVC and develops sepsis secondary to bacteremia, the CVC should be removed. Insertion is also contraindicated in patients who have severe coagulopathy or thrombocytopenia due to the risk of hemorrhage from the target vessel. Placement should be avoided in patients who have an elevated INR (greater than 1.5) or a platelet count below 50,000/µL (less than 50 x 109/L) if possible. Non-tunneled catheter placement tends to allow easier monitoring for potential bleeding and may be a safer option for patients who have coagulopathy (Chopra, 2024; Flick & Winters, 2023; Heffner & Androes, 2023).
Pros and Cons of Tunneled CVCs
Tunneled CVCs have lower infection rates when compared to non-tunneled CVCs. Patients require fewer venipunctures than with a PIV, and the devices can remain in place for years. Tunneled CVCs place restrictions on certain activities. Patients are advised to avoid swimming and contact sports when the catheter is in place. Tunneled CVCs are often inserted and removed surgically in the surgical suite under conscious or local sedation (CDC, 2017; Nettina, 2019).
Care of Tunneled CVCs
Before a subclavian or jugular tunneled CVC can be used, an x-ray must be performed and read by a licensed provider to confirm the correct placement of the catheter. Many facilities do not confirm catheter tip placement in femoral catheters, and alternatives to radiography for tip placement confirmation include ultrasound imaging, echocardiography, or intracavitary electrocardiography. The INS recommends that an initial sterile dressing should be placed on the site following insertion. This dressing should be changed 24 hours following line insertion, every 7 days thereafter, and when visibly dirty, wet, or soiled. Once the insertion site has completely healed, usually about 21 days following insertion, the line may be left open to the air and uncovered. The site does not require routine dressings in outpatient and community settings based on EBP guidelines. When parenteral nutrition is prescribed, a dedicated lumen must be allotted and labeled for these infusions. This dedicated lumen should not be used for other medications, infusions, or therapies due to an increased risk of occlusion and infection (Flick & Winters, 2023; Heffner & Androes, 2023; Nickel et al., 2024).
As noted, valved tunneled CVC lines are considered saline-only lines. When a line is not in use, it should be flushed with 10 mL of 0.9% sodium chloride once per week. By contrast, each lumen of small-bore catheters must be flushed with a heparinized solution daily. Catheters should be aspirated to assess blood return and patency before each use. The blood return should be brisk. Patency should be checked before administering any medication or infusion, and the line should also flush easily and without resistance. Syringes smaller than 10 mL should never be used to flush any tunneled CVC. The INS recommends that a 10 mL syringe (or larger) be used to withdraw blood samples or inject anything into any tunneled CVC (Flick & Winters, 2023; Heffner & Androes, 2023; Nickel et al., 2024).
Strict handwashing is essential before handling the catheter. Clean gloves should be worn when accessing a tunneled catheter, even once it has fully healed following insertion. Clean technique must also be used while retrieving blood cultures, changing a needle-free access device, and connecting or disconnecting infusion lines. The cap on small-bore tunneled CVCs should be changed every 7 days using an aseptic technique. The patient or their caregiver can be trained to care for the site, including performing cap changes and flushes. Lines should be monitored for signs of potential infection (such as erythema, edema, pain or tenderness, drainage, fluid pocket in the subcutaneous tunnel, and induration at the exit site or over the pocket) or systemic illness (such as fever, chills, rigors, lethargy, disorientation, and confusion). A tunnel infection is an indication for removing a tunneled CVC (CDC, 2017; Flick & Winters, 2023; Heffner & Androes, 2023; Nickel et al., 2024).
Removal of Tunneled CVCs
When properly maintained and free from infection, tunneled CVCs may remain in place indefinitely. According to the INS guidelines, a licensed independent practitioner should remove a tunneled CVC as soon as it is no longer required, although the specific details outlining the removal of a tunneled CVC are subject to institutional policy. Catheter removal is a surgical procedure, and a sterile technique must be maintained throughout the process to reduce infection risk. It is essential to ensure the complete removal of the subcutaneous cuff. Incomplete removal of the cuff and retention of any products place the patient at risk for subcutaneous abscess and delayed wound healing. INS guidelines recommend the use of fluoroscopy and ultrasound guidance to verify cuff location and facilitate surgical removal. As with a PICC line, the patient should be placed supine or in the Trendelenburg position with the entry site below the heart to optimize the CVP. Conscious patients should exhale or perform a Valsalva maneuver during removal. Manual pressure should be applied for 3 to 10 minutes or until bleeding stops, and a temporary sterile pressure dressing should be applied to the site. The patient should remain supine for 30 minutes following removal (CDC, 2017; Heffner & Androes, 2023; McCarthy et al., 2016; Nickel et al., 2024).
Non-Tunneled CVCs
Non-tunneled CVCs are small-bore catheters inserted percutaneously (i.e., can be done at the bedside) through the subclavian vein of the upper chest or the neck's jugular veins, as demonstrated in Figure 9 (left). The catheter exits the skin in the vicinity of the venous cannulation site, which may be the jugular, subclavian, or femoral vein. Non-tunneled CVCs vary in length from 15 to 25 cm and can have a single, double, triple, or quadruple lumen. Catheter placement is performed using sterile ANTT and the MST as previously described. The jugular site is associated with fewer mechanical complications during insertion, but the risk of infection and thrombosis increases with dwell time. A lower internal jugular insertion site is associated with improved securement and is recommended in pediatrics and neonates due to reduced risk of infection and thrombosis. The femoral vein is more easily accessed with ultrasound but is associated with a higher infection risk. Finally, the axilla-subclavian approach is associated with a reduced risk of symptomatic DVT and infection but an increased risk of mechanical complications during insertion (e.g., pneumothorax). This site should be avoided in patients who have chronic kidney disease (CKD; Chopra, 2022; Nickel et al., 2024).
Non-tunneled CVCs are intended for short-term and temporary use, usually 5 to 10 days. They are most commonly used in emergent, trauma, and critical care settings in patients who have limited peripheral access. They are not appropriate for home care or ambulatory clinic settings. The line can be used for continuous infusion therapy of medications, parenteral nutrition, vesicants (i.e., chemotherapy), high-dose potassium or other electrolyte replacement, blood products, antibiotics, and other intermittent treatments. Non-tunneled CVCs also allow for hemodynamic monitoring of patients who are critically ill via CVP. These catheters tolerate large-volume infusions if needed. Non-tunneled CVCs may be secured to prevent migration or dislodgment with an ISD or using sutures and TA. Subclavian or jugular catheters should terminate in the SVC, and a chest x-ray must confirm proper placement before use. Many facilities do not ensure catheter tip placement in femoral catheters, and alternatives to radiography for tip placement confirmation include ultrasound imaging, echocardiography, or intracavitary electrocardiography (Elisha et al., 2023; Heffner & Androes, 2023; Nickel et al., 2024).
Contraindications to Non-Tunneled CVCs
There are few absolute contraindications to non-tunneled CVCs, and recommendations are based on the targeted insertion site and patient factors. Coagulopathies merit careful consideration. Placement of a non-tunneled CVC is generally avoided for patients who have an INR greater than 2 or a platelet count below 50,000/µL (less than 50 x 109/L). However, values outside of these ranges are not absolute contraindications. Emergency access may justify non-tunneled catheter placement for clinically unstable or coagulopathic patients. The safe use of non-tunneled catheters in emergent circumstances despite coagulopathy has been documented. The subclavian site should be avoided for these patients due to the inability to compress the site easily. The use of ultrasound guidance by an experienced clinician reduces the number of attempts and complication rates. If time allows, the clinician may consider the administration of platelets or fresh frozen plasma (FFP) to patients who have a platelet count below 20,000/µL (less than 20 x 109/L) before CVC placement (Heffner, 2023; Heffner & Androes, 2023; Lee & Ramaswamy, 2018).
Pros and Cons of Non-Tunneled CVCs
Advantages of non-tunneled CVCs include the ability for bedside insertion under ultrasound guidance. Non-tunneled CVCs are designed for temporary, short-term use and can be placed in the setting of systemic infection. Non-tunneled CVCs cause the majority of CRBSIs. Therefore, they should be removed as soon as feasible to reduce infection risk, morbidity, and associated mortality. The use of multi-lumen catheters increases the risk of thrombosis, infiltration, and other complications. In addition, multi-lumen catheters cannot infuse fluids or blood products as quickly as single-lumen catheters. Non-tunneled CVCs are ideal for emergent situations because they can be inserted quickly. Urgent or emergent indications can include IV access for blood sampling and fluid, blood, or medication administration; administration of medications at higher risk for thrombophlebitis or extravasation (i.e., vasopressors); hemodynamic monitoring; and acute high-volume blood exchange for hemodialysis and plasmapheresis (CDC, 2017; Chopra, 2022; Heffner, 2023; Lee & Ramaswamy, 2018). Table 4 outlines the clinical considerations associated with various CVC insertion sites.
Care of Non-Tunneled CVCs
The CDC and INS guidelines recommend chlorhexidine-impregnated dressings for short-term, non-tunneled CVCs. Dressings on short-term CVCs should be changed every 7 days (if transparent) or 2 days (if gauze). Catheters should be assessed for continued need daily, as prompt removal is strongly advised when the catheter is no longer necessary In order to reduce potential complications. The risks of infection and thrombosis rise with increased dwell time (CDC, 2017; Heffner & Androes, 2023; Nickel et al., 2024). INS standards advise that non-tunneled CVCs should be monitored closely for complications and the presence of any of the following signs and symptoms, which must be reported and documented immediately:
- Pain or tenderness in unusual locations of the neck, chest, or upper abdomen
- Erythema or blanching at the insertion site
- Changes in skin temperature at or surrounding the insertion site
- Edema
- Sudden or unusual respiratory and neurological changes
- Leaking of fluid or purulent drainage from the puncture site
- Resistance when flushing
- Absence of brisk blood return
- Changes in catheter function associated with arm position changes
- Signs of systemic illness, such as elevated body temperature, chills, or rigors (Heffner & Androes, 2023; Nickel et al., 2024)
Removal of Non-Tunneled CVCs
Non-tunneled catheters should be removed per organizational policies. The line should never be forcibly removed if met with resistance, as catheter fracture and embolization may occur. Immediately after removing a non-tunneled line, the catheter tip should be examined to ensure it was removed fully intact. As previously described for other CVCs, the patient should be supine or in the Trendelenburg position to prevent air entrainment and should be instructed to exhale or do a Valsalva maneuver during removal. Manual pressure should be applied to the site for 3 to 10 minutes following removal or until bleeding stops, and a temporary sterile pressure dressing should be applied. The patient should remain supine for 30 minutes following removal (Elisha et al., 2023; Heffner & Androes, 2023; McCarthy et al., 2016; Nickel et al., 2024).
Peripherally Inserted Central Catheters
First described by Hoshal in 1975, a PICC is a CVC inserted in the basilic, cephalic brachial, or median cubital veins in the upper arm and terminates in the lower segment of the SVC. A PICC is indicated for long-term access. The dwell time varies from weeks to months, but PICCs can remain in place for more than a year with proper care. PICCs are usually chosen for patients requiring IV therapy that ranges from a week to a year. INS guidelines recommend placing a PICC line early during treatment before veins are damaged from multiple venipunctures and infusions. Nearly all infusion therapies and medications can be administered through a PICC, and the line may also be used for laboratory blood draws (Gonzalez & Cassaro, 2023; Nickel et al., 2024). Herc and colleagues (2017) performed a retrospective model-based study to establish CLABSI risk factors, estimating an individual’s risk before PICC placement. Their proposed model performed well and could inform patient selection and surveillance practices for high-risk groups, although it should first be validated for clinical practice. Their model, the Michigan PICC-CLABSI (MPC) score, assigns points for the presence of:
- Hematological cancer (3 points)
- A CLABSI in the last 3 months (2 points)
- Placement of a multi-lumen PICC (2 points)
- Ongoing chemotherapy for a solid tumor/cancer (2 points)
- Receipt of parenteral nutrition (1 point)
- Another CVC at the time of PICC placement (1 point; Herc et al., 2017)
There are two basic types of PICC lines: valved and non-valved (open-ended). Valved PICCs are more common and have a PASV located at the external end of the catheter, which is called the hub. The PASV is a slit at the end of the tube that opens when blood is withdrawn or when fluid is infused and self-seals when the line is not in use. The PASV prevents the backflow of blood into the catheter and negates the need for clamps. Valved PICCs are considered saline-only lines, as they do not require heparin flushing to ensure patency. Open-ended PICC lines, like small-bore CVCs, do not have a valve or a slit in the tubing. The end of the PICC tubing remains open and requires a clamp to close. The line should be clamped when not in use to prevent blood from backing into the tubing. Figure 10 depicts a valved PICC with a PASV hub on the end of the catheter (yellow circle). Figure 11 is a photograph of an open-ended PICC with clamps. PICC sizes range from two to six French (2F to 6F), with a catheter length of 40 to 60 cm. The catheter is measured and cut to the patient's size at the time of insertion. PICC lines are available with single, double, and triple lumens. However, multi-lumen PICC lines have twice the complication rate as single-lumen catheters. Therefore, as with all IV insertions, INS guidelines recommend inserting the fewest lumens and the smallest lumen required for the prescribed therapy (Gonzalez & Cassaro, 2023; Nickel et al., 2024; Paje et al., 2019).
Figure 10
Valved PICC Line
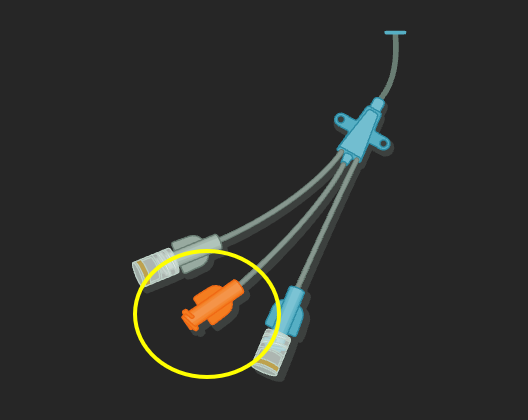
Figure 11
Non-Valved PICC Line
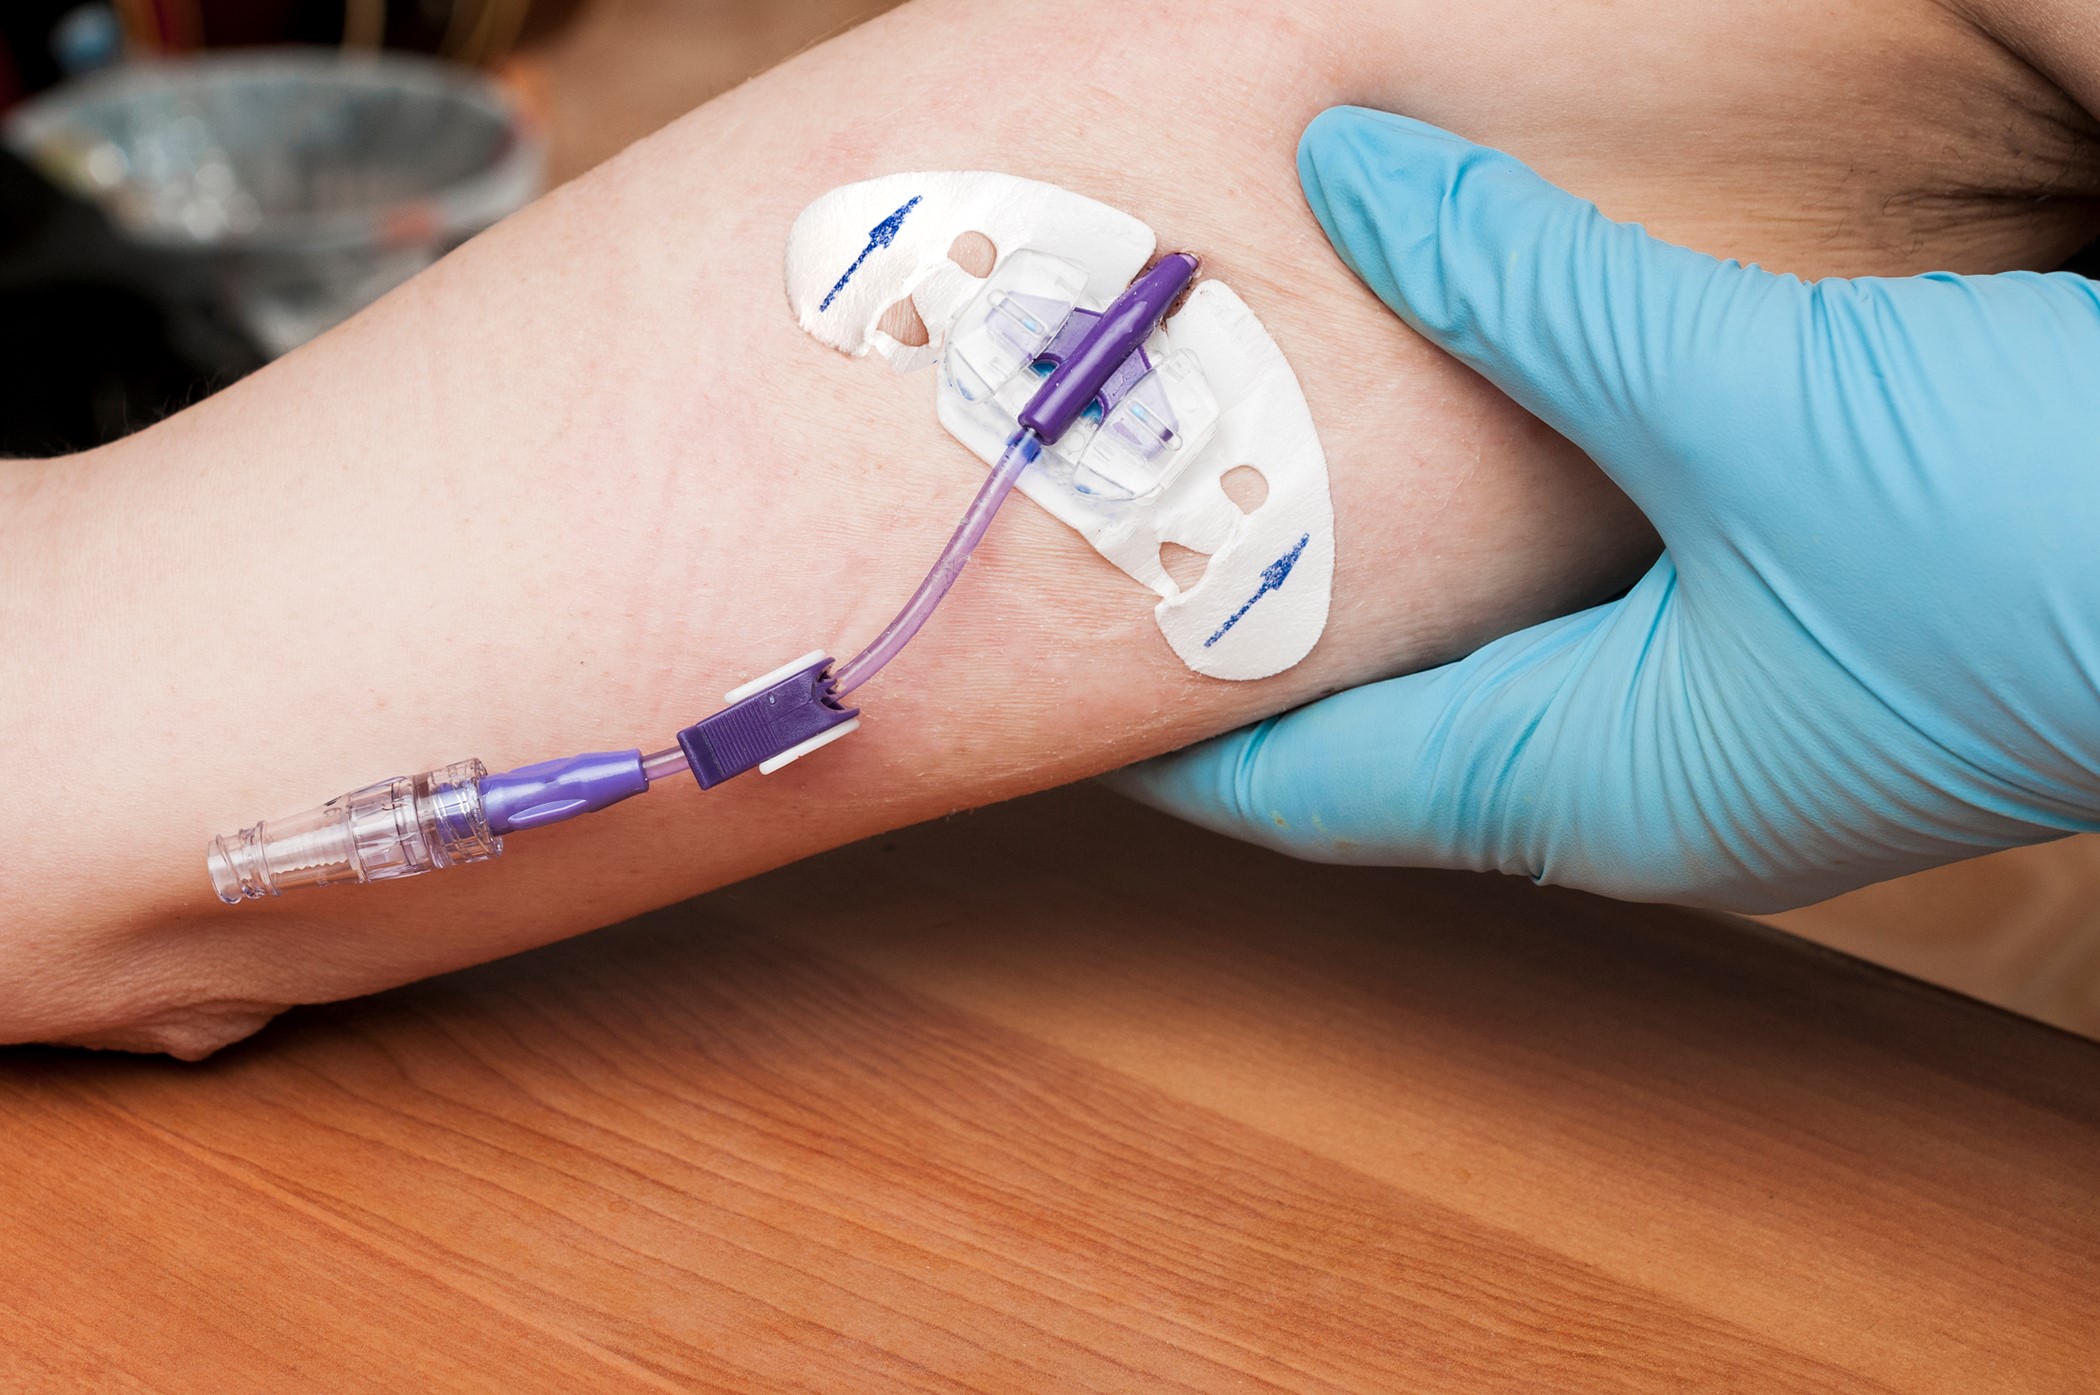
Pros and Cons of PICC Lines
Anesthesia is not required to insert or remove PICC lines, making insertion less complicated, less expensive, and less risky for patients. PICC lines are inserted by specially trained PICC-certified nurses, APRNs, or physicians at the bedside. The catheter size of PICC lines is typically smaller, and the insertion site (i.e., the upper arm) eliminates the risk of pneumothorax or injury to the vessels in the neck that is associated with other CVCs. PICC lines reduce the need for multiple venipuncture and IV sticks, thereby enhancing patient satisfaction compared with PIVs. PICC lines contribute to decreased length of hospital stay, as they allow for IV therapy in non-acute settings, such as home care, skilled nursing facilities, and hospice (Caprara, 2017; Gonzalez & Cassaro, 2023; Heffner & Androes, 2023; Montanarella et al., 2024).
When properly cared for, PICC lines may have lower infection rates than other CVCs, although recent studies indicate similar infection rates. There remains a lack of large randomized controlled trials (RCTs) comparing PICC lines with other CVCs. The cumulative incidence of CRBSIs for PICC lines is 1.1 per 1,000 PICC days, with slightly higher rates in the inpatient setting, 2.1 per 1,000 PICC days. The infection rate is also high when the PICC is placed in the antecubital fossa. Most potential complications associated with PICC lines mirror those discussed above for CVCs in general, such as malposition, bleeding at the insertion site, AVF, arrhythmia, and nerve damage. Nerve damage typically causes radiating electrical pain upon insertion or other nerve symptoms, such as paresthesia, tingling, or numbness. Specifically, PICC lines have led to reported cases of Horner's syndrome, which is inflammation of the cervical sympathetic nerves that results in asymmetrical eyelid drooping, pupillary constriction, and a lack of facial sweating (Caprara, 2017; Gonzalez & Cassaro, 2023; Heffner & Androes, 2023; Montanarella et al., 2024).
A significant complication associated with PICC lines is an increased risk of venous thromboembolism, particularly DVT. PICC lines carry a substantial risk of upper-extremity DVTs compared to other central lines and are also associated with an increased risk of central vein stenosis. Careful consideration should be given before inserting a PICC line in cancer patients due to the hypercoagulability that often accompanies cancer or in critically ill patients due to the increased risk of CLABSI in hospitalized patients (Chopra, 2022; Nickel et al., 2024).
National guidelines strongly recommend that PICC line insertion should be avoided for patients who have advanced CKD and may require hemodialysis in the future. An autogenous AVF is the most common VAD used for long-term hemodialysis. Research demonstrates higher rates of AVF failure in veins into which PICC lines or other types of indwelling vascular catheters have been inserted. PICC lines should not be placed in the veins of an upper extremity on the same side as a previous breast surgery with axillary lymph node dissection, in the setting of lymphedema, or with a known DVT due to heightened risks for infection and thrombotic complications. Additional contraindications include the presence of a hemodialysis catheter (e.g., AVF), current or recent infection (e.g., cellulitis), fracture, burn injury, or neuromuscular dysfunction related to a central nervous system injury (e.g., hemiparesis or hemiplegia). These contraindications apply to PIVs and PICC lines. PICC lines are contraindicated in an extremity affected by a newly implanted pacemaker or defibrillator (Leib et al., 2019; Nettina, 2019; Nickel et al., 2024; Paje et al., 2019).
Clinically, PICC lines pose particular challenges related to catheter occlusion. A catheter placement slightly distal to or at the antecubital fossa may result in occlusion of the line and discontinuation of the infusion therapy. If the patient’s arm does not remain straight, flow within the catheter may be obstructed. Movement by the patient can necessitate constant repositioning and clearing of the line, resulting in therapy delays and resource loss due to the vigilance required (Gonzalez & Cassaro, 2023; Montanarella et al., 2024).
PICC Placement
PICC line insertion is a sterile procedure that requires formal training. Most PICC lines are inserted by vascular teams led by specially trained PICC-certified nurses. PICC lines are inserted at the bedside or in interventional radiology under fluoroscopy guidance. The preferred site for PICC insertion is the middle third of the upper arm. The right basilic vein is the largest, straightest, and, therefore, the most frequently chosen. It also travels in a more superficial position, making cannulation easier. In addition, it has fewer valves, better hemodilution, and a shallower angle of insertion. The cephalic vein is smaller than the basilic, may be tortuous in some patients, and tends to have a sharper insertion angle. The brachial vein is large yet runs close to the brachial artery and median nerve and deeper than the basilic. While typically prominent in the antecubital fossa, the median cubital vein is prone to mechanical phlebitis and occlusion due to bending at the elbow. For pediatric and neonatal patients, the axillary, temporal, posterior auricular, popliteal, and saphenous veins may also be considered. If available, an ultrasound should be used to evaluate the access site. Dynamic (real-time) ultrasound guidance can guide venipuncture, direct tip navigation, and scan for complications following cannulation. This guidance is especially crucial when directing the catheter into the brachiocephalic vein and avoiding the brachial artery and median nerve (Gonzalez & Cassaro, 2023; Montanarella et al., 2024; Nickel et al., 2024; Sabado & Mousa, 2023).
Materials should be gathered, and informed consent should be obtained, as with other CVCs. The patient's upper arm circumference should also be measured and documented to assess possible swelling later. The measurement should be 10 cm above the antecubital fossa. The patient should be well hydrated, as with other venous access devices, to enhance vein location. A tourniquet is applied, and the insertion site is marked. The length of the catheter required should be measured from the insertion site to the mid-right mid-clavicular line and down to the third intercostal space. Hand hygiene is performed, and the upper arm is cleansed with chlorhexidine or alcohol. PPE should be donned (mask, face shield, hair cover, gown, and sterile gloves), and the patient should be draped. The insertion site can be anesthetized as described previously, and the vein should be relocated using ultrasound. The MST is most often used for the placement of a PICC catheter. The needle is used to access the vein until blood is aspirated, the guidewire is placed through the needle, and the needle is then removed. Guidewire placement should be confirmed with an ultrasound. A scalpel is used to enlarge the insertion site to accommodate the dilator and introducer, which enters via the guidewire. The guidewire and dilator are removed, leaving only the introducer in place. The catheter is inserted through the introducer to the predetermined length, and then the introducer is removed (Gonzalez & Cassaro, 2023; Montanarella et al., 2024; Nickel et al., 2024; Sabado & Mousa, 2023).
According to the INS guidelines, PICC lines should be stabilized using a securement device (SASS, ISD, TA, or ASD) similar to tunneled CVCs. Sutures increase the risk of infection and are associated with needlestick injuries. While a single RCT and several small observational studies have indicated that SASS may be more effective than ASD, additional studies are needed to differentiate the risks and benefits between the securement methods. The National Institute for Clinical Excellence (NICE) in the UK also recommends using SASS for patient safety and cost/benefit reasons, especially with catheters expected to remain for longer than 15 days. A chest x-ray is required to confirm the catheter tip placement in the lower segment of the SVC before the PICC line is used. Clinicians should avoid placing the catheter tip in veins distal to the SVC due to the increased risk of thrombosis (Gonzalez & Cassaro, 2023; Montanarella et al., 2024; Nickel et al., 2024; Sabado & Mousa, 2023).
Care of PICC Lines
An aseptic technique is required at each encounter, and all clinicians who utilize a PICC line should be appropriately trained and competent in its use. Since the PICC is placed within a large vessel, blood return should be brisk. The PICC line requires regular flushing with a 10 mL syringe, the minimum size syringe that can safely be used with this device. Smaller syringes may cause excessive pressure within the device, leading to catheter fracture. The line should be flushed at least daily (most institutional protocols call for every 12 hours) with 10 mL of 0.9% sodium chloride In order to maintain patency and prevent the line from clotting when not in use. It must also be flushed following any infusion, bolus injection, or blood withdrawal to clear any residue. Flushing helps reduce the buildup of fibrin and platelets. Blood present in the catheter lumen contributes to the risk of infection. A transparent dressing should cover the PICC insertion site and the hub at all times to ensure infection control. Dressing changes are recommended every 7 days or if the dressing becomes soiled, wet, loose, or dirty (Nettina, 2019). Additionally, PICC lines should be wrapped or secured before bathing and showering to preserve dressing integrity and reduce the infection risk. Extension tubing should remain clamped and secured to the patient's arm. A tubular or sleeve gauze or mesh is recommended for tubing securement instead of a rolled bandage (Nettina, 2019; Nickel et al., 2024)
As noted earlier, open-ended PICC lines should remain clamped when the catheter is not in use. The patient's arm circumference should be measured before the PICC insertion and when clinically indicated to assess for the presence of edema, which could indicate a DVT. Patients should be counseled to avoid heavy lifting, which can lead to catheter dislodgement or lumen occlusion. PICC lines should routinely be evaluated for infiltration and extravasation, which require immediate intervention to prevent morbidity. Signs of infiltration or extravasation include leakage at the insertion site, firmness, blistering, or surrounding edema (Nettina, 2019; Nickel et al., 2024)
PICC Line Removal
The removal of any central line, including a PICC, should be considered in the following circumstances:
- Sepsis
- Suppurative (septic) thrombophlebitis
- Endocarditis
- Bloodstream infection that continues despite 48 to 72 hours of adequate antimicrobial coverage
- Infection with a resistant or challenging-to-eradicate pathogen (Nickel et al., 2024)
PICC lines should be promptly removed when they are no longer essential. The patient should be placed in a supine or Trendelenburg position for removal unless contraindicated. This position minimizes the risk of air embolism, which is a rare complication of PICC line removal. The occlusive dressing and securement device should be removed while the end of the catheter is stabilized. Next, the catheter should be withdrawn with gentle yet firm pressure while the patient exhales, hums, or performs a Valsalva maneuver. If resistance is encountered, a more experienced professional or a physician should be contacted for assistance. The catheter should never be forcibly removed if met with resistance, as there is a potential for catheter fracture and embolization. A catheter fragment retained within the vein may require endovascular removal to avoid infection, thrombosis, and migration. Once removed, the catheter tip should be examined to ensure it is fully intact, and documentation should indicate that the tip of the catheter was observed upon removal. An occlusive sterile dressing with antibiotic ointment should be applied and firmly held with pressure on the site for a minimum of 2 minutes or until bleeding subsides. The site should be monitored for 48 hours to detect any signs of post-infusion phlebitis, bleeding, or infection. If the patient is being discharged or if the access line is being removed in an outpatient setting, the patient and any available caregivers should receive written instructions regarding monitoring for infectious signs and symptoms (erythema, edema, warmth, increased bleeding, or purulent drainage) and whom to contact if these occur (CDC, 2019[CT3] ; McCarthy et al., 2016; Nickel et al., 2024).
Implantable VADs (Ports)
An implantable port is a central VAD that Is surgically placed (typically in an interventional suite or surgical suite) into a subcutaneous pocket of the anterior chest wall, about 2.5 cm (1 inch) beneath the collarbone (see Figure 12). The device may also be implanted in the abdomen or upper arm, but these sites are less commonly used. This device is referred to as a port-a-cath or mediport and is inserted under local anesthesia with or without IV sedation by a surgeon or an interventional radiologist. The port consists of a thin, flexible catheter that is attached to a reservoir. The catheter is threaded into the central venous system via the subclavian or jugular vein. The tip of the catheter resides within the SVC. The reservoir can be made of plastic, stainless steel, or titanium and is about the size of a quarter. The port is covered with a self-sealing silicone septum that can withstand multiple needle punctures. Ports have a single or double lumen, and they may also be power-injectable to withstand high-speed injections (Craven et al., 2021; Lippincott Williams & Wilkins, 2022).
Accessing the port requires a specialized needle called a non-coring (Huber) needle. The Huber needle is inserted perpendicular to the reservoir (see Figure 13). Since the device is implanted below the skin, it is palpated to identify the placement of the Huber needle. Accessing the port with a needle is required to administer fluids and medications or to perform blood sampling. Ports are used for long-term infusion therapy and are associated with a low risk of infection. Aside from tunneled CVCs, implantable ports are the most common CVCs chosen for chemotherapy administration, including continuous vesicant administration. An implanted port is similar to a tunneled catheter, except that the port is not visible due to its placement beneath the subcutaneous tissue. Ports do not require external CVC maintenance care or impede daily activities, such as swimming and contact sports, when not accessed (CDC, 2019[CT4] ; Chopra, 2024; Craven et al., 2021; Lippincott Williams & Wilkins, 2022).
Figure 12
Venous Access Port
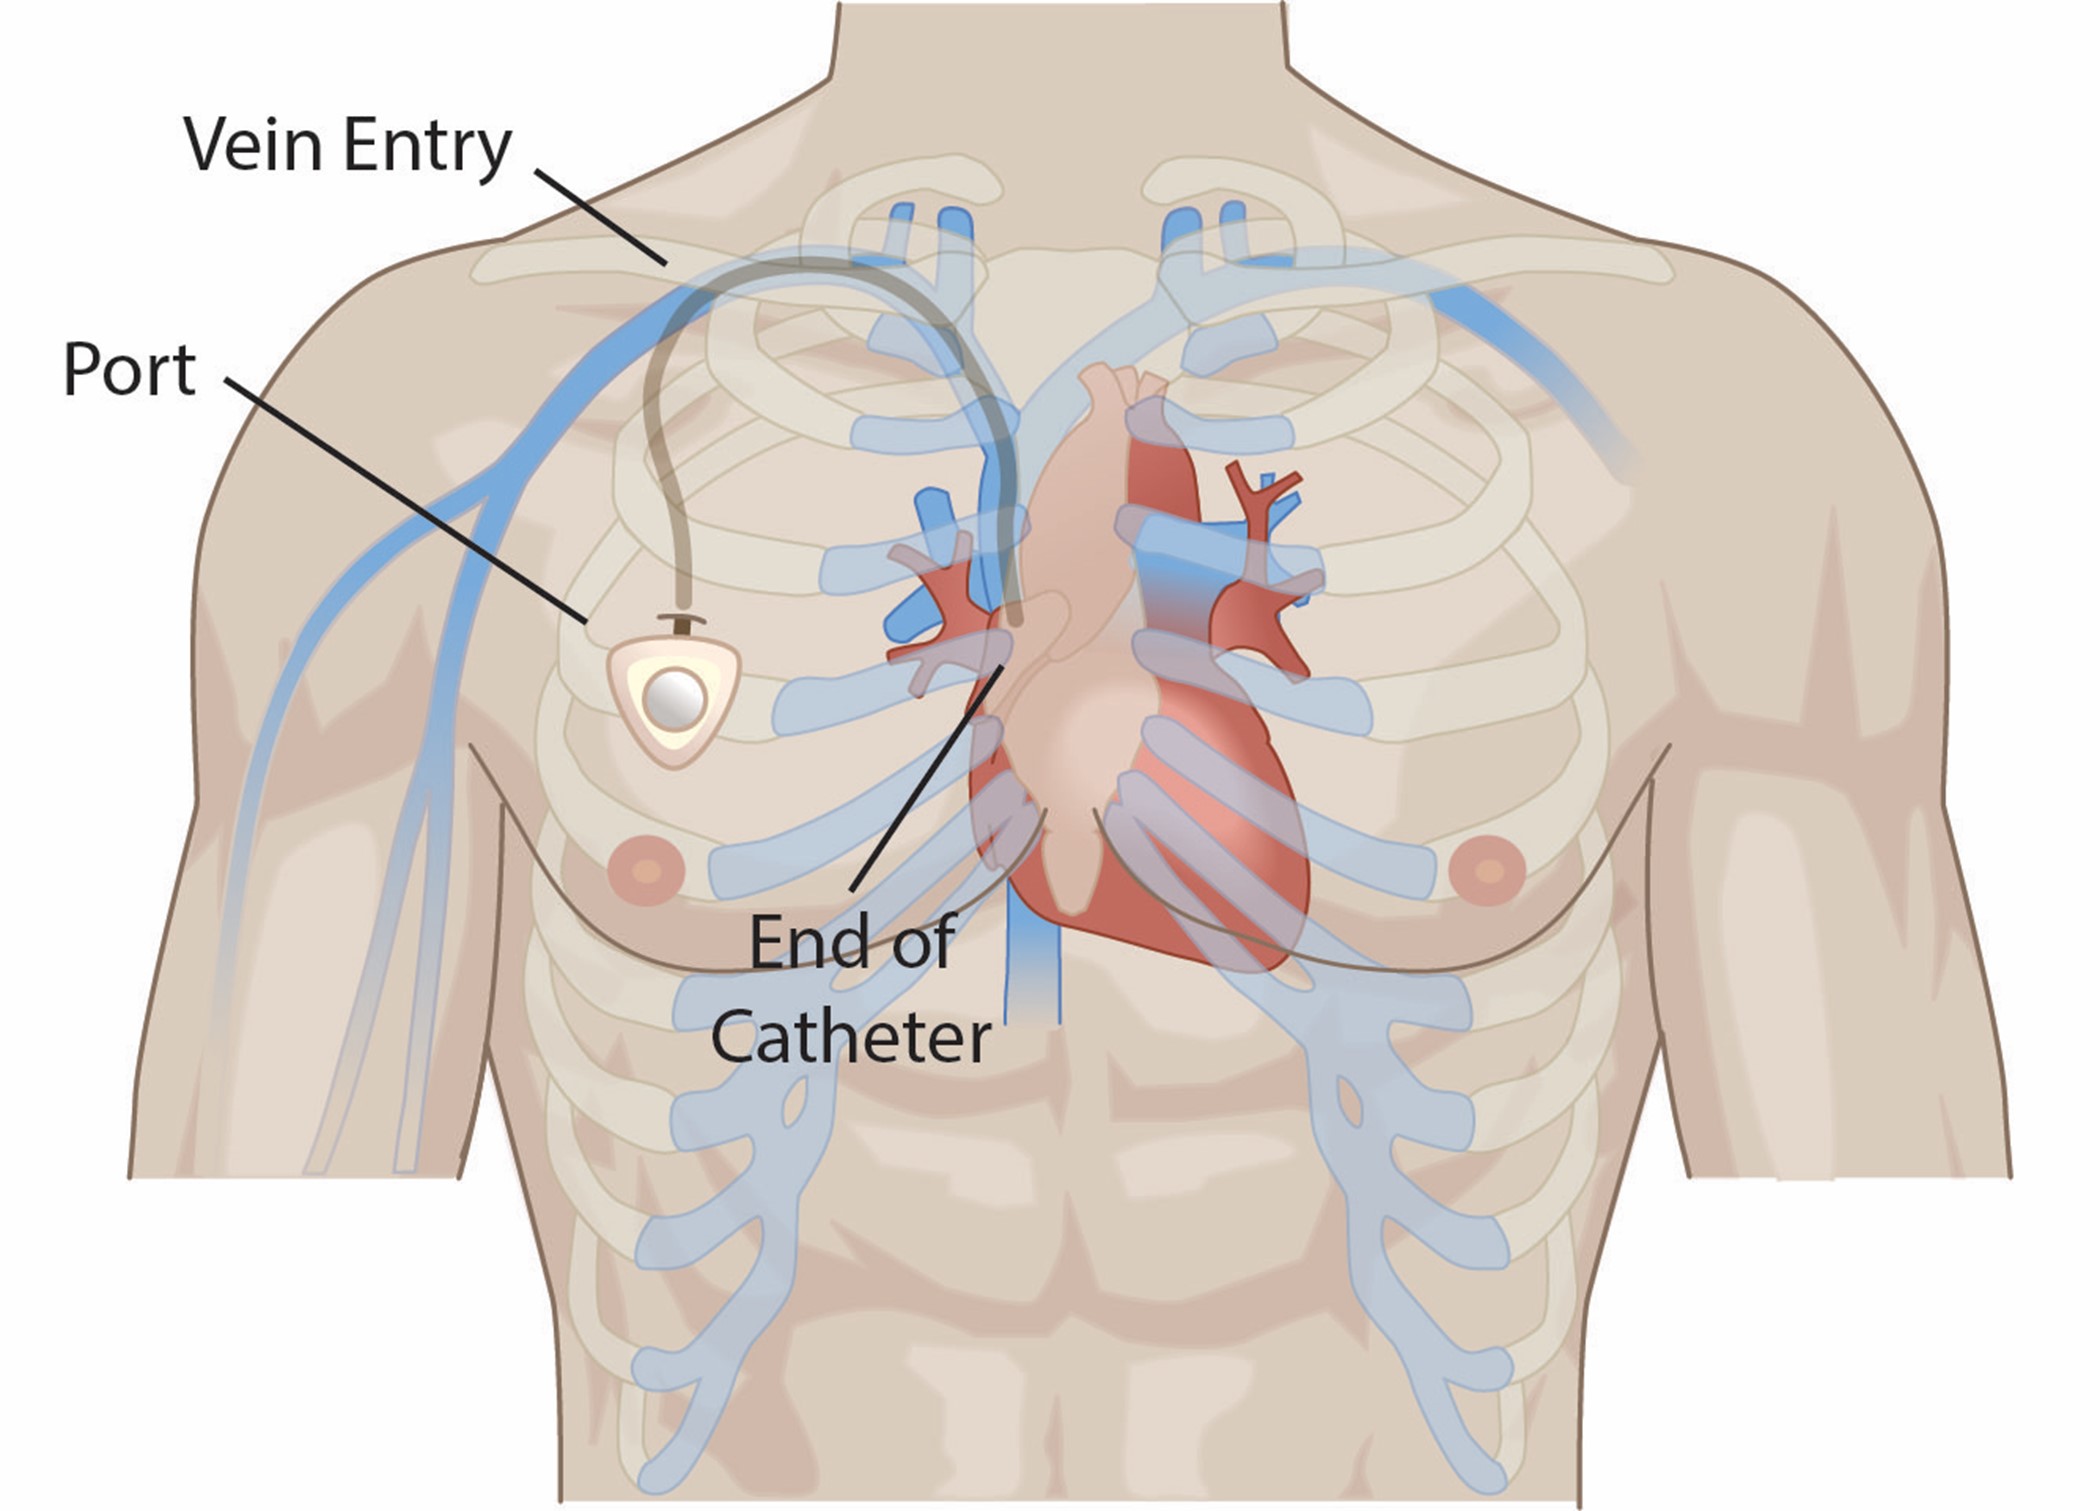
Figure 13
Needle Access of Implantable Port
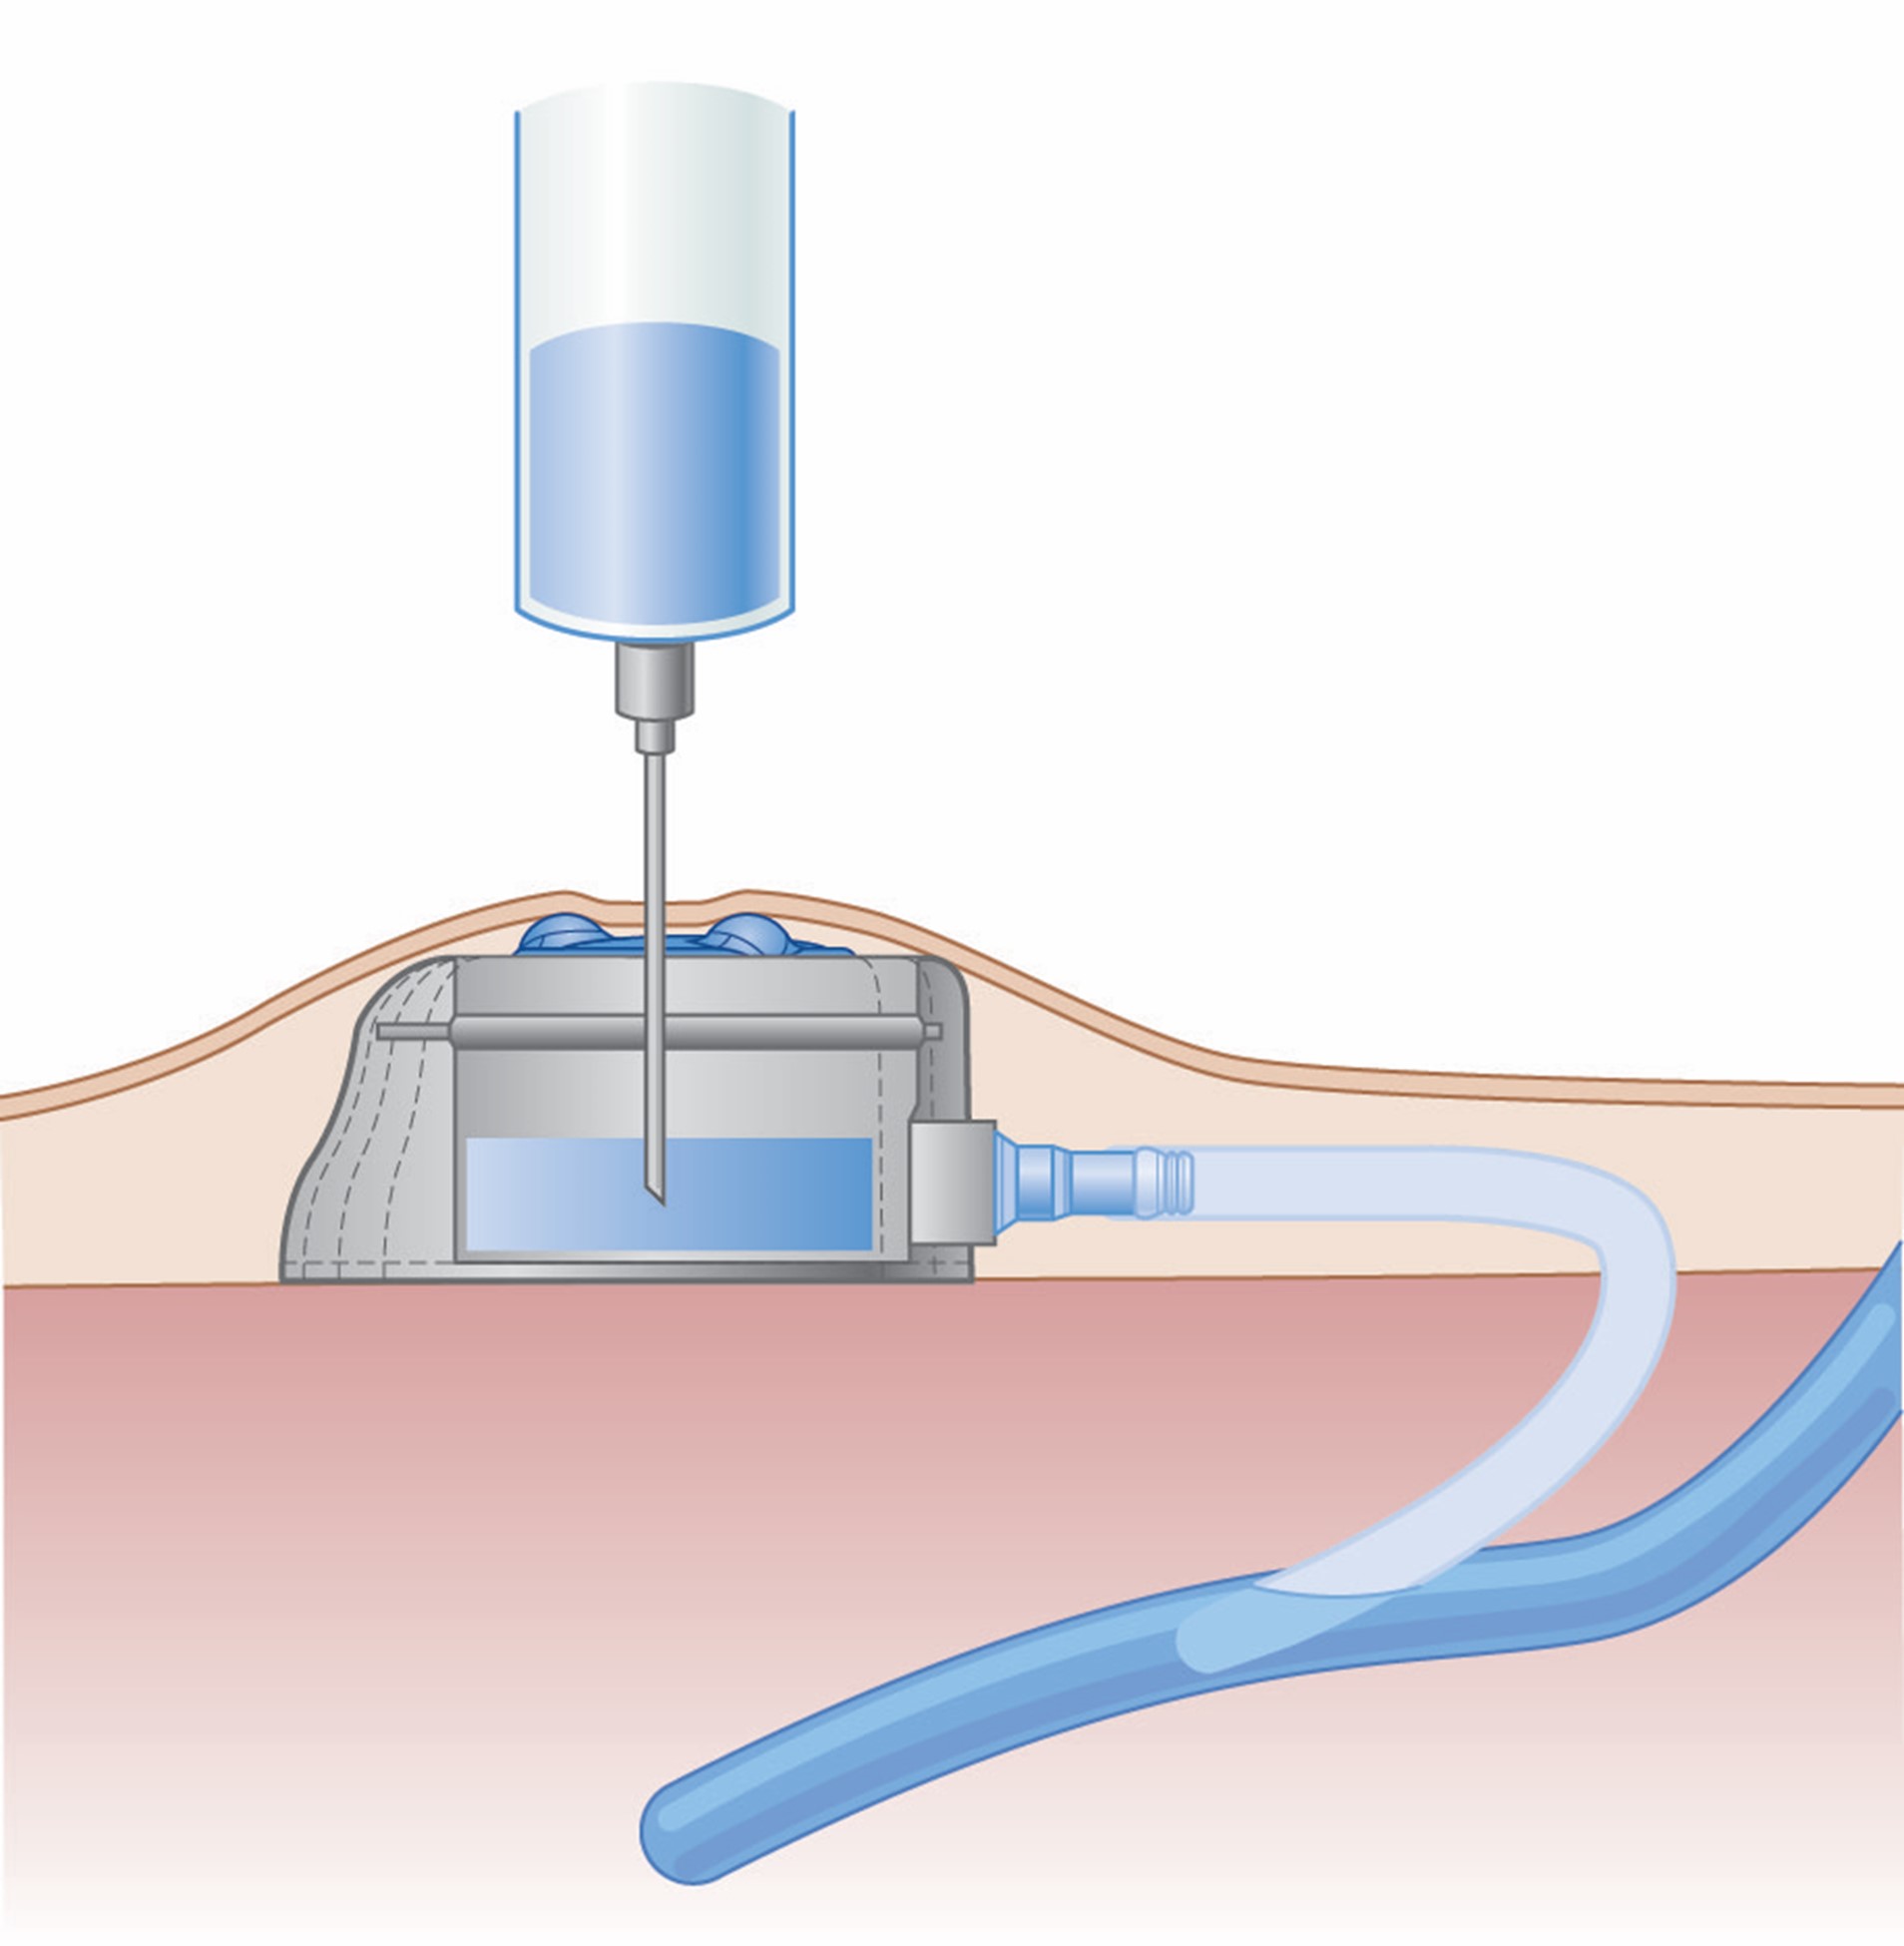
Contraindications to Implantable Ports
Contraindications to the insertion of implantable VADs include bacteremia (i.e., positive blood cultures) and clinical sepsis. Port insertion is also contraindicated in severe uncorrected coagulopathies, such as increased bleeding time and severe thrombocytopenia. Relative contraindications may include burns or trauma at the intended site. INS guidelines recommend the upper extremity as a potential alternative site for patients in whom chest ports cannot be implanted (Chopra, 2024; Nickel et al., 2024).
Pros and Cons of Implantable Ports
There are several benefits to implantable ports, particularly when the patient's peripheral veins have been damaged due to recurrent needlesticks and IV placement. Ports can eliminate the need for multiple needle sticks, reduce discomfort and fear for patients who require long-term therapies, and ensure adequate vascular access for necessary treatments. Since ports are hidden beneath the skin, they are considered the most cosmetically appealing central lines. Importantly, when used intermittently with proper aseptic technique during needle access, ports have a lower incidence of CLABSI than other chest-accessed central lines. However, continuous port access is associated with infection rates comparable to other long-term CVCs. In addition, implantable ports require less routine catheter care than other devices, such as PICC lines. Furthermore, ports minimally restrict patient activity, as patients can bathe, shower, and swim when the port is not accessed (CDC, 2019[CT5] ; Chopra, 2024; Craven et al., 2021; Lippincott Williams & Wilkins, 2022; Nickel et al., 2024).
Some disadvantages of implantable ports include the port insertion process, which requires a minor surgical procedure in the surgical suite or interventional radiology. Medication delivery requires needle access, which can be uncomfortable or stressful for the patient. The most common complications associated with implantable ports include infiltration secondary to improper insertion, dislodgment of the needle, occlusion, thrombus, infection, catheter fracture, and catheter migration. Abscess formation around an implantable port is an indication for removal. Additionally, institutional protocols may prohibit the access of devices that have not been accessed for an extended period due to the increased risk of dislodging a clot into the vasculature (Chopra, 2024; Craven et al., 2021; Lippincott Williams & Wilkins, 2022; Nickel et al., 2024).
Placement of Implantable Ports
Implantable ports are inserted using fluoroscopic guidance—the initial steps in the process mirror those described above for other CVCs. After guidewire placement, the intended subcutaneous pocket area is anesthetized and then cauterized to the fascia level. The patency and function of the port hub should be assessed before implantation by flushing with sterile saline. The port is placed into the pocket, and its size/position is adjusted as needed. The catheter is then tunneled from the pocket to the guidewire exit site if needed (e.g., jugular vein access), avoiding any acute angulation. As with tunneled catheters, the tissue dilator/sheath combination is inserted over the guidewire using fluoroscopic guidance. The tissue dilator is then removed, the catheter is advanced through the sheath, and the sheath is peeled away. The catheter tip position should be assessed and adjusted as needed. The catheter should be trimmed if required and attached to the port hub. The port is then placed into the pocket and sutured with three fixation points into the surrounding fascia. The subcutaneous and skin tissue is sutured closed. The port should then be accessed, aspirated, and irrigated to confirm proper functioning. A sterile dressing should then be applied. The INS standards recommend chlorhexidine-impregnated dressings for patients over 18 who have implanted ports (Heffner & Androes, 2023; Nickel et al., 2024).
Care of Implantable Ports
Ports can safely remain in place for months to years, but they require routine care so that they do not get blocked or clogged. While implantable ports may be used immediately following placement, HCPs must first ensure that catheter tip placement has been confirmed radiographically. This confirmation is generally attained at the time of port insertion. Accessing the port is a sterile procedure and requires an aseptic technique. Ports that are power-injectable (i.e., can be used for computed tomography [CT] contrast injection) require an access needle equipped for power injection to ensure that the tubing and connections do not rupture or separate under the infusion pressure (Craven et al., 2021; Lippincott Williams & Wilkins, 2022). Adherence to aseptic technique includes protocols governed by national guidelines and institutional policy. According to INS guidelines, accessing an implanted port requires adherence to the following steps (Nickel et al., 2024):
- Hand hygiene should be performed before examining or touching the site.
- Don sterile gloves and a mask.
- Perform site antisepsis before port access:
- The preferred skin antiseptic agent is greater than 0.5% chlorhexidine in an alcohol solution.
- For those with contraindications to chlorhexidine, appropriate alternatives include:
- tincture of iodine,
- povidone-iodine, or
- 70% alcohol.
- The HCP should scrub back and forth for 30 seconds.
- The skin antiseptic agent must be allowed to fully dry (2 minutes) to allow for maximal effect before port access.
- The smallest-gauge non-coring needle that will accommodate the prescribed therapy should be used.
- A sterile dressing covering both the non-coring needle and the access site should remain in place as long as the port is accessed.
- Perform hand hygiene after examining the site and after any direct contact.
Like with most central access devices, a syringe size smaller than 10 mL should never be used to flush a port, as smaller syringes can create excessive pressure within the device and lead to catheter fracture. Each lumen of the port must be managed separately and flushed accordingly. The port should be flushed and aspirated for the presence of brisk blood return before each infusion or administration of medication to confirm correct needle placement and catheter function. As with other CVC devices, failure to obtain blood flow through the port site requires evaluation before use and potentially repositioning the access needle. The port should also be flushed after each infusion to clear the catheter lumen and reduce the catheter's risk of occlusion. Ports accessed with a needle must be flushed daily if they are not infused with continuous IV fluids. If the port remains in continual use, the dressing and non-coring needle should be changed at least every 5 to 7 days or when visibly soiled. When not in use, implanted ports do not require exit-site care or dressings over the site (Craven et al., 2021; Lippincott Williams & Wilkins, 2022; Nickel et al., 2024).
Following the final infusion or medication of that round, the port should be flushed and locked with preservative-free 0.9% sodium chloride and 5 mL of heparin 10 units/mL in a pre-filled syringe before removing the needle or de-accessing the port. Some institutions may be changing to a saline-only flush as research has shown similar effectiveness in maintaining patency. This heparin-lock solution reduces the risk of catheter occlusion. Many ports require needle access and flushing once every 4 to 8 weeks or, according to the institutional policy, when not in use. Additionally, some patients are placed on low-dose warfarin (Coumadin) at less than 3 mg/day to prevent thrombosis of the port. HCPs must continually monitor the site for any abnormalities at the insertion site—such as redness, swelling, warmth, tenderness, or pain—that indicate an infection (Craven et al., 2021; Lippincott Williams & Wilkins, 2022; Nickel et al., 2024).
Troubleshooting Common Port Problems
HCPs caring for patients who have implanted ports should be trained in managing and troubleshooting common port problems. The inability to flush a port or obtain a brisk blood return is commonly reported, and the etiology can vary. The port needle may not be correctly placed, the catheter may be lodged against the vessel wall, or a fibrin sheath may have developed at the catheter tip (Craven et al., 2021; Nickel et al., 2024; Young & You, 2023). Interventions to resolve some of the most common port problems include the following:
- Ensure correct needle placement within the port and advancement of the needle through the septum.
- Reposition the patient or ask the patient to cough, raise their arms, lay back, sit up, or take a deep breath, as these maneuvers can help dislodge the catheter from the vessel wall.
- Re-access the port with a new needle.
- Use a fibrinolytic agent to dissolve a suspected clot per facility protocol.
- Assess for signs of potential catheter rupture, such as localized swelling, erythema, or acute pain at the site (Craven et al., 2021; Nickel et al., 2024).
The potential for catheter rupture during and after power injection can lead to extravasation, catheter fragment emboli, and the subsequent need for port removal and replacement (Nickel et al., 2024).
Removal of Implantable VADs
According to the INS guidelines, implanted vascular access ports should be removed in the surgical suite or interventional radiology department with a minor sterile procedure. The skin should be prepped with appropriate antisepsis. Immediately following removal, the catheter should be examined to ensure it has been removed fully intact. If any piece of the catheter is retained within the vein, it will require removal through endovascular techniques to reduce the risk of infection, thrombosis, and migration of the catheter fragment. An occlusive dressing should be applied, and pressure should be held on the site until the bleeding subsides. Bleeding is typically minimal with implantable port removal, and excessive bleeding should prompt the potential re-exploration of the port site (Nickel et al., 2024).
Complications of CVCs
The potential complications for all VADs are listed in Table 6. These can be limited with the consistent use of imaging modalities to guide CVC placement. Dynamic ultrasound is typically indicated during puncture and wire placement, and fluoroscopic guidance of the wires and catheter is recommended, if available. The incidence of arterial puncture varies from 3.7% to 12% of central venous access procedures. If an arterial puncture is recognized immediately upon needle insertion, the needle can be removed, and direct (but nonocclusive) pressure should be held for 15 minutes continuously. External pressure is easier to apply at the femoral and jugular sites and more challenging when accessing the subclavian vein (Young & Yuo, 2023).
Table 6
Common Complications of VAD Therapies
Complication | Potential Signs and Symptoms |
Extravasation (leaking of a vesicant medication into the surrounding tissue, causing severe tissue damage with infection, tissue necrosis, disfigurement, loss of function, and even amputation) |
|
Infiltration (leaking of IV fluids into the surrounding tissue) |
|
Phlebitis (inflammation of the vein, usually associated with highly acidic or alkaline solutions) |
|
Dislodgment |
|
Infection |
|
Thrombosis |
|
Occlusion |
|
(Campagna et al., 2018; Lippincott Williams & Wilkins, 2022; Nettina, 2019; Young & Yuo, 2023)
Arterial puncture is more common with femoral site placement and less common with subclavian. If arterial placement is suspected after the guidewire has been placed, a single-lumen catheter should be placed over the guidewire and temporarily connected to a pressure transducer to assess venous versus arterial waveforms. If a catheter is inadvertently placed into the arterial system, there is some debate regarding how to proceed. Historically, the recommendation was to remove the catheter immediately, hold pressure to limit bleeding for 15 minutes, and perform follow-up imaging to assess for any continued bleeding, AVF, or pseudoaneurysm. This technique is still acceptable for femoral artery catheterization but is accompanied by a risk for hematoma, false aneurysm, airway obstruction, and stroke. As a result, recent evidence has suggested that the safer alternative to carotid or subclavian artery cannulation is to leave the misplaced catheter undisturbed and proceed with surgical or endovascular removal and repair of any damage as soon as possible. This is also the case for most tunneled (hemodialysis, apheresis) catheters, which are often larger than 12F. Image-guided placement (fluoroscopy or ultrasound) followed by confirmatory imaging of newly placed CVCs is paramount to preventing and identifying misplaced catheters quickly. Similarly, any significant venous injury to a major vessel (subclavian, jugular) warrants emergent surgical repair. While typically not life-threatening, hematomas can foster microorganism growth, develop into an abscess, or lead to hemothorax or hemomediastinum. A carotid puncture can obstruct the airway and become life-threatening if it is not recognized early. Manual pressure held at the insertion site can help limit hematoma formation in patients who have coagulopathies, favoring a compressible insertion site (internal jugular or femoral vein). Congenital anomalies (persistence of the left-sided vena cava) should be recognized, and consideration should be made for alternative placement (right-sided) in these cases if appropriate. Additional devices, such as IVC filters, should also be noted before placement to avoid entanglement. Due to the anatomic location of the thoracic duct, placing a non-tunneled CVC in the internal jugular or subclavian increases the risk of lymphatic injury (Butterworth et al., 2022; Elisha et al., 2023; Young & Yuo, 2023).
Pulmonary complications associated with CVC placement are rare. Pneumothorax is most seen with subclavian and, to a lesser degree, internal jugular access sites. Underlying risk factors that increase this risk include lung disease, operator inexperience, and setting. A larger catheter size or repeated attempts at placement increase the risk of subclavian catheter placement and injury to the parietal pleura, resulting in pneumothorax or pneumomediastinum. Although high-flow oxygen treatment may be sufficient, a pneumothorax coupled with hemodynamic instability and hypoxia indicates the need for chest tube placement. Lymphatic injury to the thoracic duct is also possible and termed chylothorax (or chylopericardium). Patients who have a pre-existing pneumothorax should have a CVC placed only on the side of the pneumothorax to prevent a bilateral pneumothorax. This is likewise necessary for patients undergoing lung surgery who require presurgical or post-surgical placement of a CVC. The CVC must be placed on the ipsilateral (same) side as the surgery to prevent the non-surgical, fully inflated lung from suffering a pneumothorax leading to bilateral pneumothoraces (Butterworth et al., 2022; Elisha et al., 2023; Young & Yuo, 2023).
Trauma or hematoma development can lead to damage to the recurrent laryngeal nerve, brachial plexus, or phrenic nerve, requiring 6 to 12 months for a full recovery. Nerve damage is most often indicated by reports of electrical-type pain at insertion or reports of paresthesia, tingling, burning, or numbness after insertion. Phrenic nerve involvement may also lead to respiratory difficulty. Iatrogenic tracheal punctures have been reported but are typically insignificant clinically unless the patient is mechanically ventilated. If the endotracheal tube or tracheostomy cuff is punctured, a consequent air leak may necessitate a tube change (Butterworth et al., 2022; Elisha et al., 2023; Young & Yuo, 2023).
Air embolism can occur when inserting, flushing, or removing a CVC. Emboli arise due to the open connection between the air and the vascular system and the pressure gradient in place secondary to the low CVP found in the SVC. This pressure gradient is increased by hypovolemia and during inspiration. An estimated 200 to 300 cc (or 3 to 5 mL/kg) of air may be lethal to an adult, but the rate and route of entry are also factors. An air embolism can be prevented by ensuring adequate hydration and placing the patient in the Trendelenburg position to increase venous pressure when possible during insertion. The operator should also occlude the needle hub with their thumb when the guidewire is not in place. Air emboli are most common in subclavian lines due to the intrathoracic pressure changes associated with breathing, which may be prevented by avoiding placement during inspiration. The subcutaneous route to a jugular catheter should be sufficient in length, as this reduces the risk of an air embolism during removal. All catheter hubs should be capped (occluded) at all times, and all air should be removed from catheters, syringes, administration sets, and needleless connectors. During removal, the patient should again be placed in the Trendelenburg position with the entry site below heart level to ensure adequate CVP. The patient should perform a Valsalva maneuver during removal, or the removal should be timed during active expiration. Symptoms are typically non-specific and may include dyspnea, coughing, tachypnea, wheezing, chest pain, tachyarrhythmia, hypotension, and neurological dysfunction. Patients may also present with sudden cardiopulmonary or neurological symptoms. Patients on a mechanical ventilator often present with a significant drop in end-tidal CO2 on capnography. If air embolism is suspected, the first step is to stop any additional air from entering the patient’s venous system. The patient should be placed on high-flow oxygen and rolled into the left lateral decubitus and Trendelenburg position (Durant’s maneuver). This helps localize any air to the right atrium/lung and prevent it from entering the pulmonary artery and causing hypoxia. This maneuver is ineffective for patients with a patent foramen ovale or other anatomical abnormality (e.g., previous pneumonectomy). The rapid response or code blue system should be initiated if the patient is unresponsive or hemodynamically unstable. Fluid boluses and adrenergic agents should be used as indicated clinically. Small amounts of air (1 to 2 mL) may be self-resolving and managed with supplemental oxygen and slightly increased systemic blood pressure. Large emboli may require hyperbaric oxygen therapy to reduce the gas volume or extracorporeal membrane oxygenation (ECMO) in the ICU. In some cases, cardiac catheterization has been performed to aspirate the air (Butterworth et al., 2022; Elisha et al., 2023; McCarthy et al., 2016; Young & Yuo, 2023).
Cardiac complications typically involve contact with the guidewire. Brief contact with the right atrium may prompt arrhythmia, such as premature atrial or ventricular contractions. Prolonged contact with the AV node may lead to supraventricular tachycardia. Knowledge and awareness of guidewire depth and imaging during placement may help prevent arrhythmia, while telemetry monitoring allows for early recognition. Direct valvular or myocardial perforations (usually the tricuspid valve or the right ventricle) should be evaluated immediately using echocardiography, if the patient is hemodynamically stable, and surgical intervention should be planned accordingly. Guidewire depth should not exceed 16 cm to limit this risk (Butterworth et al., 2022; Elisha et al., 2023; McCarthy et al., 2016; Young & Yuo, 2023).
As discussed previously regarding PIV complications, device dysfunction with VADs may occur at any time and include infection or thrombosis. Infection is treated with catheter removal or systemic antibiotics if catheter removal is precluded. In addition to the signs and symptoms outlined in Table 6, thrombosis of a CVC can cause SVC syndrome with associated head and neck swelling. Thrombosis is least common in the subclavian location and most likely in femoral lines and among cancer patients. Prophylactic thrombolytic treatment is not recommended. Small thrombi (less than 3 cm) can be treated with catheter removal, while larger or infected thrombi may require thrombolytics or surgical intervention to remove them safely. In addition, a fibrin sheath may develop within the first week after device placement, occluding the port openings and necessitating the use of fibrinolytic agents (e.g., 2 mg alteplase [Cathflo Activase] IV once) per facility protocol. A sheath is usually indicated by resistance when flushing the catheter and poor or absent blood return. Catheter fractures are more common in subclavian lines that are in place for longer. Fracture is often related to forceful flushing or flushing with an inappropriate syringe (smaller than 10 mL). Signs and symptoms of a catheter rupture include extravasation/infiltration of fluid, the development of an air embolism, or occult internal bleeding. Catheter embolization may lead to arrhythmia, sepsis, endocarditis, or cardiac perforation. Removal may be performed by intervention radiology via the endovascular route or surgically, or the patient can be observed if they are asymptomatic and nonmobile. Venous stenosis has been reported with chronic central venous access. This risk is higher in patients who have previous cannulation, prior infection, and a longer catheter dwell time. Typically, patients are asymptomatic, but stenting may be required for symptomatic or severe cases of venous stenosis (Lippincott Williams & Wilkins, 2022; Young & You, 2023).
Hemodynamic Monitoring
CVP Monitoring
CVC placement is indicated not only for the IV administration of exogenous agents but also for monitoring CVP, the aspiration of air emboli, and the insertion of transcutaneous pacing leads. CVP is used clinically to assess a patient's fluid status and right-sided heart function. CVP is achieved by connecting a port of the CVC to a transducer, which produces a waveform and numerical value in order to guide fluid management, primarily for critically ill patients. A transducer or amplifier attaches to a subclavian or internal jugular CVC. The transducer must first be zeroed by opening the stopcock to atmospheric pressure. The transducer should then be aligned to the horizontal plane of the tricuspid valve or the phlebostatic axis (i.e., the fourth intercostal space), which in most adults is just inferior to the nipple line, at the mid-diameter of the anterior-posterior chest wall (see Figure 6). A low CVP indicates hypovolemia or venous vasodilation, which decreases venous return. Increased CVP occurs in patients who have heart failure due to decreased contractility, valve dysfunction, and arrhythmias. Elevated CVP may also affect ventilated patients with excessive positive end-expiratory pressure (PEEP), which increases pulmonary arterial resistance. CVP monitoring is typically used to guide fluid resuscitation for critically ill patients. For example, current sepsis guidelines recommend a target CVP of 8 to 12 mm Hg for critically ill patients receiving fluid boluses (Butterworth et al., 2022; Shah & Louis, 2023).
Pulmonary Artery Catheters
Pulmonary artery catheters (PACs or Swan-Ganz catheters) are typically inserted in an ICU, a surgical suite, or a cardiac catheterization lab. They are generally indicated for patients who have known or suspected pulmonary hypertension, severe cardiogenic or unexplained shock, or unexplained dyspnea In order to assess the pulmonary artery pressure, pulmonary wedge (artery occlusion) pressure, right atrial or ventricular pressure, cardiac output, cardiac index, systemic vascular resistance, pulmonary vascular resistance, and mixed oxyhemoglobin saturation (SvO2). Pulmonary wedge pressure is often used to assess left heart function, including the mitral valve, ventricular filling, and atrial pressure. Routine PAC use has dropped as other technologies have become available, although they may still be helpful in guiding fluid resuscitation for certain patients. Other than contraindications described above for other VADs, PACs are contraindicated without consent, during cardiopulmonary bypass, and in patients who have right-sided ventricular assist devices. Significant coagulopathy, thrombocytopenia, and electrolyte or acid-base disturbances are relative contraindications (Weinhouse, 2023).
The most common site is the right internal jugular vein, followed by the left subclavian. Alternatives include the subclavian, femoral, or antecubital veins. Imaging is typically used for guidance (fluoroscopy when accessing via the antecubital or femoral veins, ultrasonography when using the jugular or subclavian). If the patient has an implanted pacemaker in their subclavian, then the contralateral side can be utilized for PAC access. An existing CVC can be exchanged for a PAC using an adequate-length sterile guidewire in patients who have sufficient alternative venous access. Resuscitation and telemetry equipment, along with imaging equipment and PAC supplies, should be available at the bedside before the procedure. Local anesthetic (1% to 2% lidocaine) and IV sedatives (e.g., midazolam [Versed]) may be given before the procedure, and the patient should be placed in the Trendelenburg position (for jugular or subclavian access) or supine (for femoral or antecubital access; Weinhouse, 2023).
PACs are placed under surgical ANTT conditions using a large sterile field, full barrier precautions described above, and 2% chlorhexidine for skin antisepsis. Arterial puncture is prevented by using image guidance during the initial needle insertion. The introducer is a large-bore (8.5 French), short, central venous catheter typically inserted using the MST. The introducer has a side-arm extension for medication or fluid administration and a hemostatic valve on the operator’s end through which the PAC is placed. Inadvertent arterial puncture should be managed by removing the needle and holding pressure for 10 to 15 minutes. Once the introducer is in place, positioning can be confirmed using a pressure waveform transducer. Alternatively, a blood gas analysis or the presence of dark red blood lacking pulsatile flow may be utilized if pressure transduction is not available. A chest x-ray is often completed to confirm that a pneumothorax has not occurred. Then, the introducer can be secured in place if desired (Weinhouse, 2023).
The field is resterilized before placement of the PAC, including the hub of the introducer. The PAC ports should be flushed and capped (except the thermistor port), and the balloon and transducer condition should be inspected to ensure their integrity. The PAC is then zeroed by opening the system to atmospheric air to establish zero pressure. The air-fluid interface of the catheter stopcock or the transducer stopcock should be placed at the phlebostatic axis (see Figure 6) for referencing (or leveling). To evaluate placement and function, the PAC transducer tip should be held at heart level, which should correlate to a pressure reading of 0 mm Hg. The tip can be extended straight up 30 cm, which should increase the pressure on the monitor to 22 mm Hg (Weinhouse, 2023).
The patient is placed supine while the PAC is advanced through the introducer. It is advanced through the SVC, cardiac chambers, and pulmonary artery (PA) while the pressure at its tip is transduced. The balloon may only be inflated when the pressure transducer indicates that the tip is in the SVC or right atrium. It should be inflated as the catheter is advanced further until the pulmonary capillary wedge pressure (PCWP) waveform is identified. The catheter is graduated to allow the operator to visualize the inserted depth. For the jugular or subclavian veins, the right atrium is usually 20 cm beyond the insertion site, followed by the right ventricle at 30 cm, the PA at 40 cm, and the PCWP after 50 cm. The risk of arrhythmias is greatest while the catheter tip is in the right ventricle, and therefore, advancement should not be stalled at this point in the process. If the catheter tip coils inside the right ventricle, the catheter should be withdrawn back into the right atrium, the balloon should be deflated and reinflated, and another attempt can be made through the right ventricle. After passing through the PA, the catheter tip is advanced until a decrease in pressure and a change in the waveform are seen, indicating the PCWP (Weinhouse, 2023).
If the catheter is left in position for continued monitoring, the protective sleeve should be attached to the introducer hub and secured with an antiseptic dressing. A chest x-ray can be obtained to confirm the catheter tip position daily. The site should be checked daily, and dressing changes need to be performed per institutional policy. A sterile technique is required to inject medications into PAC ports, adjust the catheter positioning, or connect tubing. PACs should be left in place for as short a period as possible. With the patient in the Trendelenburg position, the balloon is deflated when the PAC is withdrawn. Withdrawal should occur during expiration for a spontaneously ventilated patient and during inspiration for a patient receiving positive pressure ventilation in order to prevent air emboli. Other potential complications include structural damage to vessels or the heart, valvular damage, and arrhythmias. After catheter removal, the introducer may be used as a CVC, replaced with a new CVC, or withdrawn. If it is removed, the securement device should be removed first, and the patient should be placed in the Trendelenburg position. As mentioned above, the introducer should be removed during expiration/inspiration (depending on the breathing mechanism) while pressure is held at the site to limit bleeding for 1 to 2 minutes. A sterile dressing should be placed over the area and observed over the next several days (Weinhouse, 2023).
Adams, D. Z., Little, A., Vinsant, C., & Khandelwal, S. (2016). The midline catheter: A clinical review. Journal of Emergency Medicine, 51(3), 252-258. https://doi.org/10.1016/j.jemermed.2016.05.029
Agency for Healthcare Research and Quality. (2024). Central line insertion care team checklist. https://www.ahrq.gov/hai/patient-safety-resources/cli-checklist/index.html
Alexandrou, E., Ray-Barruel, G., Carr, P. J. Frost, S. A., Inwood, S., Higgins, N., Lin, F., Alberto, L., Mermel, L., Rickard, C. M., & OMG Study Group. (2018). Use of short peripheral intravenous catheters: Characteristics, management, and outcomes worldwide. Journal of Hospitalist Medicine, 13(5), E1-E7. https://doi.org/10.12788/jhm.3039
Bahl, A., Hang, B., Brackney, A., Joseph, S., Karabon, P., Mohammad, A., Nnanabu, I., & Shotkin, P. (2019). Standard long IV catheters versus extended dwell catheters: A randomized comparison of ultrasound-guided catheter survival. American Journal of Emergency Medicine, 37(4), 715-721. https://doi.org/10.1016/j.ajem.2018.07.031
Beecham, G. B., & Tackling, G. (2023). Peripheral line placement. StatPearls. https://www.ncbi.nlm.nih.gov/books/NBK539795
Berry, C. (2022). Vascular access. Merck Manual: Professional Edition. https://www.merckmanuals.com/professional/critical-care-medicine/approach-to-the-critically-ill-patient/vascular-access
Butterworth, J. F., Mackey, D. C., & Wasnick, J. D. (2022). Morgan & Mikhail’s clinical anesthesiology (7th ed.). McGraw Hill.
Calderwood, M. S. (2023). Intravascular non-hemodialysis catheter-related infection: Treatment. UpToDate. Retrieved April 3, 2024, from https://www.uptodate.com/contents/intravascular-non-hemodialysis-catheter-related-infection-treatment
Campagna, S., Gonella, S., Zerla, P. A., Corona, G., Correggia, T., Mussa, B., & Dimonte, V. (2018). The risk of adverse events related to extended-dwell peripheral intravenous access. Infection Control and Hospital Epidemiology, 1-3. https://doi.org/10.1017/ice.2018.79
Caprara, J. (2017). PICC versus midline. Home Healthcare Now, 35(10), 575-575. https://www.nursingcenter.com/journalarticle?Article_ID=4388386&Journal_ID=2695880&Issue_ID=4388241
Centers for Disease Control and Prevention. (2017). Guidelines for the prevention of intravascular catheter-related infections, 2011. https://www.cdc.gov/infection-control/media/pdfs/Guideline-BSI-H.pdf
Centers for Disease Control and Prevention. (2023).[MR1] Frequently asked questions about catheters. https://www.cdc.gov/nhsn/faqs/faq-bsi.html
Chopra, V. (2022). Peripherally inserted central catheter (PICC)-related venous thrombosis in adults. UpToDate. Retrieved April 20, 2024, from https://www.uptodate.com/contents/peripherally-inserted-central-catheter-picc-related-venous-thrombosis-in-adults
Chopra, V. (2024). Central venous access: Device and site selection in adults. UpToDate. Retrieved April 18, 2024, from https://www.uptodate.com/contents/central-venous-access-device-and-site-selection-in-adults
Craven, R. F., Hirnle, C. J., & Henshaw, C. M. (2021). Fundamentals of nursing: Concepts and competencies for practice (9th ed.). Wolters Kluwer.
Dornhofer, P., & Kellar, J. Z. (2023). Intraosseous vascular access. StatPearls. https://www.ncbi.nlm.nih.gov/books/NBK554373
Elisha, S., Heiner, J S., & Nagelhout, J. L. (2023). Nurse anesthesia (7th ed.). Elsevier.
Ferrada, P. (2020). How to do internal jugular vein cannulation. Merck Manual: Professional Edition. https://www.merckmanuals.com/professional/critical-care-medicine/how-to-do-central-vascular-procedures/how-to-do-internal-jugular-vein-cannulation
Flick, A. I., & Winters, R. (2023). Vascular tunneled central catheter access. StatPearls. https://www.ncbi.nlm.nih.gov/books/NBK557614
Frank, R. L. (2023). Peripheral venous access in adults. UpToDate. Retrieved April 3, 2024, from https://www.uptodate.com/contents/peripheral-venous-access-in-adults
Gonzalez, R., & Cassaro, S. (2023). Percutaneous central catheter. StatPearls. https://www.ncbi.nlm.nih.gov/books/NBK459338
Haddadin, Y., Annamaraju, P., & Regunath, H. (2022). Central line-associated bloodstream infections. StatPearls. https://www.ncbi.nlm.nih.gov/books/NBK430891
Heffner, A. C. (2023). Central venous access: Acute and emergency access in adults. UpToDate. Retrieved April 20th, 2024, from https://www.uptodate.com/contents/central-venous-access-acute-and-emergency-access-in-adults
Heffner, A. C., & Androes, M. P. (2023). Central venous access in adults: General principles. UpToDate. Retrieved April 10th, 2024, from https://www.uptodate.com/contents/central-venous-access-in-adults-general-principles
Herc, E., Patel, P., Washer, L., Conion, A., Flanders, S., & Chopra, V. (2017). A model to predict central-line-associated bloodstream infection among patients with peripherally inserted central catheters: The MPC score. Infection Control and Hospital Epidemiology, 38(10), 1155-1166. https://doi.org/10.1017/ice.2017.167
Jarding Major, E. K., & Makic, M. F. (2021). Central line care and management: Adopting evidence-based nursing interventions. Journal of PeriAnesthesia Nursing, 36(4), 328-333. https://doi.org/10.1016/j.jopan.2020.10.010
Leib, A. D., England, B. S., & Kiel, J. (2023). Central line. StatPearls. https://www.ncbi.nlm.nih.gov/books/NBK519511
Lippincott Williams & Wilkins. (2022). Lippincott nursing procedures (9th ed.). Lippincott Williams & Wilkins.
Liu, Y. T. (2023a). How to do intraosseous cannulation, manually and with a power drill. Merck Manual: Professional Edition. https://www.merckmanuals.com/professional/critical-care-medicine/how-to-do-peripheral-vascular-procedures/how-to-do-intraosseous-cannulation,-manually-and-with-a-power-drill
Liu, Y. T. (2023b). How to do peripheral vein cannulation. Merck Manual: Professional Edition. https://www.merckmanuals.com/professional/critical-care-medicine/how-to-do-peripheral-vascular-procedures/how-to-do-peripheral-vein-cannulation
Liu, Y. T. (2023c). How to do radial artery cannulation. Merck Manual: Professional Edition. https://www.merckmanuals.com/professional/critical-care-medicine/how-to-do-peripheral-vascular-procedures/how-to-do-radial-artery-cannulation
McCarthy, C. J., Behravesh, S., Naidu, S. G., & Oklu, R. (2016). Air embolism: Practical tips for prevention and treatment. Journal of Clinical Medicine, 5(11), 93. https://doi.org/10.3390/jcm5110093
Montanarella, M. J., Agarwal, A., & Moon, B. (2024). Peripherally inserted central catheter (PICC) line placement. StatPearls. https://www.ncbi.nlm.nih.gov/books/NBK573064
Nettina, S. M. (Ed.). (2019). Lippincott manual of nursing practice (11th ed.). Wolters Kluwer.
Nickel, B., Gorski, L., Kleidon, T., Kyes, A., DeVries, M., Keogh, S., Meyer, B., Sarver, M. J., Crickman, R., Ong, J., Clare, S., & Hagle, M. E. (2024). Infusion therapy standard of practice, 9th edition. Journal of Infusion Therapy, 47(1S), S1-S285. https://doi.org/10.1097/NAN.0000000000000532
Paje, D., Rogers, M., Conlon, A., Flanders, S., Bernstein, S., & Choppra, V. (2019). Use of peripherally inserted central catheters in patients with advanced chronic kidney disease: A prospective cohort study. Annals of Internal Medicine, 171(1), 10-18. https://doi.org/10.7326/M18-2937
Pedagogy Continuing Nurse Education (n.d.). Peripheral IV catheter chart. Retrieved April 5, 2024, from https://pedagogyeducation.com/Resources/Infusion/Peripheral-IV-Catheter-Chart
Perron, C. E. (2022). Intraosseous infusion. UpToDate. Retrieved April 12, 2024, from https://www.uptodate.com/contents/intraosseous-infusion
Pierre, L., Pasrija, D., & Keenaghan, M. (2024). Arterial Lines. StatPearls. https://www.ncbi.nlm.nih.gov/books/NBK499989
Sabado, J. J., & Mousa, A. Y. (2023). Basic principles of ultrasound-guided venous access. UpToDate. Retrieved April 23, 2024, from https://www.uptodate.com/contents/basic-principles-of-ultrasound-guided-venous-access
Shah, P., & Louis, M. A. (2023). Physiology: Central venous pressure. StatPearls. https://www.ncbi.nlm.nih.gov/books/NBK519493
Song, I. K., Kim, E. H., Lee, J. H., Jang, Y. E. Kim, H. S., & Kim, J. T. (2018). Seldinger vs modified Seldinger techniques for ultrasound-guided central venous catheterization in neonates: A randomized controlled trial. Paediatric Anesthesia, 121(6), 1332-1337. https://doi.org/10.1016/j.bja.2018.08.008
Swaminathan, L., Flanders, S., & Horowitz, J. (2022). Safety and outcomes of midline catheters vs peripherally inserted central catheters for patients with short-term indication: A multicenter study. JAMA Internal Medicine, 182(1), 50-58. https://doi.org/10.1001/jamainternmed.2021.6844
Thaut, L., Weymouth, W., Hunsaker, B., & Reschke, D. (2019). Evaluation of central venous access with accelerated Seldinger technique versus modified Seldinger technique. Journal of Emergency Medicine, 56(1), 23-28. https://doi.org/10.1016/j.jemermed.2018.10.021
Theodore, A. C. (2023). Arterial blood gases. UpToDate. Retrieved April 14, 2024, from https://www.uptodate.com/contents/arterial-blood-gases
Theodore, A. C., Clermont, G., & Dalton, A. (2022). Intra-arterial catheterization for invasive monitoring: Indications, insertion techniques, and interpretation. UpToDate. Retrieved April 14, 2024, from https://www.uptodate.com/contents/intra-arterial-catheterization-for-invasive-monitoring-indications-insertion-techniques-and-interpretation
Tse, A., & Schick, M. A. (2022). Central line placement. StatPearls. https://www.ncbi.nlm.nih.gov/books/NBK470286
Ullman, A. M., & Chopra, V. (2024). Routine care and maintenance of intravenous devices. UpToDate. Retrieved April 3, 2024, from https://www.uptodate.com/contents/routine-care-and-maintenance-of-intravenous-devices
Villalba-Nicolau, M., Chover-Sierra, E., Saus-Ortega, C., Ballestar-Tarin, M. L., Chover-Sierra, P., & Martinez-Sabater, A. (2022). Usefulness of midline catheters versus peripheral venous catheters in an inpatient unit: A pilot randomized clinical trial. Nursing Reports, 12(4), 814-823. https://doi.org/10.3390%2Fnursrep12040079
Weiner, R., Ryan, E., & Yohannes-Tomicich, J. (2017). Arterial line monitoring and placement. In J. M. Oropello, S. M. Pastores, & V. Kvetan (Eds.). Critical care. McGraw-Hill Education.
Weinhouse, G. L. (2023). Pulmonary artery catheters: Insertion technique in adults. UpToDate. Retrieved April 30, 2024, from https://www.uptodate.com/contents/pulmonary-artery-catheters-insertion-technique-in-adults
Young, M. P., & Yuo, T. H. (2023). Central venous catheters: Overview of complications and prevention in adults. UpToDate. Retrieved April 30, 2024, from https://www.uptodate.com/contents/central-venous-catheters-overview-of-complications-and-prevention-in-adults